Querying Google BigLake Iceberg Tables Data as a Graph
Summary
In this tutorial, you will:
- Create Google Cloud BigLake Iceberg tables in a GCS bucket and load them with example data.
- Start a PuppyGraph Docker container and connect it to the BigLake tables.
- Query the BigLake data as a graph.
Prerequisites
Please ensure that docker is available. The installation can be verified by running:
See https://docs.docker.com for more details on Docker.
You also need:
- A Google Cloud project with BigLake API enabled.
- A GCS bucket and a BigLake catalog with the end-user credential mode. See Create a BigLake Iceberg catalog for instructions. Note that you just need to create the catalog without creating any tables, as the tutorial will create sample tables for you.
- A service account with the following roles, and its key file downloaded locally (e.g.,
/path/to/key.json):roles/biglake.editor(BigLake Editor) on the projectroles/storage.objectUser(Storage Object User) on the Cloud Storage bucketroles/serviceusage.serviceUsageConsumer(Service Usage Consumer) on the project
- Python 3.9+ installed locally, used for setting up the data preparation environment.
Note
For production (read-only) use, roles/biglake.viewer (BigLake Viewer) and roles/storage.objectViewer (Storage Object Viewer) are sufficient for PuppyGraph to read the data. The BigLake Editor role is for writing sample data in the tutorial.
Data Preparation
 Create and activate a Python virtual environment, then install PySpark:
Create BigLake Iceberg Tables
Set the GOOGLE_APPLICATION_CREDENTIALS environment variable to point to your service account key file so that the script can authenticate with Google Cloud:
Create a file named data.py with the following content, then run it to create tables and insert sample data via the BigLake Iceberg REST catalog:
data.py
from pyspark.sql import SparkSession

catalog_name = "sample"
namespace = "modern"
spark = SparkSession.builder.appName("sample") \
  .config('spark.jars.packages', 'org.apache.iceberg:iceberg-spark-runtime-4.0_2.13:1.10.1,org.apache.iceberg:iceberg-gcp-bundle:1.10.1') \
  .config(f'spark.sql.catalog.{catalog_name}', 'org.apache.iceberg.spark.SparkCatalog') \
  .config(f'spark.sql.catalog.{catalog_name}.type', 'rest') \
  .config(f'spark.sql.catalog.{catalog_name}.uri', 'https://biglake.googleapis.com/iceberg/v1/restcatalog') \
  .config(f'spark.sql.catalog.{catalog_name}.warehouse', 'gs://<MY_BIGLAKE_BUCKET>') \
  .config(f'spark.sql.catalog.{catalog_name}.header.x-goog-user-project', '<MY_PROJECT_ID>') \
  .config(f'spark.sql.catalog.{catalog_name}.rest.auth.type', 'org.apache.iceberg.gcp.auth.GoogleAuthManager') \
  .config(f'spark.sql.catalog.{catalog_name}.io-impl', 'org.apache.iceberg.gcp.gcs.GCSFileIO') \
  .config(f'spark.sql.catalog.{catalog_name}.rest-metrics-reporting-enabled', 'false') \
  .config('spark.sql.extensions', 'org.apache.iceberg.spark.extensions.IcebergSparkSessionExtensions') \
  .config('spark.sql.defaultCatalog', catalog_name) \
  .getOrCreate()

spark.sql(f"CREATE NAMESPACE IF NOT EXISTS {namespace};")
spark.sql(f"USE {namespace};")

spark.sql("""
CREATE EXTERNAL TABLE person (
  id string,
  name string,
  age int
) USING iceberg;
""")

spark.sql("""
INSERT INTO person VALUES
  ('v1', 'marko', 29),
  ('v2', 'vadas', 27),
  ('v4', 'josh', 32),
  ('v6', 'peter', 35);
""")

spark.sql("""
CREATE EXTERNAL TABLE software (
  id string,
  name string,
  lang string
) USING iceberg;
""")

spark.sql("""
INSERT INTO software VALUES
  ('v3', 'lop', 'java'),
  ('v5', 'ripple', 'java');
""")

spark.sql("""
CREATE EXTERNAL TABLE created (
  id string,
  from_id string,
  to_id string,
  weight double
) USING iceberg;
""")

spark.sql("""
INSERT INTO created VALUES
  ('e9', 'v1', 'v3', 0.4),
  ('e10', 'v4', 'v5', 1.0),
  ('e11', 'v4', 'v3', 0.4),
  ('e12', 'v6', 'v3', 0.2);
""")

spark.sql("""
CREATE EXTERNAL TABLE knows (
  id string,
  from_id string,
  to_id string,
  weight double
) USING iceberg;
""")

spark.sql("""
INSERT INTO knows VALUES
  ('e7', 'v1', 'v2', 0.5),
  ('e8', 'v1', 'v4', 1.0);
""")

spark.stop()
Note
Replace <MY_BIGLAKE_BUCKET> with your GCS bucket name and <MY_PROJECT_ID> with your Google Cloud project ID.
The above SQL creates the following tables:
| id | name | age |
|---|---|---|
| v1 | marko | 29 |
| v2 | vadas | 27 |
| v4 | josh | 32 |
| v6 | peter | 35 |
| id | name | lang |
|---|---|---|
| v3 | lop | java |
| v5 | ripple | java |
| id | from_id | to_id | weight |
|---|---|---|---|
| e7 | v1 | v2 | 0.5 |
| e8 | v1 | v4 | 1.0 |
| id | from_id | to_id | weight |
|---|---|---|---|
| e9 | v1 | v3 | 0.4 |
| e10 | v4 | v5 | 1.0 |
| e11 | v4 | v3 | 0.4 |
| e12 | v6 | v3 | 0.2 |
Deployment
Run PuppyGraph with Docker:
docker run -p 8081:8081 -p 8182:8182 -p 7687:7687 \
  -v <PATH_TO_KEY_JSON>:/home/ubuntu/key.json \
  -e PUPPYGRAPH_PASSWORD=puppygraph123 \
  -e GOOGLE_APPLICATION_CREDENTIALS=/home/ubuntu/key.json \
  -d --name puppy --rm --pull=always puppygraph/puppygraph:1.0-preview
Warning
Replace <PATH_TO_KEY_JSON> with the absolute path to your service account key file (e.g., /path/to/key.json).
Modeling the Graph
We then define a graph on top of the data tables we just created. Actually, this is the "Modern" graph defined by Apache TinkerPop.
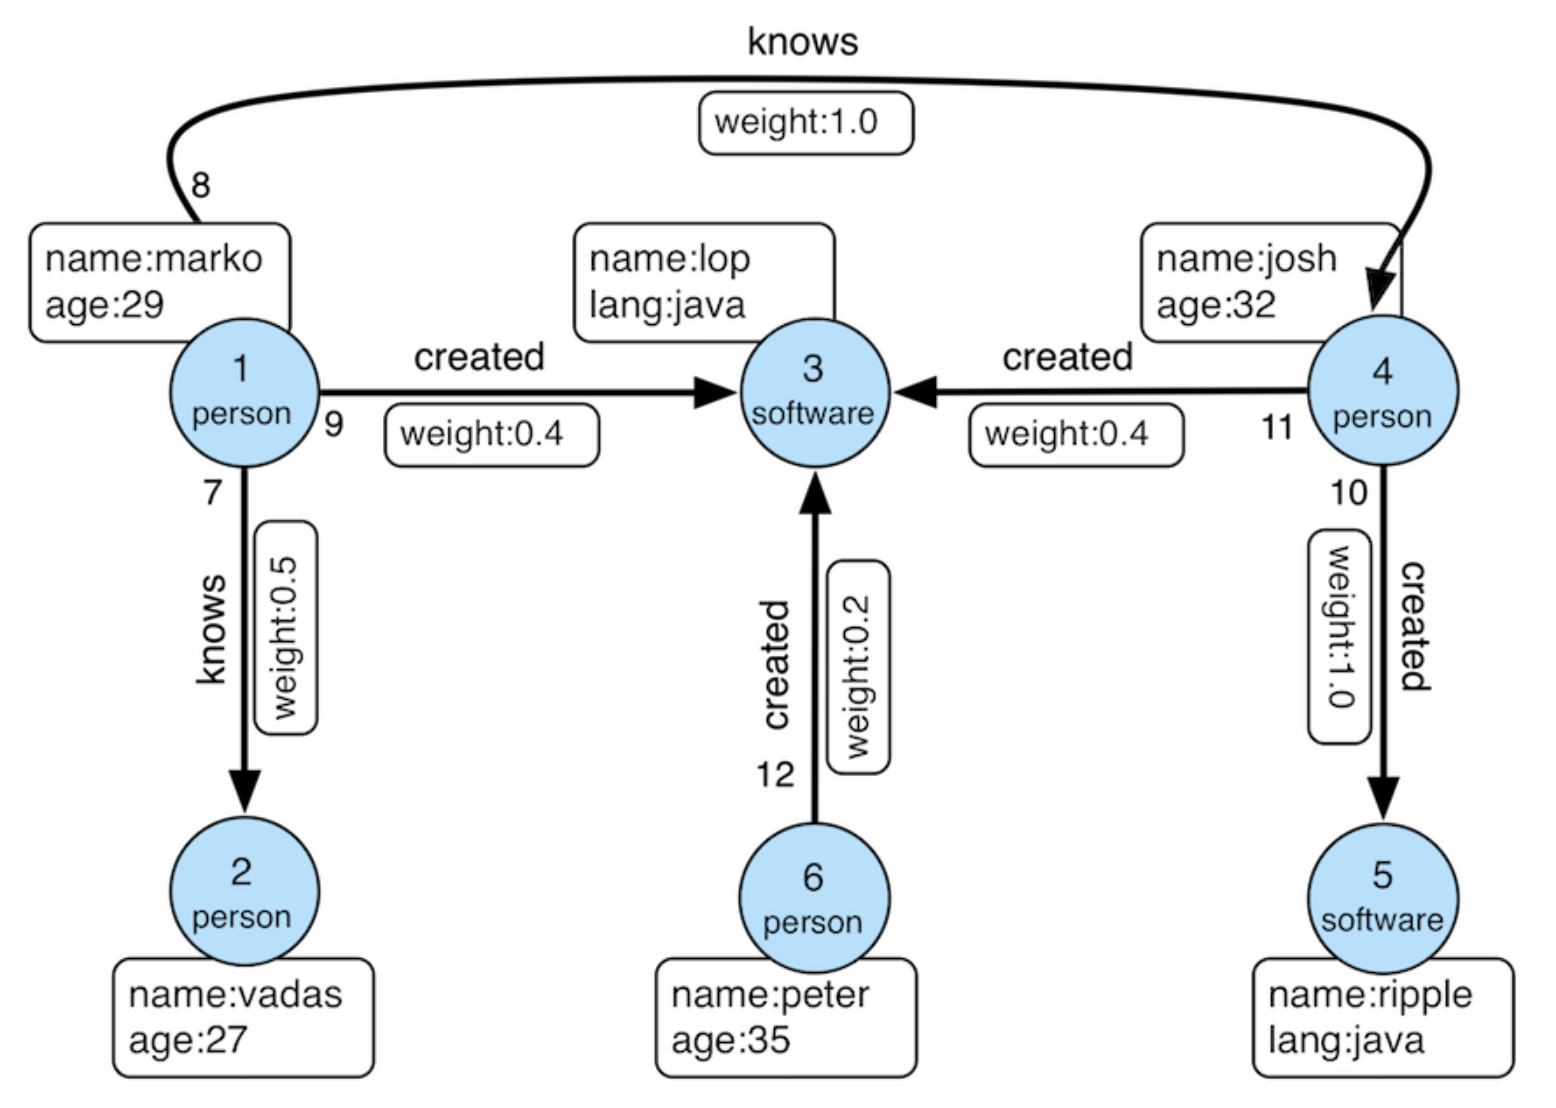
Modern Graph
We can model the graph schema in PuppyGraph Web UI in two ways:
- Build the graph manually by adding catalogs, nodes and edges step by step.
- Upload a schema file
First, log into the PuppyGraph Web UI at http://localhost:8081 with the following credentials if necessary:
| Field | Value |
|---|---|
| Username | puppygraph |
| Password | puppygraph123 |
Connecting to BigLake
Click Catalog in the sidebar, then click Add Catalog > Data Lakes > Apache Iceberg.
In the Catalog section, fill in the fields as follows:
| Parameter | Value |
|---|---|
| Catalog type | Apache Iceberg |
| Catalog name | biglake_test |
| Metastore type | Google BigLake REST |
| Endpoint URL | https://biglake.googleapis.com/iceberg/v1/restcatalog |
| GCS Warehouse | gs://<MY_BIGLAKE_BUCKET> |
| GCP User Project | <MY_PROJECT_ID> |
| Storage type | Get from metastore |
Note
Replace <MY_BIGLAKE_BUCKET> with your GCS bucket name and <MY_PROJECT_ID> with your Google Cloud project ID.
Click Create Catalog.

Creating the Graph Schema
Click Graph in the sidebar. Click Add Nodes from Catalog > From Catalog > biglake_test > modern > person, then click Next.
Now, you are in the Add Node panel. Drag the id bar in ID Columns. Click Next.
Click Enable Local Replication for better performance. Then click Add Node to finish adding the person vertex.
Click Add Edge in the toolbar. Select knows table in the same way. Set both From Node and To Node to person. Select from_id as the From Node ID and to_id as the To Node ID. Drag the id bar in ID Columns. Click Next.
Click Enable Local Replication, then click Add Edge to finish adding the knows edge.
Add the software node in the same way as the person node.
Add the created edge in the same way as the knows edge. Set person as the From Node and software as the To Node. Select from_id for the From node and to_id for the To node.
Click Local in the toolbar. If local tables are not loaded or loading, click Load Data to load the data to local tables.
Create a schema file schema.json:
schema.json
{
"catalog": [
{
"name": "biglake_test",
"type": "iceberg",
"metastore": {
"type": "rest",
"uri": "https://biglake.googleapis.com/iceberg/v1/restcatalog",
"warehouse": "gs://<MY_BIGLAKE_BUCKET>",
"security": "google",
"enableIcebergMetaCache": "true",
"icebergMetaCacheTTL": "180",
"headers": {
"x-goog-user-project": "<MY_PROJECT_ID>"
}
}
}
],
"node": [
{
"dataSourceGroup": {
"externalDataSource": {
"catalog": "biglake_test",
"schema": "modern",
"table": "person",
"mappedField": [
{
"sourceFieldName": "id",
"targetFieldName": "id"
},
{
"sourceFieldName": "name",
"targetFieldName": "name"
},
{
"sourceFieldName": "age",
"targetFieldName": "age"
}
]
},
"localDataSource": {
"enabled": true,
"localTableName": "local_person",
"mappedField": [
{
"sourceFieldName": "id",
"targetFieldName": "id"
},
{
"sourceFieldName": "name",
"targetFieldName": "name"
},
{
"sourceFieldName": "age",
"targetFieldName": "age"
}
]
}
},
"label": "person",
"id": [
{
"name": "id",
"type": "STRING"
}
],
"attribute": [
{
"name": "name",
"type": "STRING"
},
{
"name": "age",
"type": "INT"
}
]
},
{
"dataSourceGroup": {
"externalDataSource": {
"catalog": "biglake_test",
"schema": "modern",
"table": "software",
"mappedField": [
{
"sourceFieldName": "id",
"targetFieldName": "id"
},
{
"sourceFieldName": "name",
"targetFieldName": "name"
},
{
"sourceFieldName": "lang",
"targetFieldName": "lang"
}
]
},
"localDataSource": {
"enabled": true,
"localTableName": "local_software",
"mappedField": [
{
"sourceFieldName": "id",
"targetFieldName": "id"
},
{
"sourceFieldName": "name",
"targetFieldName": "name"
},
{
"sourceFieldName": "lang",
"targetFieldName": "lang"
}
]
}
},
"label": "software",
"id": [
{
"name": "id",
"type": "STRING"
}
],
"attribute": [
{
"name": "name",
"type": "STRING"
},
{
"name": "lang",
"type": "STRING"
}
]
}
],
"edge": [
{
"dataSourceGroup": {
"externalDataSource": {
"catalog": "biglake_test",
"schema": "modern",
"table": "knows",
"mappedField": [
{
"sourceFieldName": "id",
"targetFieldName": "id"
},
{
"sourceFieldName": "from_id",
"targetFieldName": "from_id"
},
{
"sourceFieldName": "to_id",
"targetFieldName": "to_id"
},
{
"sourceFieldName": "weight",
"targetFieldName": "weight"
}
]
},
"localDataSource": {
"enabled": true,
"localTableName": "local_knows",
"mappedField": [
{
"sourceFieldName": "id",
"targetFieldName": "id"
},
{
"sourceFieldName": "from_id",
"targetFieldName": "from_id"
},
{
"sourceFieldName": "to_id",
"targetFieldName": "to_id"
},
{
"sourceFieldName": "weight",
"targetFieldName": "weight"
}
]
}
},
"label": "knows",
"fromNodeLabel": "person",
"toNodeLabel": "person",
"id": [
{
"name": "id",
"type": "STRING"
}
],
"fromKey": [
{
"name": "from_id",
"type": "STRING"
}
],
"toKey": [
{
"name": "to_id",
"type": "STRING"
}
],
"attribute": [
{
"name": "from_id",
"type": "STRING"
},
{
"name": "to_id",
"type": "STRING"
},
{
"name": "weight",
"type": "DOUBLE"
}
]
},
{
"dataSourceGroup": {
"externalDataSource": {
"catalog": "biglake_test",
"schema": "modern",
"table": "created",
"mappedField": [
{
"sourceFieldName": "id",
"targetFieldName": "id"
},
{
"sourceFieldName": "from_id",
"targetFieldName": "from_id"
},
{
"sourceFieldName": "to_id",
"targetFieldName": "to_id"
},
{
"sourceFieldName": "weight",
"targetFieldName": "weight"
}
]
},
"localDataSource": {
"enabled": true,
"localTableName": "local_created",
"mappedField": [
{
"sourceFieldName": "id",
"targetFieldName": "id"
},
{
"sourceFieldName": "from_id",
"targetFieldName": "from_id"
},
{
"sourceFieldName": "to_id",
"targetFieldName": "to_id"
},
{
"sourceFieldName": "weight",
"targetFieldName": "weight"
}
]
}
},
"label": "created",
"fromNodeLabel": "person",
"toNodeLabel": "software",
"id": [
{
"name": "id",
"type": "STRING"
}
],
"fromKey": [
{
"name": "from_id",
"type": "STRING"
}
],
"toKey": [
{
"name": "to_id",
"type": "STRING"
}
],
"attribute": [
{
"name": "from_id",
"type": "STRING"
},
{
"name": "to_id",
"type": "STRING"
},
{
"name": "weight",
"type": "DOUBLE"
}
]
}
],
"localTable": [
{
"dataSourceGroup": {
"externalDataSource": {
"enabled": true,
"catalog": "biglake_test",
"schema": "modern",
"table": "person",
"mappedField": [
{
"sourceFieldName": "id",
"targetFieldName": "id"
},
{
"sourceFieldName": "name",
"targetFieldName": "name"
},
{
"sourceFieldName": "age",
"targetFieldName": "age"
}
]
}
},
"name": "local_person",
"column": [
{
"name": "id",
"type": "STRING"
},
{
"name": "name",
"type": "STRING"
},
{
"name": "age",
"type": "INT"
}
],
"indexColumn": [
"id"
],
"distributeBy": [
{
"bucket": {
"num": 12,
"column": [
"id"
]
}
}
],
"orderBy": [
{
"column": "id"
}
],
"colocateKey": "co_whi0f3_person",
"replicationNum": 1
},
{
"dataSourceGroup": {
"externalDataSource": {
"enabled": true,
"catalog": "biglake_test",
"schema": "modern",
"table": "software",
"mappedField": [
{
"sourceFieldName": "id",
"targetFieldName": "id"
},
{
"sourceFieldName": "name",
"targetFieldName": "name"
},
{
"sourceFieldName": "lang",
"targetFieldName": "lang"
}
]
}
},
"name": "local_software",
"column": [
{
"name": "id",
"type": "STRING"
},
{
"name": "name",
"type": "STRING"
},
{
"name": "lang",
"type": "STRING"
}
],
"indexColumn": [
"id"
],
"distributeBy": [
{
"bucket": {
"num": 12,
"column": [
"id"
]
}
}
],
"orderBy": [
{
"column": "id"
}
],
"colocateKey": "co_339xsg_software",
"replicationNum": 1
},
{
"dataSourceGroup": {
"externalDataSource": {
"enabled": true,
"catalog": "biglake_test",
"schema": "modern",
"table": "knows",
"mappedField": [
{
"sourceFieldName": "id",
"targetFieldName": "id"
},
{
"sourceFieldName": "from_id",
"targetFieldName": "from_id"
},
{
"sourceFieldName": "to_id",
"targetFieldName": "to_id"
},
{
"sourceFieldName": "weight",
"targetFieldName": "weight"
}
]
}
},
"name": "local_knows",
"column": [
{
"name": "id",
"type": "STRING"
},
{
"name": "from_id",
"type": "STRING"
},
{
"name": "to_id",
"type": "STRING"
},
{
"name": "weight",
"type": "DOUBLE"
}
],
"indexColumn": [
"id"
],
"distributeBy": [
{
"bucket": {
"num": 12,
"column": [
"id"
]
}
}
],
"orderBy": [
{
"column": "id"
}
],
"colocateKey": "co_m3520t_knows",
"replicationNum": 1
},
{
"dataSourceGroup": {
"externalDataSource": {
"enabled": true,
"catalog": "biglake_test",
"schema": "modern",
"table": "created",
"mappedField": [
{
"sourceFieldName": "id",
"targetFieldName": "id"
},
{
"sourceFieldName": "from_id",
"targetFieldName": "from_id"
},
{
"sourceFieldName": "to_id",
"targetFieldName": "to_id"
},
{
"sourceFieldName": "weight",
"targetFieldName": "weight"
}
]
}
},
"name": "local_created",
"column": [
{
"name": "id",
"type": "STRING"
},
{
"name": "from_id",
"type": "STRING"
},
{
"name": "to_id",
"type": "STRING"
},
{
"name": "weight",
"type": "DOUBLE"
}
],
"indexColumn": [
"id"
],
"distributeBy": [
{
"bucket": {
"num": 12,
"column": [
"id"
]
}
}
],
"orderBy": [
{
"column": "id"
}
],
"colocateKey": "co_52ejgb_created",
"replicationNum": 1
}
]
}
Note
Replace <MY_BIGLAKE_BUCKET> with your GCS bucket name and <MY_PROJECT_ID> with your Google Cloud project ID.
In the Web UI, click Graph in the sidebar, then click Upload Schema and select the schema file.
In the Upload Schema panel, you can see the basic information of the graph schema parsed from the file. Choose Cache data only in After Upload option, then click Upload.
Click Local in the toolbar. If local tables are not loaded, click Load Data to load the data to local tables.
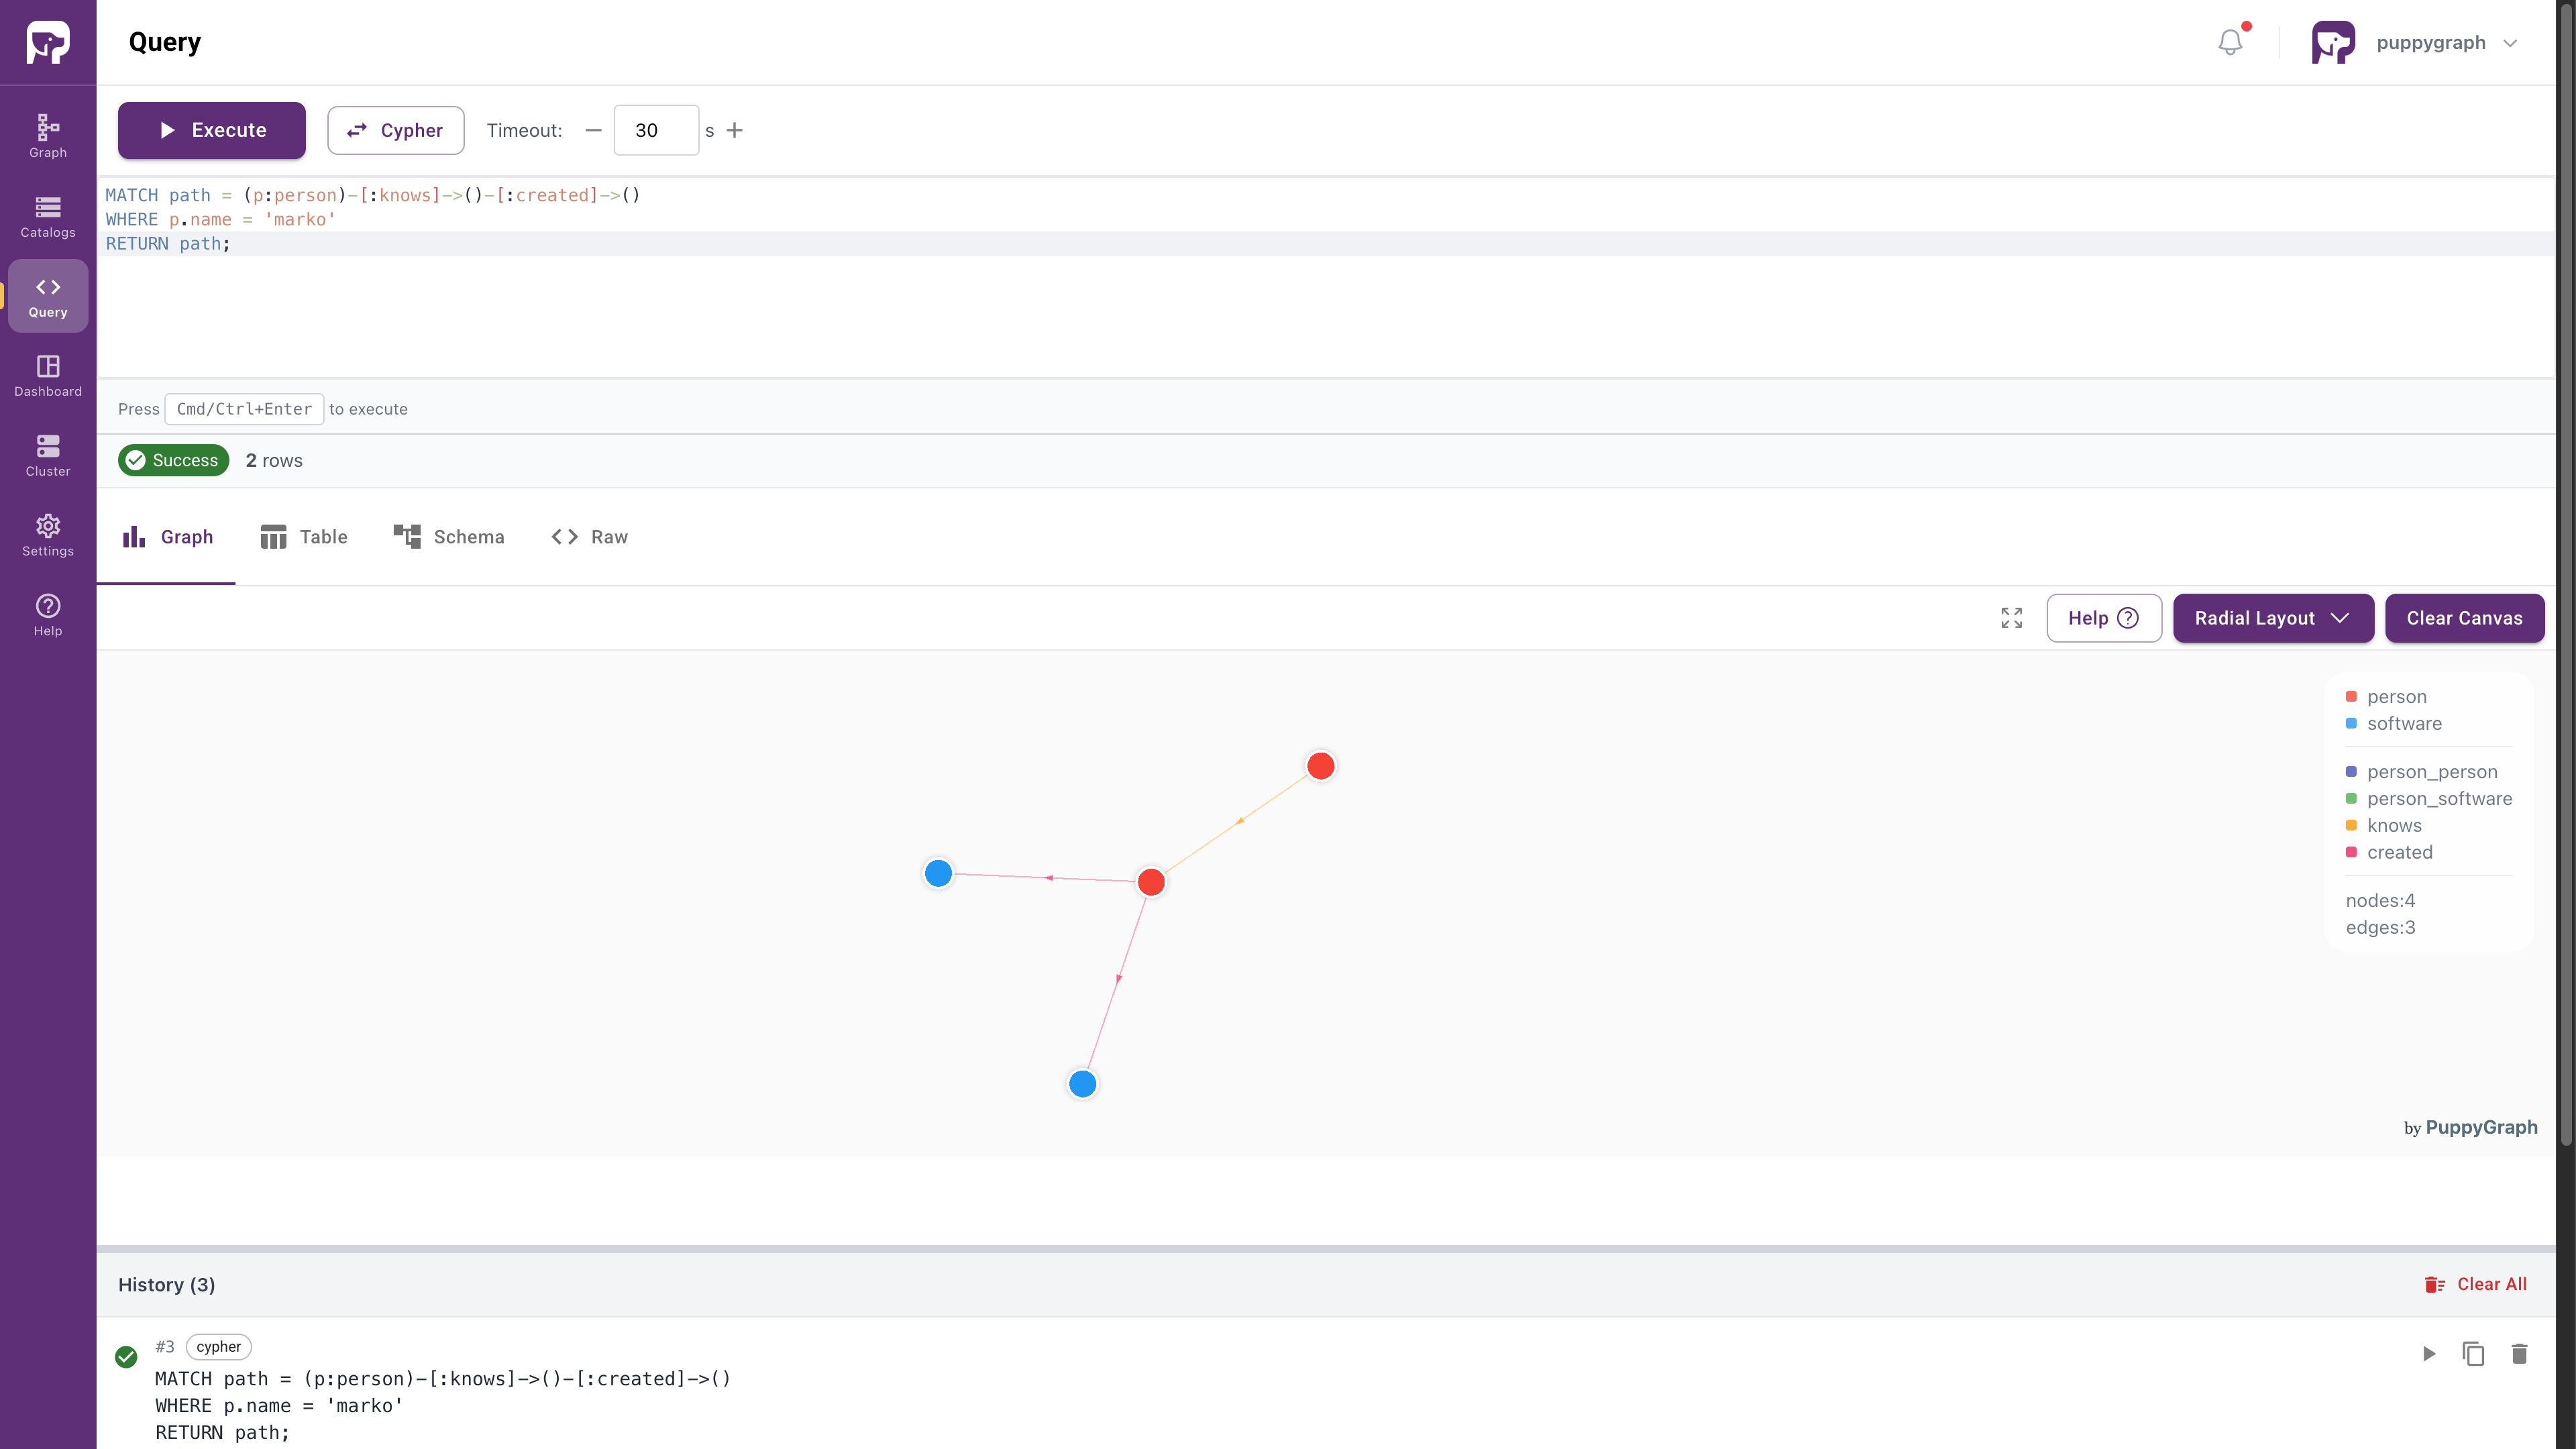
Querying the Graph
In PuppyGraph Web UI, click Query in the sidebar. You can run graph queries in openCypher or Gremlin language.
For example, the following query answers the question: "What software was created by people that marko knows?"
-
openCypher
-
Gremlin
Cleanup
- To stop and remove the PuppyGraph Docker container, run:
- To remove the python virtual environment, simply delete the
venvdirectory: