Connecting to BigQuery
Prerequisites
- The BigQuery service is accessible over the network from the PuppyGraph instance.
- A service account with proper permissions (see below) is available for PuppyGraph to connect to BigQuery with.
Service Account Permission
PuppyGraph uses a Google Service Account for reading data from BigQuery. The service account needs to have the following permissions:
To validate required permission on the service account, you can use the following gcloud command:
gcloud projects get-iam-policy <PROJECT_ID> --flatten="bindings[].members" --format='table(bindings.role)' --filter="bindings.members:<SERVICE_ACCOUNT>"
<PROJECT_ID> with your project ID and <SERVICE_ACCOUNT> with your service account email.
The output should contain the following lines:
Configuration
| Configuration | Explanation |
|---|---|
| JDBC URI | A JDBC compatible connection URI of the data source. Read the official BigQuery JDBC driver documentation for more details on how to construct the URI. Set the following parameters according to your service account configuration:
|
| JDBC Driver Class | The class name of the JDBC Driver. The default value is |
| JDBC Driver URL | Optional. PuppyGraph includes a BigQuery JDBC driver by default. To use your own driver jar, provide the Maven Central URL for the official Google BigQuery JDBC driver, for example |
Demo
Prerequisites
The demo assumes that PuppyGraph has been deployed at localhost according to the instruction in Launching PuppyGraph from AWS Marketplace or Launching PuppyGraph in Docker.
In this demo, we use the username puppygraph and password puppygraph123.
Data Preparation (Optional)
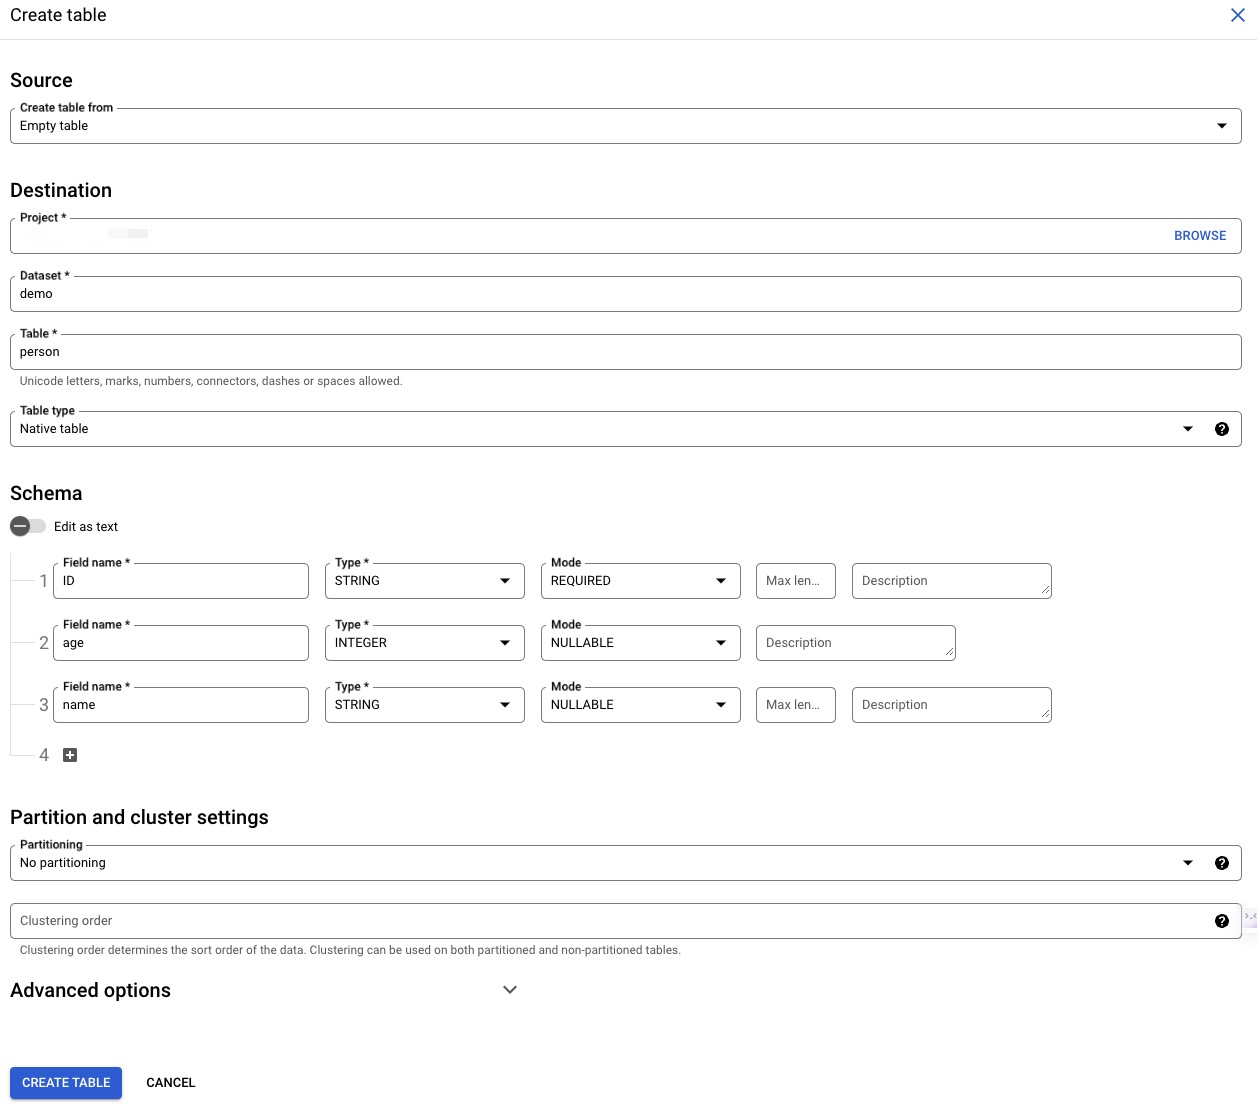
| ID | age | name |
|---|---|---|
| v1 | 29 | Marko |
| v2 | 27 | Vadas |
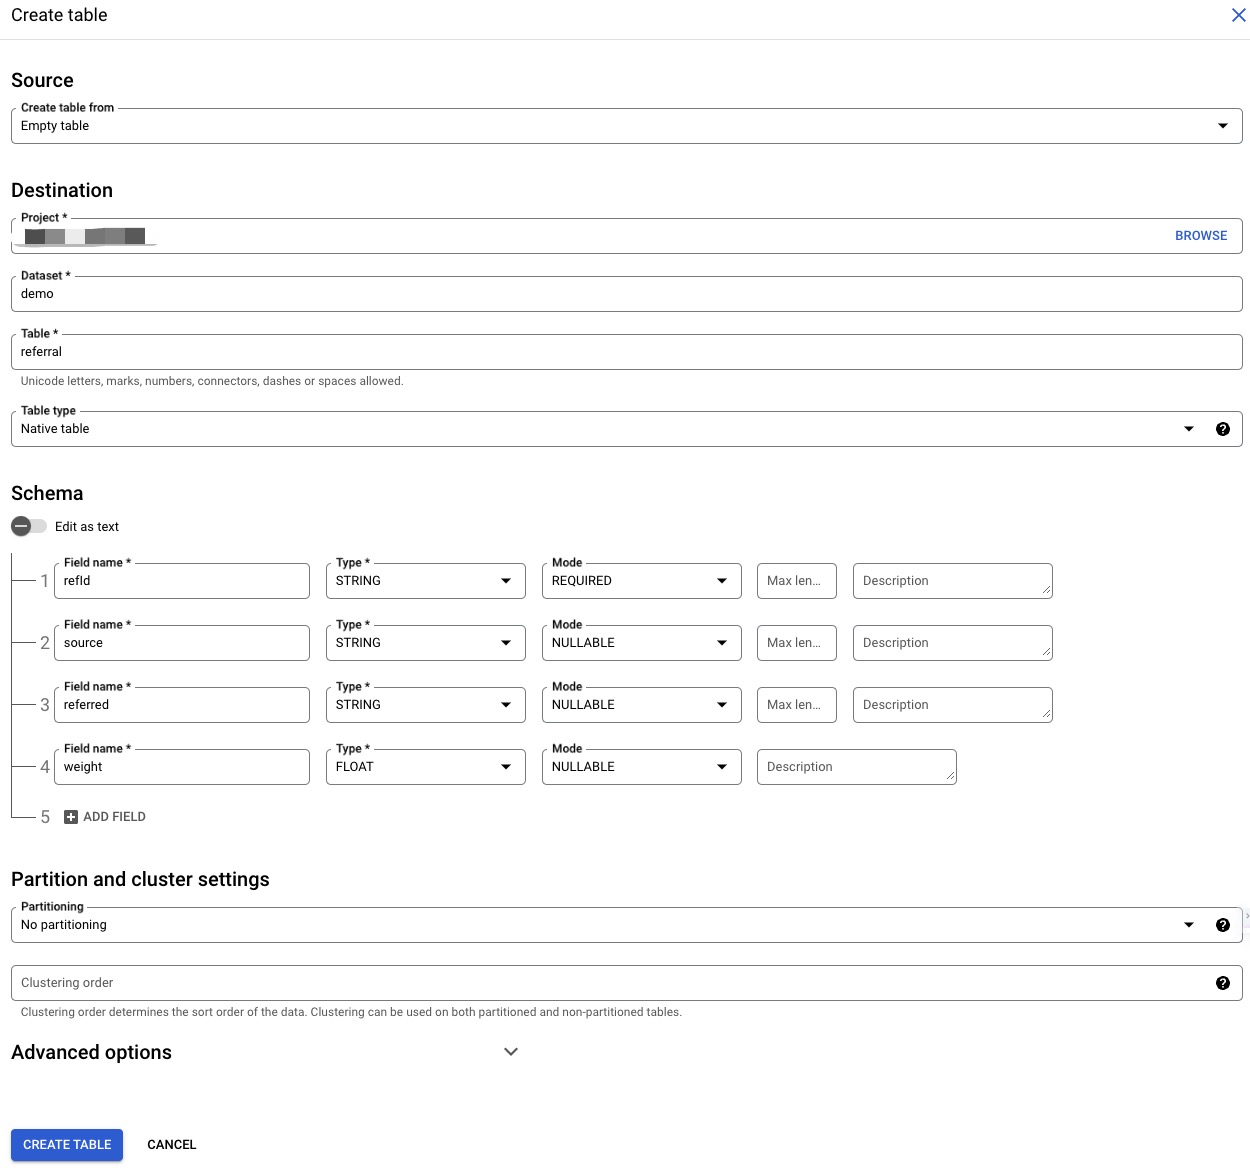
| refId | source | referred | weight |
|---|---|---|---|
| e1 | v1 | v2 | 0.5 |
The demo uses people and referral information as shown above.
The following steps will create tables and insert data to BigQuery in the Google Cloud Web Console.
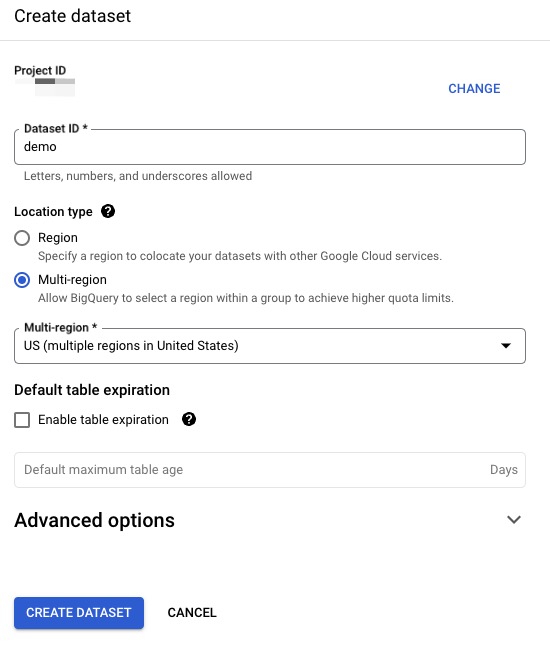
Create a dataset with multi-region support.
Then create tables using the web console.
Finally, open the query tab and execute the following SQL.
insert into `demo.person` values ('v1', 29, 'marko'), ('v2', 27, 'vadas');
insert into `demo.referral` values ('e1', 'v1', 'v2', 0.5);
Start PuppyGraph with Credential
We recommend using Application Default Credentials(ADC).
See Authentication for PuppyGraph to access Google Cloud resources for more information on how to configure this.
Firstly, you must create a service account and generate its key.
Then, download this key and put it to PuppyGraph's environment. Assume the key file downloaded to current directory and named key.json.
Then, we start PuppyGraph with command:
docker run -p 8081:8081 -p 8182:8182 -p 7687:7687 \
  -e PUPPYGRAPH_USERNAME=puppygraph \
  -e PUPPYGRAPH_PASSWORD=puppygraph123 \
  -e GOOGLE_APPLICATION_CREDENTIALS=/home/ubuntu/key.json \
  -v ./key.json:/home/ubuntu/key.json \
  --name puppy --rm -itd puppygraph/puppygraph:latest
Upload the schema
Now the data are ready in BigQuery. We need a PuppyGraph schema before querying it. Let's create a schema file bigquery.json:
{
  "catalog": [
    {
      "name": "jdbc_bigquery",
      "type": "bigquery",
      "jdbc": {
        "jdbcUri": "jdbc:bigquery://https://www.googleapis.com/bigquery/v2:443;ProjectId=PJID;OAuthType=3;EnableSession=1;Location=US",
        "driverClass": "com.google.cloud.bigquery.jdbc.BigQueryDriver"
      }
    }
  ],
  "node": [
    {
      "label": "person",
      "dataSourceGroup": {
        "externalDataSource": {
          "enabled": true,
          "catalog": "jdbc_bigquery",
          "schema": "demo",
          "table": "person",
          "mappedField": [
            { "sourceFieldName": "ID",   "targetFieldName": "id"   },
            { "sourceFieldName": "name", "targetFieldName": "name" },
            { "sourceFieldName": "age",  "targetFieldName": "age"  }
          ]
        }
      },
      "id":        [{ "name": "id", "type": "STRING" }],
      "attribute": [
        { "name": "name", "type": "STRING" },
        { "name": "age",  "type": "LONG"   }
      ]
    }
  ],
  "edge": [
    {
      "label":         "knows",
      "fromNodeLabel": "person",
      "toNodeLabel":   "person",
      "dataSourceGroup": {
        "externalDataSource": {
          "enabled": true,
          "catalog": "jdbc_bigquery",
          "schema": "demo",
          "table": "referral",
          "mappedField": [
            { "sourceFieldName": "refId",    "targetFieldName": "id"      },
            { "sourceFieldName": "source",   "targetFieldName": "from_id" },
            { "sourceFieldName": "referred", "targetFieldName": "to_id"   },
            { "sourceFieldName": "weight",   "targetFieldName": "weight"  }
          ]
        }
      },
      "id":        [{ "name": "id",      "type": "STRING" }],
      "fromKey":   [{ "name": "from_id", "type": "STRING" }],
      "toKey":     [{ "name": "to_id",   "type": "STRING" }],
      "attribute": [
        { "name": "from_id", "type": "STRING" },
        { "name": "to_id",   "type": "STRING" },
        { "name": "weight",  "type": "DOUBLE" }
      ]
    }
  ]
}
Here are some notes on this schema:
- A catalog
jdbc_bigqueryis added to specify the remote data source in BigQuery. - Set
typetobigquery. - Set
driverClasstocom.google.cloud.bigquery.jdbc.BigQueryDriver. - Configure
jdbcUriaccording to your service account configuration. ProjectId=PJID: setPJIDto your BigQuery project ID.OAuthType=3: use Application Default Credentials.EnableSession=1: set to1to create a session ID.Location=US: set to your dataset location.- See the official BigQuery JDBC driver documentation for more configuration details.
Now we can upload the schema file bigquery.json to PuppyGraph with the following shell command, assuming that the PuppyGraph is running on localhost:
curl -XPOST -H "content-type: application/json" --data-binary @./bigquery.json --user "puppygraph:puppygraph123" localhost:8081/schema
Query the data
Connecting to PuppyGraph at http://localhost:8081 and start gremlin console from the "Query" section:
[PuppyGraph]> console
         \,,,/
         (o o)
-----oOOo-(3)-oOOo-----
plugin activated: tinkerpop.server
plugin activated: tinkerpop.utilities
plugin activated: tinkerpop.tinkergraph
Now we have connected to the Gremlin Console. We can query the graph:
FAQ
Not found: Dataset was not found in location US.
The default location, or the Location parameter provided in jdbcUri, does not match the dataset location. Set Location to the correct dataset location in jdbcUri. For example, if Data location is us-central1 in Dataset info in BigQuery Studio, use jdbc:bigquery://https://www.googleapis.com/bigquery/v2:443;ProjectId=PJID;OAuthType=3;EnableSession=1;Location=us-central1; to access the data with PuppyGraph.