Querying Nessie and MinIO AIStor Data as a Graph with TLS
Summary
In this tutorial, you will:
- Generate a local Root CA plus server certificates for MinIO AIStor and Nessie.
- Start a PuppyGraph container alongside a Nessie-backed Iceberg lakehouse with TLS for both the catalog and object storage.
- Connect Nessie to PuppyGraph over TLS and define a graph schema.
- Run Cypher and Gremlin queries against the Nessie-managed Iceberg data as a graph.
Local TLS demo
This tutorial bundles cert generation, a TLS-enabled Nessie + MinIO AIStor + Spark stack, and PuppyGraph configured to trust the local CA. The non-TLS variant is in Querying Nessie Data as a Graph.
In real deployments, replace the self-signed certs with your organization's CA-signed pair and mount the trust material into the PuppyGraph container. See Connecting to Iceberg for the connection reference.
Prerequisites
MinIO AIStor license
Before continuing, obtain a valid MinIO AIStor license, such as the AIStor Free Tier license for a single-node deployment. Save the license as minio.license in your working directory, where you will create docker-compose.yaml below.
This tutorial requires a valid AIStor license to create the bucket and write data. Docker Compose mounts the license file read-only into the AIStor container.
Docker and certificate tools
-
docker composeavailable: -
opensslandkeytoolavailable for generating certificates and PKCS12 stores. On Debian/Ubuntu:
Accessing the PuppyGraph Web UI requires a browser. The schema upload and query steps also have CLI alternatives via curl and the bundled Gremlin console.
Setup
TLS certificate generation
 Create a file
 generate_crt.sh with the following content. It mints a Root CA, then server certs for MinIO AIStor and Nessie signed by that CA, plus a PKCS12 truststore that Java services use to trust the CA:
generate_crt.sh
#!/usr/bin/env bash
set -euo pipefail

CERT_ROOT="${CERT_ROOT:-./certs}"
CA_DIR="${CA_DIR:-${CERT_ROOT}/ca}"
MINIO_DIR="${MINIO_DIR:-${CERT_ROOT}/minio}"
NESSIE_DIR="${NESSIE_DIR:-${CERT_ROOT}/nessie}"

CA_DAYS="${CA_DAYS:-3650}"
SERVER_DAYS="${SERVER_DAYS:-365}"

CA_PASSWORD="${CA_PASSWORD:-ca_password}"
NESSIE_PASSWORD="${NESSIE_PASSWORD:-nessie_password}"

CA_CN="${CA_CN:-MyRootCA}"
MINIO_CN="${MINIO_CN:-minio}"
NESSIE_CN="${NESSIE_CN:-nessie}"

MINIO_SANS=( ${MINIO_SANS:-minio localhost 127.0.0.1} )
NESSIE_SANS=( ${NESSIE_SANS:-nessie localhost 127.0.0.1} )

build_san() {
  local sans=("$@")
  local idx=1
  for san in "${sans[@]}"; do
    if [[ $san =~ ^[0-9]+\.[0-9]+\.[0-9]+\.[0-9]+$ ]]; then
      echo "IP.$idx = $san"
    else
      echo "DNS.$idx = $san"
    fi
    ((idx++))
  done
}

rm -rf "$CERT_ROOT"
mkdir -p "$CA_DIR" "$MINIO_DIR" "$NESSIE_DIR"

echo "[1/4] Generating Root CA..."
openssl genrsa -out "$CA_DIR/ca.key" 2048
cat > "$CA_DIR/ca.cnf" <<EOL
[req]
distinguished_name = req_distinguished_name
x509_extensions = v3_ca
prompt = no

[req_distinguished_name]
C = US
ST = State
L = City
O = Organization
OU = Unit
CN = $CA_CN

[v3_ca]
basicConstraints = critical, CA:TRUE
keyUsage = critical, keyCertSign, cRLSign
EOL
openssl req -new -x509 -days "$CA_DAYS" \
  -key "$CA_DIR/ca.key" \
  -out "$CA_DIR/ca.crt" \
  -config "$CA_DIR/ca.cnf"

echo "[2/4] Generating MinIO AIStor certificate..."
cat > "$MINIO_DIR/minio.cnf" <<EOL
[req]
distinguished_name = req_distinguished_name
req_extensions = v3_req
prompt = no

[req_distinguished_name]
C = US
ST = State
L = City
O = Organization
OU = Unit
CN = $MINIO_CN

[v3_req]
subjectAltName = @alt_names

[alt_names]
$(build_san "${MINIO_SANS[@]}")
EOL
openssl genrsa -out "$MINIO_DIR/private.key" 2048
openssl req -new -key "$MINIO_DIR/private.key" \
  -out "$MINIO_DIR/minio.csr" \
  -config "$MINIO_DIR/minio.cnf"
openssl x509 -req -days "$SERVER_DAYS" \
  -in "$MINIO_DIR/minio.csr" \
  -CA "$CA_DIR/ca.crt" \
  -CAkey "$CA_DIR/ca.key" \
  -CAcreateserial \
  -out "$MINIO_DIR/public.crt" \
  -extfile "$MINIO_DIR/minio.cnf" \
  -extensions v3_req

echo "[3/4] Creating CA truststore (PKCS12)..."
keytool -import -trustcacerts -noprompt \
  -alias root-ca \
  -file "$CA_DIR/ca.crt" \
  -keystore "$CA_DIR/ca-truststore.p12" \
  -storetype PKCS12 \
  -storepass "$CA_PASSWORD"

echo "[4/4] Generating Nessie certificate..."
cat > "$NESSIE_DIR/nessie.cnf" <<EOL
[req]
distinguished_name = req_distinguished_name
req_extensions = v3_req
prompt = no

[req_distinguished_name]
C = US
ST = State
L = City
O = Organization
OU = Unit
CN = $NESSIE_CN

[v3_req]
subjectAltName = @alt_names
keyUsage = digitalSignature, keyEncipherment
extendedKeyUsage = serverAuth

[alt_names]
$(build_san "${NESSIE_SANS[@]}")
EOL
openssl genrsa -out "$NESSIE_DIR/private.key" 2048
openssl req -new -key "$NESSIE_DIR/private.key" \
  -out "$NESSIE_DIR/nessie.csr" \
  -config "$NESSIE_DIR/nessie.cnf"
openssl x509 -req -days "$SERVER_DAYS" \
  -in "$NESSIE_DIR/nessie.csr" \
  -CA "$CA_DIR/ca.crt" \
  -CAkey "$CA_DIR/ca.key" \
  -CAcreateserial \
  -out "$NESSIE_DIR/nessie.crt" \
  -extfile "$NESSIE_DIR/nessie.cnf" \
  -extensions v3_req

openssl pkcs12 -export \
  -in "$NESSIE_DIR/nessie.crt" \
  -inkey "$NESSIE_DIR/private.key" \
  -name "nessie-cert" \
  -out "$NESSIE_DIR/nessie.p12" \
  -passout "pass:$NESSIE_PASSWORD"

chmod 600 "$CA_DIR/ca.key" "$MINIO_DIR/private.key" "$NESSIE_DIR/private.key"
chmod 644 "$NESSIE_DIR/nessie.p12"

echo "Certificates generated under $CERT_ROOT"
Run the script:
Stage the cert material into per-service mount directories so each container only sees what it needs:
mkdir -p ./minio_certs && cp ./certs/minio/public.crt ./certs/minio/private.key ./minio_certs/
cp ./certs/ca/ca.crt ./minio_certs/
# The AIStor image runs as root and can read this private directory.
chmod 700 ./minio_certs
chmod 600 ./minio_certs/private.key

mkdir -p ./nessie_certs && cp ./certs/nessie/nessie.p12 ./certs/ca/ca-truststore.p12 ./nessie_certs/
mkdir -p ./spark_certs && cp ./certs/ca/ca-truststore.p12 ./spark_certs/
mkdir -p ./puppygraph && cp ./certs/ca/ca.crt ./puppygraph/MyRootCA.crt && \
  cp ./certs/minio/public.crt ./puppygraph/minio.crt && \
  cp ./certs/nessie/nessie.crt ./puppygraph/nessie.crt
Default credentials
The compose file ships with MinIO AIStor root credentials admin / password, Nessie keystore password nessie_password, and CA truststore password ca_password. Change them before running on a publicly accessible machine, and regenerate the certificates accordingly.
Deployment
Create a file docker-compose.yaml with the following content. TLS settings are baked into MinIO AIStor, Nessie, Spark, and PuppyGraph:
docker-compose.yaml
version: "3"
services:
  spark-iceberg:
    image: tabulario/spark-iceberg
    container_name: spark-iceberg
    networks:
      - nessie_tls_net
    depends_on:
      nessie:
        condition: service_started
      minio-init:
        condition: service_completed_successfully
    volumes:
      - ./spark_certs:/spark_certs
    environment:
      - AWS_ACCESS_KEY_ID=admin
      - AWS_SECRET_ACCESS_KEY=password
      - AWS_REGION=us-east-1
      - JAVA_TOOL_OPTIONS=-Djavax.net.ssl.trustStore=/spark_certs/ca-truststore.p12 -Djavax.net.ssl.trustStorePassword=ca_password
    ports:
      - "8888:8888"
      - "8180:8080"
      - "10000:10000"
      - "10001:10001"
  minio:
    image: quay.io/minio/aistor/minio:latest
    container_name: minio
    command: ["server", "/data", "--console-address", ":9001", "--certs-dir", "/minio_certs", "--license", "/minio.license"]
    environment: &minio-credentials
      MINIO_ROOT_USER: admin
      MINIO_ROOT_PASSWORD: password
    networks:
      - nessie_tls_net
    ports:
      - "9000:9000"
      - "9001:9001"
    volumes:
      - ./minio_certs:/minio_certs:ro
      - type: bind
        source: ./minio.license
        target: /minio.license
        read_only: true
        bind:
          create_host_path: false
    healthcheck:
      test: ["CMD", "curl", "-fsS", "--cacert", "/minio_certs/ca.crt", "https://localhost:9000/minio/health/ready"]
      interval: 2s
      timeout: 5s
      retries: 30
      start_period: 10s
  minio-init:
    image: quay.io/minio/aistor/minio:latest
    depends_on:
      minio:
        condition: service_healthy
    networks:
      - nessie_tls_net
    environment: *minio-credentials
    volumes:
      - ./certs/ca/ca.crt:/ca.crt:ro
    entrypoint:
      - /bin/sh
      - -ec
      - |
        curl -fsS --cacert /ca.crt --aws-sigv4 aws:amz:us-east-1:s3 --user "$${MINIO_ROOT_USER}:$${MINIO_ROOT_PASSWORD}" \
          --head https://minio:9000/my-bucket >/dev/null 2>&1 ||
        curl -fsS --cacert /ca.crt --aws-sigv4 aws:amz:us-east-1:s3 --user "$${MINIO_ROOT_USER}:$${MINIO_ROOT_PASSWORD}" \
          -X PUT https://minio:9000/my-bucket
  nessie:
    depends_on:
      minio-init:
        condition: service_completed_successfully
    image: ghcr.io/projectnessie/nessie:0.104.1
    container_name: nessie
    networks:
      - nessie_tls_net
    ports:
      - "19121:19121"
    volumes:
      - ./nessie_certs:/nessie_certs
    environment:
      - nessie.version.store.type=IN_MEMORY
      - nessie.catalog.default-warehouse=warehouse
      - nessie.catalog.warehouses.warehouse.location=s3a://my-bucket/
      - nessie.catalog.service.s3.default-options.region=us-east-1
      - nessie.catalog.service.s3.default-options.endpoint=https://minio:9000
      - nessie.catalog.service.s3.default-options.path-style-access=true
      - nessie.catalog.service.s3.default-options.access-key=urn:nessie-secret:quarkus:nessie.catalog.secrets.access-key
      - nessie.catalog.secrets.access-key.name=admin
      - nessie.catalog.secrets.access-key.secret=password
      - nessie.server.authentication.enabled=false
      - quarkus.http.ssl-port=19121
      - quarkus.http.ssl.certificate.key-store-file=/nessie_certs/nessie.p12
      - quarkus.http.ssl.certificate.key-store-password=nessie_password
      - quarkus.http.ssl.certificate.key-store-type=PKCS12
      - JAVA_TOOL_OPTIONS=-Djavax.net.ssl.trustStore=/nessie_certs/ca-truststore.p12 -Djavax.net.ssl.trustStorePassword=ca_password
  puppygraph:
    image: puppygraph/puppygraph:latest
    pull_policy: always
    container_name: puppygraph
    networks:
      - nessie_tls_net
    environment:
      - PUPPYGRAPH_USERNAME=puppygraph
      - PUPPYGRAPH_PASSWORD=puppygraph123
      - CERTIFICATE_BASEPATH=/home/ubuntu/tls-certs
    ports:
      - "8081:8081"
      - "8182:8182"
      - "7687:7687"
    volumes:
      - ./puppygraph:/home/ubuntu/tls-certs
    depends_on:
      - spark-iceberg
networks:
  nessie_tls_net:
    name: puppy-nessie-tls
The CERTIFICATE_BASEPATH env var tells PuppyGraph to load every *.crt and *.pem file in that directory into its trust store at startup, so it can verify both the MinIO AIStor and Nessie certificates without further config.
Start the stack:
[+] Running 6/6
 ✔ Network puppy-nessie-tls  Created
 ✔ Container minio          Started
 ✔ Container minio-init     Exited
 ✔ Container nessie          Started
 ✔ Container spark-iceberg   Started
 ✔ Container puppygraph      Started
The minio-init service uses the same root credentials as AIStor and creates the bucket with a signed S3 request before the catalog starts. The bucket stays private; the clients use the credentials configured above.
Data Preparation
Open a Spark-SQL shell connected to Nessie over HTTPS:
The command sets the MinIO AIStor endpoint and enables path-style access, overriding the endpoint bundled in the Spark image.
docker exec -it spark-iceberg spark-sql \
  --conf spark.sql.catalog.demo=org.apache.iceberg.spark.SparkCatalog \
  --conf spark.sql.catalog.demo.uri=https://nessie:19121/iceberg/ \
  --conf spark.sql.catalog.demo.warehouse=s3a://my-bucket/ \
  --conf spark.sql.catalog.demo.type=rest \
  --conf spark.sql.catalog.demo.s3.endpoint=https://minio:9000 \
  --conf spark.sql.catalog.demo.s3.path-style-access=true
Paste the following SQL into the spark-sql ()> prompt to create the schema and insert data:
modern.sql
CREATE DATABASE demo.modern;

CREATE EXTERNAL TABLE demo.modern.software (
  id   string,
  name string,
  lang string
) USING iceberg;
INSERT INTO demo.modern.software VALUES
  ('v3', 'lop',    'java'),
  ('v5', 'ripple', 'java');

CREATE EXTERNAL TABLE demo.modern.person (
  id   string,
  name string,
  age  int
) USING iceberg;
INSERT INTO demo.modern.person VALUES
  ('v1', 'marko', 29),
  ('v2', 'vadas', 27),
  ('v4', 'josh',  32),
  ('v6', 'peter', 35);

CREATE EXTERNAL TABLE demo.modern.created (
  id      string,
  from_id string,
  to_id   string,
  weight  double
) USING iceberg;
INSERT INTO demo.modern.created VALUES
  ('e9',  'v1', 'v3', 0.4),
  ('e10', 'v4', 'v5', 1.0),
  ('e11', 'v4', 'v3', 0.4),
  ('e12', 'v6', 'v3', 0.2);

CREATE EXTERNAL TABLE demo.modern.knows (
  id      string,
  from_id string,
  to_id   string,
  weight  double
) USING iceberg;
INSERT INTO demo.modern.knows VALUES
  ('e7', 'v1', 'v2', 0.5),
  ('e8', 'v1', 'v4', 1.0);
| id | name | age |
|---|---|---|
| v1 | marko | 29 |
| v2 | vadas | 27 |
| v4 | josh | 32 |
| v6 | peter | 35 |
| id | name | lang |
|---|---|---|
| v3 | lop | java |
| v5 | ripple | java |
| id | from_id | to_id | weight |
|---|---|---|---|
| e9 | v1 | v3 | 0.4 |
| e10 | v4 | v5 | 1.0 |
| e11 | v4 | v3 | 0.4 |
| e12 | v6 | v3 | 0.2 |
| id | from_id | to_id | weight |
|---|---|---|---|
| e7 | v1 | v2 | 0.5 |
| e8 | v1 | v4 | 1.0 |
Exit the shell with quit;.
Modeling a Graph
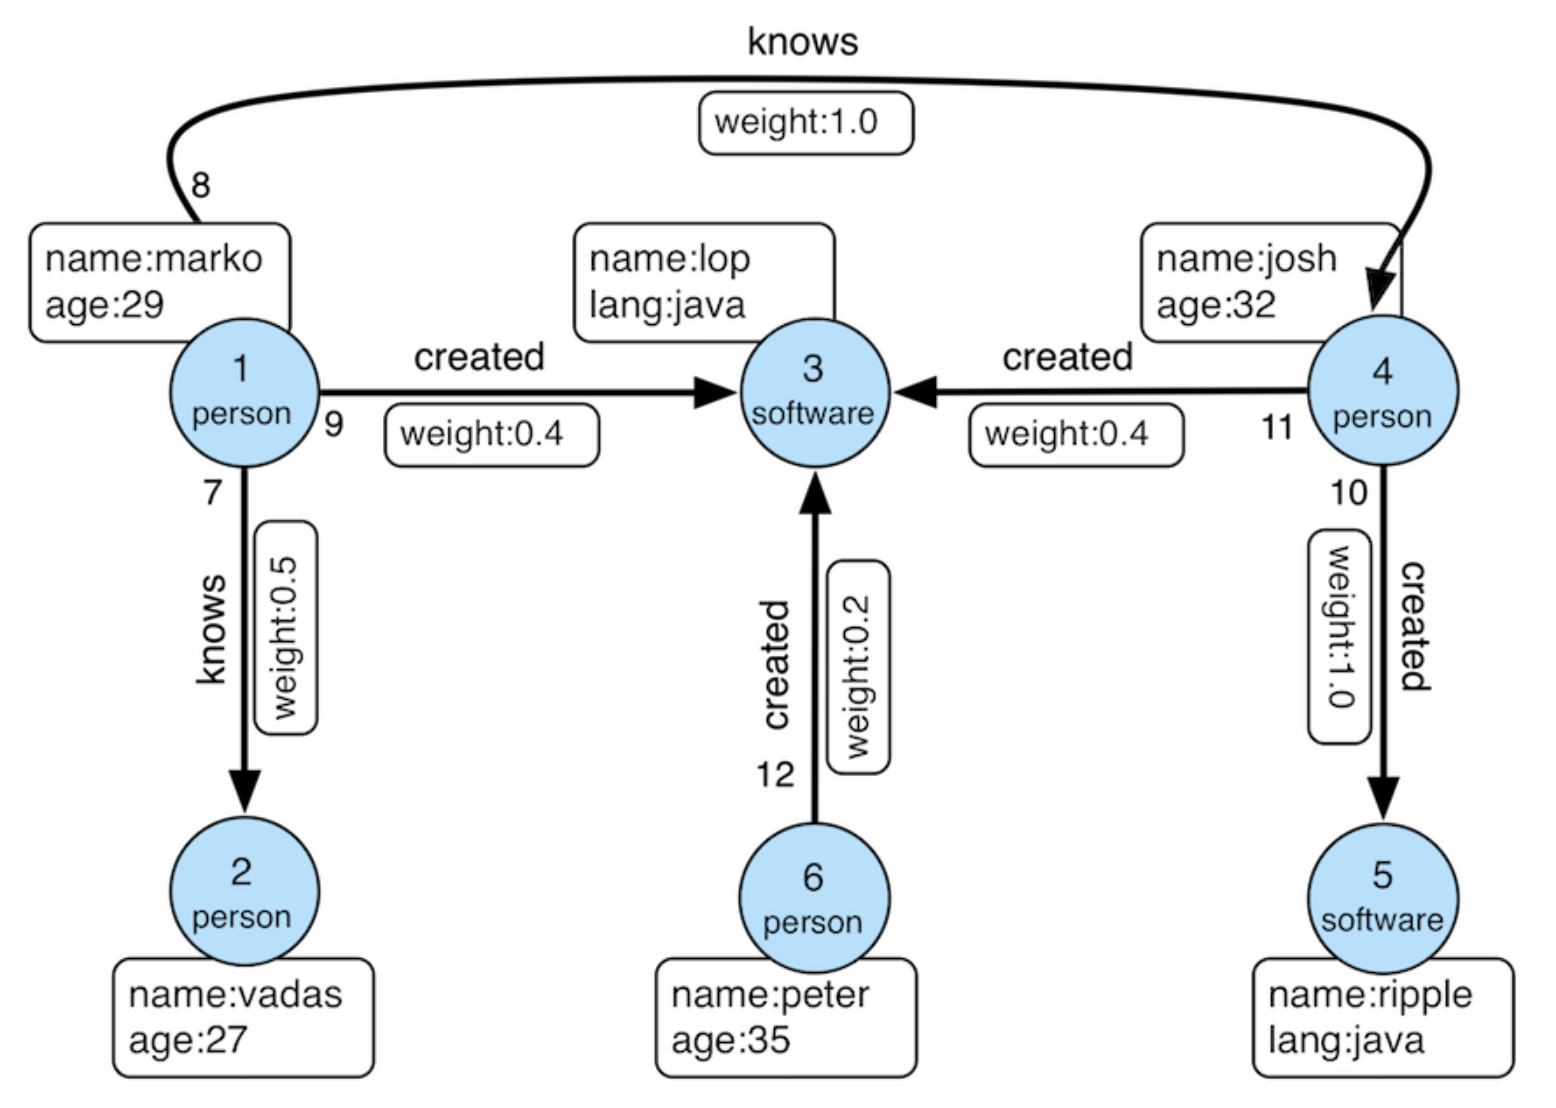
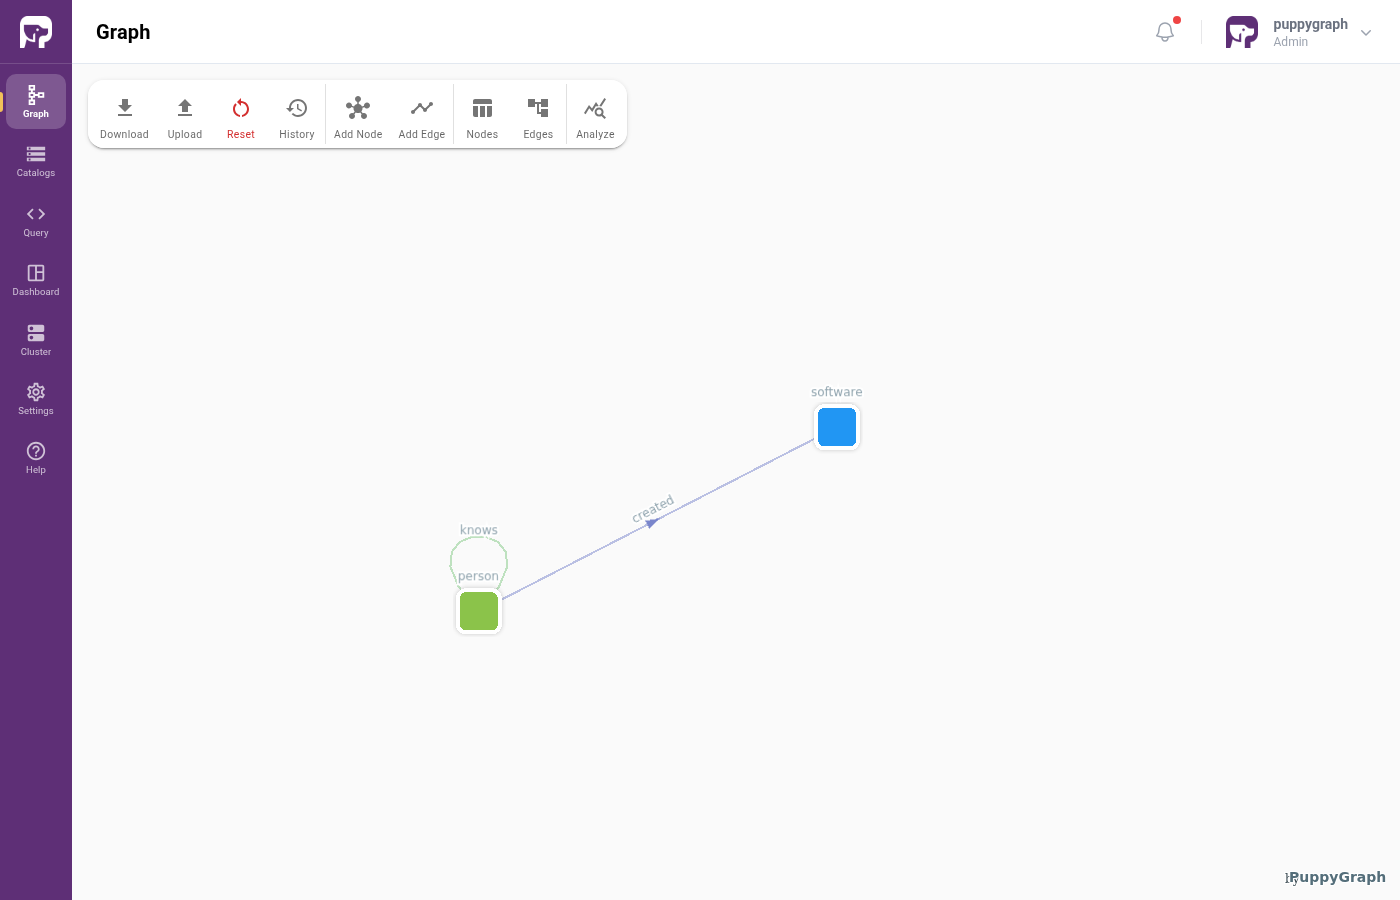
We model the data as the TinkerPop modern graph: two node types (person, software) and two edge types (knows, created).
First, log into the PuppyGraph Web UI at http://localhost:8081 with the credentials configured above:
| Field | Value |
|---|---|
| Username | puppygraph |
| Password | puppygraph123 |
There are two ways to define the schema in PuppyGraph: build it interactively in the Schema Builder, or upload a JSON file directly. Pick whichever you prefer; both produce the same graph.
Build the graph in the Schema Builder
The Schema Builder is the visual editor in the PuppyGraph Web UI for adding catalogs, nodes, and edges step by step. It's the recommended path when you're modeling a graph for the first time or want to inspect what each click produces. For a deeper visual walkthrough of every dialog and field, see Modeling a Graph through the Schema Builder. The summary below covers what's needed to build the modern graph against this tutorial's TLS-secured Nessie.
Connecting to Nessie
Click Create Catalog, then expand Data Lakes and pick Apache Iceberg.
Fill in the connection form. Note the HTTPS URLs and Enable SSL toggle:
| Field | Value |
|---|---|
| Catalog name | nessie_tls_data |
| Metastore type | Iceberg REST |
| Endpoint URL | https://nessie:19121/iceberg |
| REST Warehouse | s3a://my-bucket/ |
| S3 Endpoint | https://minio:9000 |
| Access Key | admin |
| Secret Key | password |
| Path-style access | enabled |
| Enable SSL | enabled |
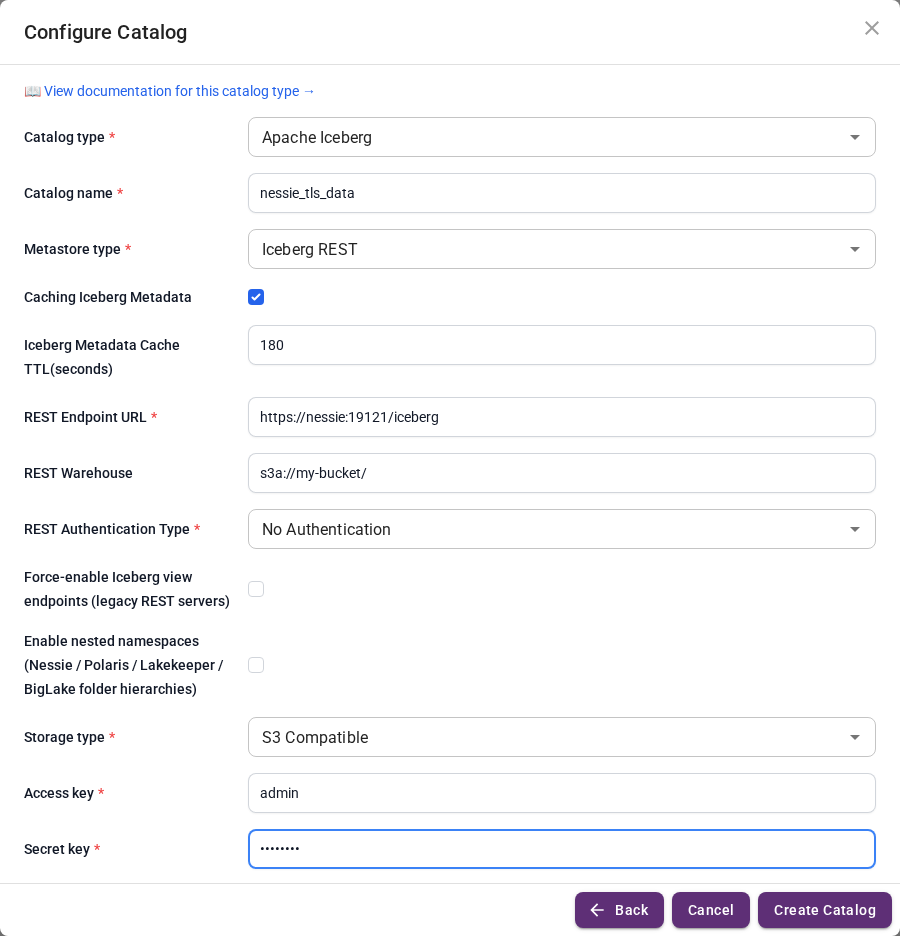
Click Create Catalog. PuppyGraph uses the CA cert mounted at CERTIFICATE_BASEPATH to verify the Nessie and MinIO AIStor server certificates.
Adding nodes and edges
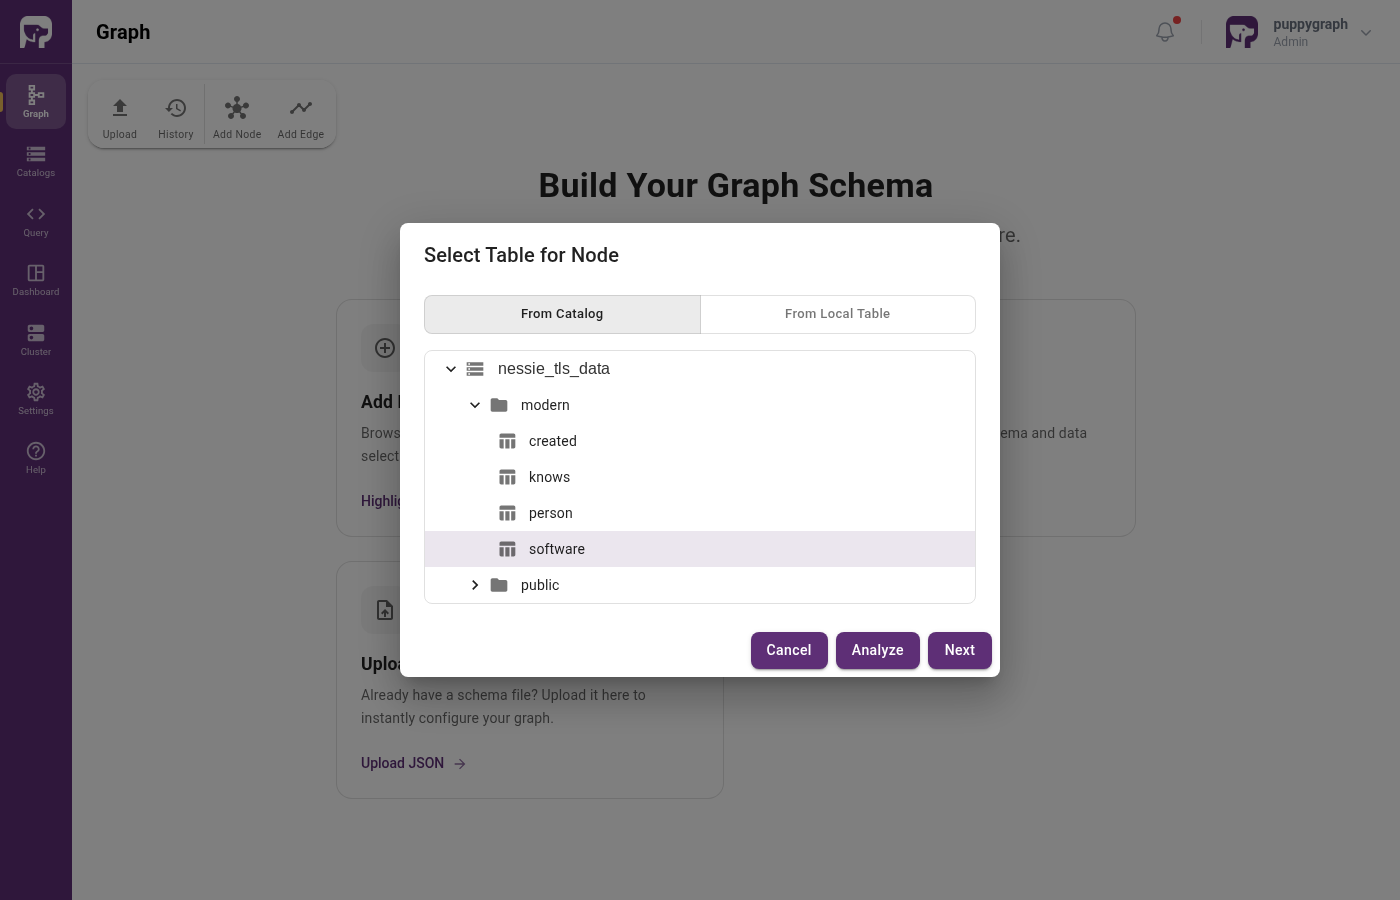
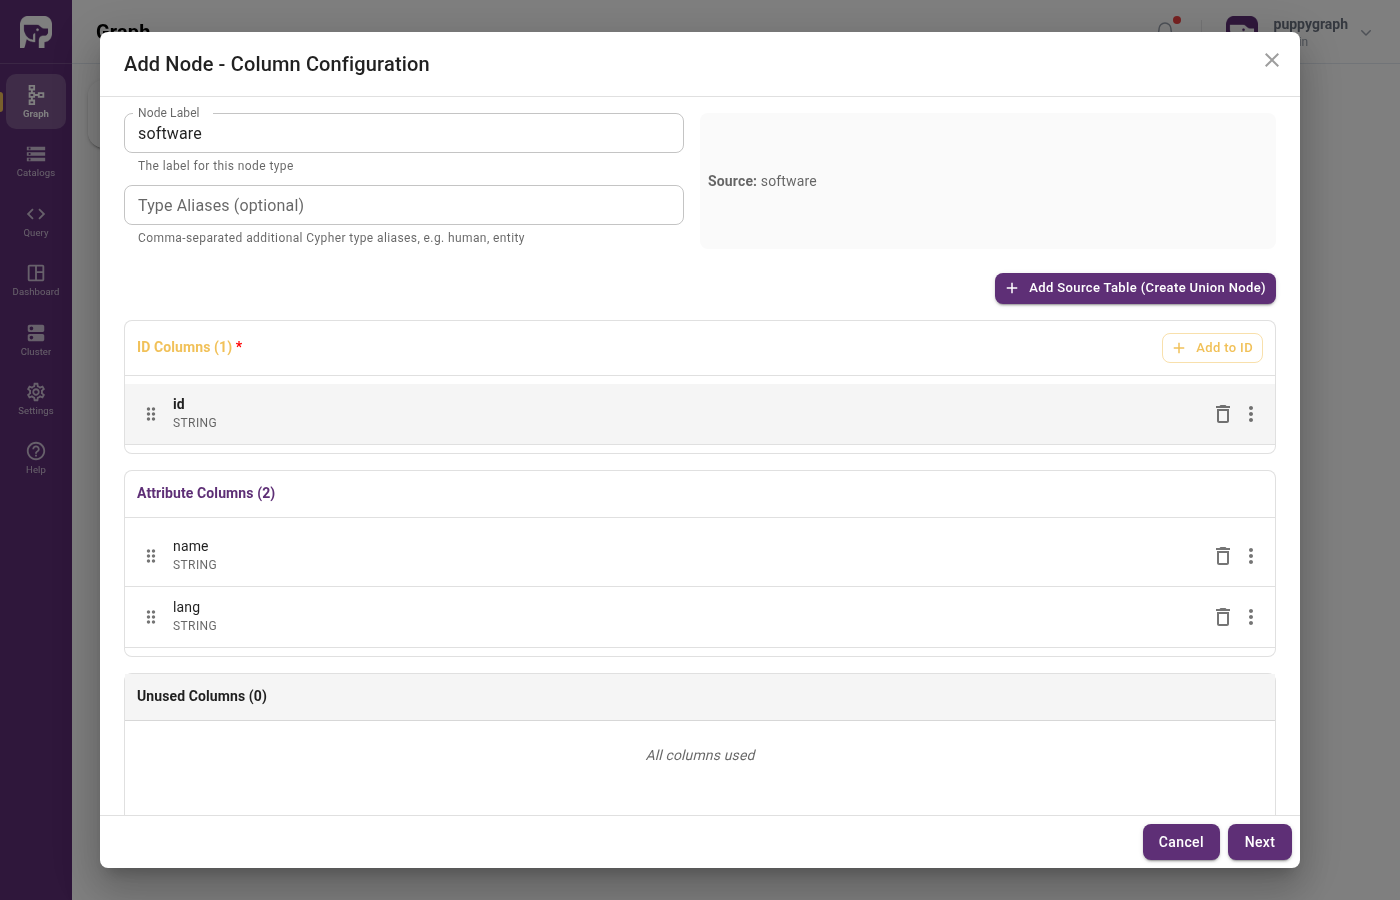
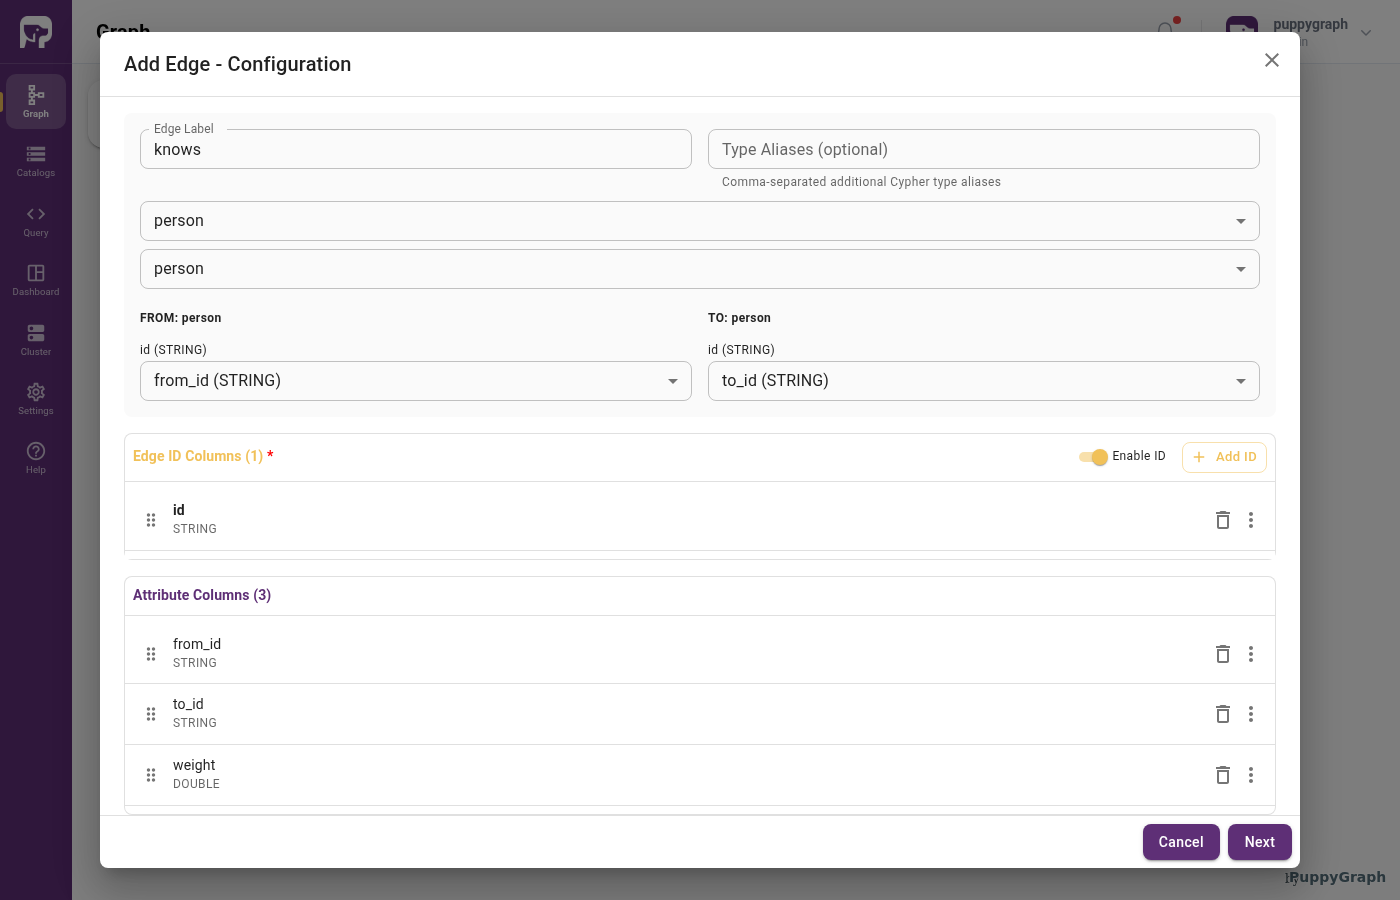
Add the software and person nodes, then the created and knows edges, the same way as in the Iceberg tutorial. For each edge, set the From / To Node, map from_id and to_id as the FROM / TO Select Column, and assign id as the edge identifier.
Upload a schema file
If you've already built the graph in the Schema Builder above, you can skip this section. The resulting schema is the same.
This method writes the full schema to a JSON file and uploads it directly. It's useful when you already have a schema for an environment and want to recreate it elsewhere (e.g. for CI, scripted setup, or copy-pasting between PuppyGraph instances).
Create a file schema.json with the following content:
schema.json
{
  "catalog": [
    {
      "name": "nessie_tls_data",
      "type": "iceberg",
      "metastore": {
        "type": "rest",
        "uri": "https://nessie:19121/iceberg",
        "warehouse": "s3a://my-bucket/"
      },
      "storage": {
        "useInstanceProfile": "false",
        "accessKey": "admin",
        "secretKey": "password",
        "enableSsl": "true",
        "endpoint": "https://minio:9000",
        "enablePathStyleAccess": "true"
      }
    }
  ],
  "node": [
    {
      "label": "software",
      "dataSourceGroup": {
        "externalDataSource": {
          "enabled": true,
          "catalog": "nessie_tls_data",
          "schema": "modern",
          "table": "software",
          "mappedField": [
            { "sourceFieldName": "id",   "targetFieldName": "id"   },
            { "sourceFieldName": "name", "targetFieldName": "name" },
            { "sourceFieldName": "lang", "targetFieldName": "lang" }
          ]
        }
      },
      "id":        [{ "name": "id",   "type": "STRING" }],
      "attribute": [
        { "name": "name", "type": "STRING" },
        { "name": "lang", "type": "STRING" }
      ]
    },
    {
      "label": "person",
      "dataSourceGroup": {
        "externalDataSource": {
          "enabled": true,
          "catalog": "nessie_tls_data",
          "schema": "modern",
          "table": "person",
          "mappedField": [
            { "sourceFieldName": "id",   "targetFieldName": "id"   },
            { "sourceFieldName": "name", "targetFieldName": "name" },
            { "sourceFieldName": "age",  "targetFieldName": "age"  }
          ]
        }
      },
      "id":        [{ "name": "id",   "type": "STRING" }],
      "attribute": [
        { "name": "name", "type": "STRING" },
        { "name": "age",  "type": "INT"    }
      ]
    }
  ],
  "edge": [
    {
      "label":         "created",
      "fromNodeLabel": "person",
      "toNodeLabel":   "software",
      "dataSourceGroup": {
        "externalDataSource": {
          "enabled": true,
          "catalog": "nessie_tls_data",
          "schema": "modern",
          "table": "created",
          "mappedField": [
            { "sourceFieldName": "id",      "targetFieldName": "id"      },
            { "sourceFieldName": "from_id", "targetFieldName": "from_id" },
            { "sourceFieldName": "to_id",   "targetFieldName": "to_id"   },
            { "sourceFieldName": "weight",  "targetFieldName": "weight"  }
          ]
        }
      },
      "id":        [{ "name": "id",      "type": "STRING" }],
      "fromKey":   [{ "name": "from_id", "type": "STRING" }],
      "toKey":     [{ "name": "to_id",   "type": "STRING" }],
      "attribute": [
        { "name": "from_id", "type": "STRING" },
        { "name": "to_id",   "type": "STRING" },
        { "name": "weight",  "type": "DOUBLE" }
      ]
    },
    {
      "label":         "knows",
      "fromNodeLabel": "person",
      "toNodeLabel":   "person",
      "dataSourceGroup": {
        "externalDataSource": {
          "enabled": true,
          "catalog": "nessie_tls_data",
          "schema": "modern",
          "table": "knows",
          "mappedField": [
            { "sourceFieldName": "id",      "targetFieldName": "id"      },
            { "sourceFieldName": "from_id", "targetFieldName": "from_id" },
            { "sourceFieldName": "to_id",   "targetFieldName": "to_id"   },
            { "sourceFieldName": "weight",  "targetFieldName": "weight"  }
          ]
        }
      },
      "id":        [{ "name": "id",      "type": "STRING" }],
      "fromKey":   [{ "name": "from_id", "type": "STRING" }],
      "toKey":     [{ "name": "to_id",   "type": "STRING" }],
      "attribute": [
        { "name": "from_id", "type": "STRING" },
        { "name": "to_id",   "type": "STRING" },
        { "name": "weight",  "type": "DOUBLE" }
      ]
    }
  ]
}
In the Web UI, click Graph in the sidebar, then Upload Schema, and select schema.json.
Upload via CLI
You can also POST the schema directly:
Querying the Graph
In the PuppyGraph Web UI, click Query in the sidebar. You can run graph queries in either Cypher or Gremlin.
The following query answers "What software was created by people that marko knows?"
There are two paths in the result: marko knows josh, who created lop and ripple.
Cleanup
Shut down the stack and remove volumes and the generated certs: