Querying SQL Server Data as a Graph
Summary
In this tutorial, you will:
- Start a PuppyGraph container alongside a Microsoft SQL Server container and load example data.
- Connect SQL Server to PuppyGraph and define a graph schema.
- Run Cypher and Gremlin queries against the SQL Server data as a graph.
Self-contained SQL Server Data
This tutorial bundles a SQL Server container and seeds it with the TinkerPop modern graph sample data.
In real deployments, PuppyGraph queries your existing SQL Server databases directly. See Connecting to SQL Server for the connection reference.
Prerequisites
Please ensure that docker compose is available. The installation can be verified by running:
See https://docs.docker.com/compose/install/ for Docker Compose installation instructions and https://www.docker.com/get-started/ for more details on Docker.
Accessing the PuppyGraph Web UI requires a browser. The schema upload and query steps also have CLI alternatives via curl and the bundled Gremlin console.
Setup
Deployment
 Create two files
 docker-compose.yaml and setup.sql with the following content:
docker-compose.yaml
version: "3"
services:
  puppygraph:
    image: puppygraph/puppygraph:latest
    pull_policy: always
    container_name: puppygraph
    environment:
      - PUPPYGRAPH_USERNAME=puppygraph
      - PUPPYGRAPH_PASSWORD=puppygraph123
    networks:
      - mssql_net
    ports:
      - "8081:8081"
      - "8182:8182"
      - "7687:7687"
  sql-server:
    image: mcr.microsoft.com/mssql/server:2022-latest
    container_name: sql-server
    environment:
      - ACCEPT_EULA=Y
      - MSSQL_SA_PASSWORD=StrongPassw0rd
    networks:
      - mssql_net
    ports:
      - "1433:1433"
    volumes:
      - ./setup.sql:/setup.sql
networks:
  mssql_net:
    name: puppy-mssql
setup.sql
CREATE DATABASE DemoDB;
GO
USE DemoDB;
GO
CREATE LOGIN demouser WITH PASSWORD = 'DemoPassword123';
GO
CREATE USER demouser FOR LOGIN demouser;
GO
ALTER ROLE db_owner ADD MEMBER demouser;
GO
CREATE SCHEMA modern;
GO
CREATE TABLE modern.software (id NVARCHAR(50), name NVARCHAR(50), lang NVARCHAR(50));
CREATE TABLE modern.person   (id NVARCHAR(50), name NVARCHAR(50), age INT);
CREATE TABLE modern.created  (id NVARCHAR(50), from_id NVARCHAR(50), to_id NVARCHAR(50), weight FLOAT);
CREATE TABLE modern.knows    (id NVARCHAR(50), from_id NVARCHAR(50), to_id NVARCHAR(50), weight FLOAT);
GO
INSERT INTO modern.software VALUES ('v3', 'lop', 'java'), ('v5', 'ripple', 'java');
INSERT INTO modern.person VALUES
  ('v1', 'marko', 29), ('v2', 'vadas', 27), ('v4', 'josh', 32), ('v6', 'peter', 35);
INSERT INTO modern.created VALUES
  ('e9', 'v1', 'v3', 0.4), ('e10', 'v4', 'v5', 1.0),
  ('e11', 'v4', 'v3', 0.4), ('e12', 'v6', 'v3', 0.2);
INSERT INTO modern.knows VALUES
  ('e7', 'v1', 'v2', 0.5), ('e8', 'v1', 'v4', 1.0);
GO
Default passwords
The compose file ships with default passwords for convenience. Change MSSQL_SA_PASSWORD and the application password in setup.sql before running on a publicly accessible machine. SQL Server requires the SA password to be at least 8 characters long and meet complexity requirements, typically using 3 of 4 character classes: uppercase, lowercase, digits, and symbols.
Start the stack:
[+] Running 3/3
 ✔ Network puppy-mssql       Created                                      0.1s
 ✔ Container puppygraph      Started                                      0.7s
 ✔ Container sql-server      Started                                      0.8s
Data Preparation
Wait until SQL Server finishes initializing (typically up to a minute on first start), then run setup.sql against it:
docker exec -it sql-server /opt/mssql-tools18/bin/sqlcmd \
  -S localhost -U sa -P StrongPassw0rd -C -i /setup.sql
This creates the DemoDB database, an application user demouser, the modern schema, and the four tables.
| id | name | age |
|---|---|---|
| v1 | marko | 29 |
| v2 | vadas | 27 |
| v4 | josh | 32 |
| v6 | peter | 35 |
| id | name | lang |
|---|---|---|
| v3 | lop | java |
| v5 | ripple | java |
| id | from_id | to_id | weight |
|---|---|---|---|
| e9 | v1 | v3 | 0.4 |
| e10 | v4 | v5 | 1.0 |
| e11 | v4 | v3 | 0.4 |
| e12 | v6 | v3 | 0.2 |
| id | from_id | to_id | weight |
|---|---|---|---|
| e7 | v1 | v2 | 0.5 |
| e8 | v1 | v4 | 1.0 |
Modeling a Graph
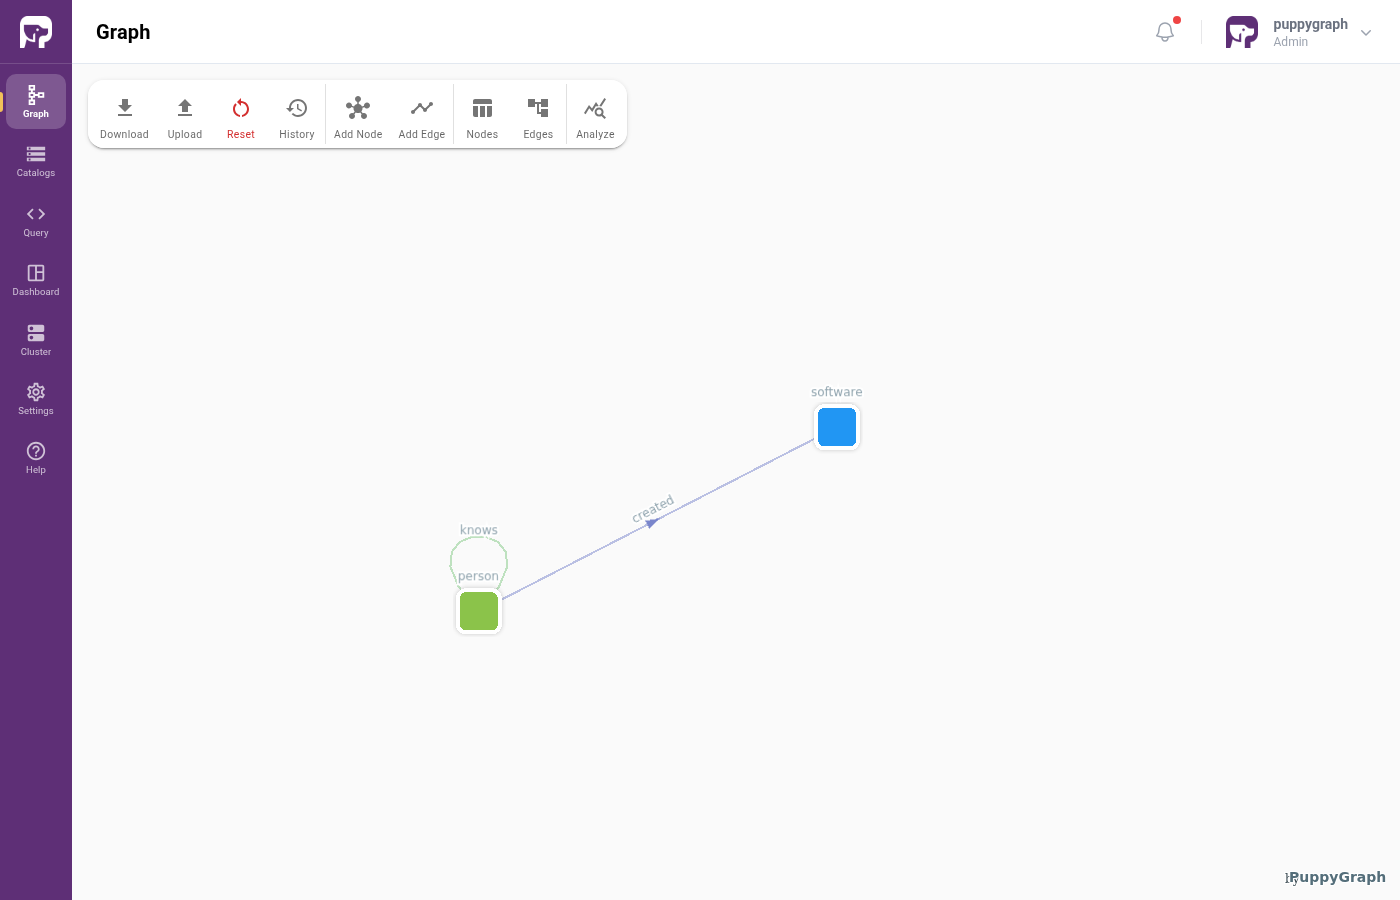
We model the data as the TinkerPop modern graph: two node types (person, software) and two edge types (knows, created).
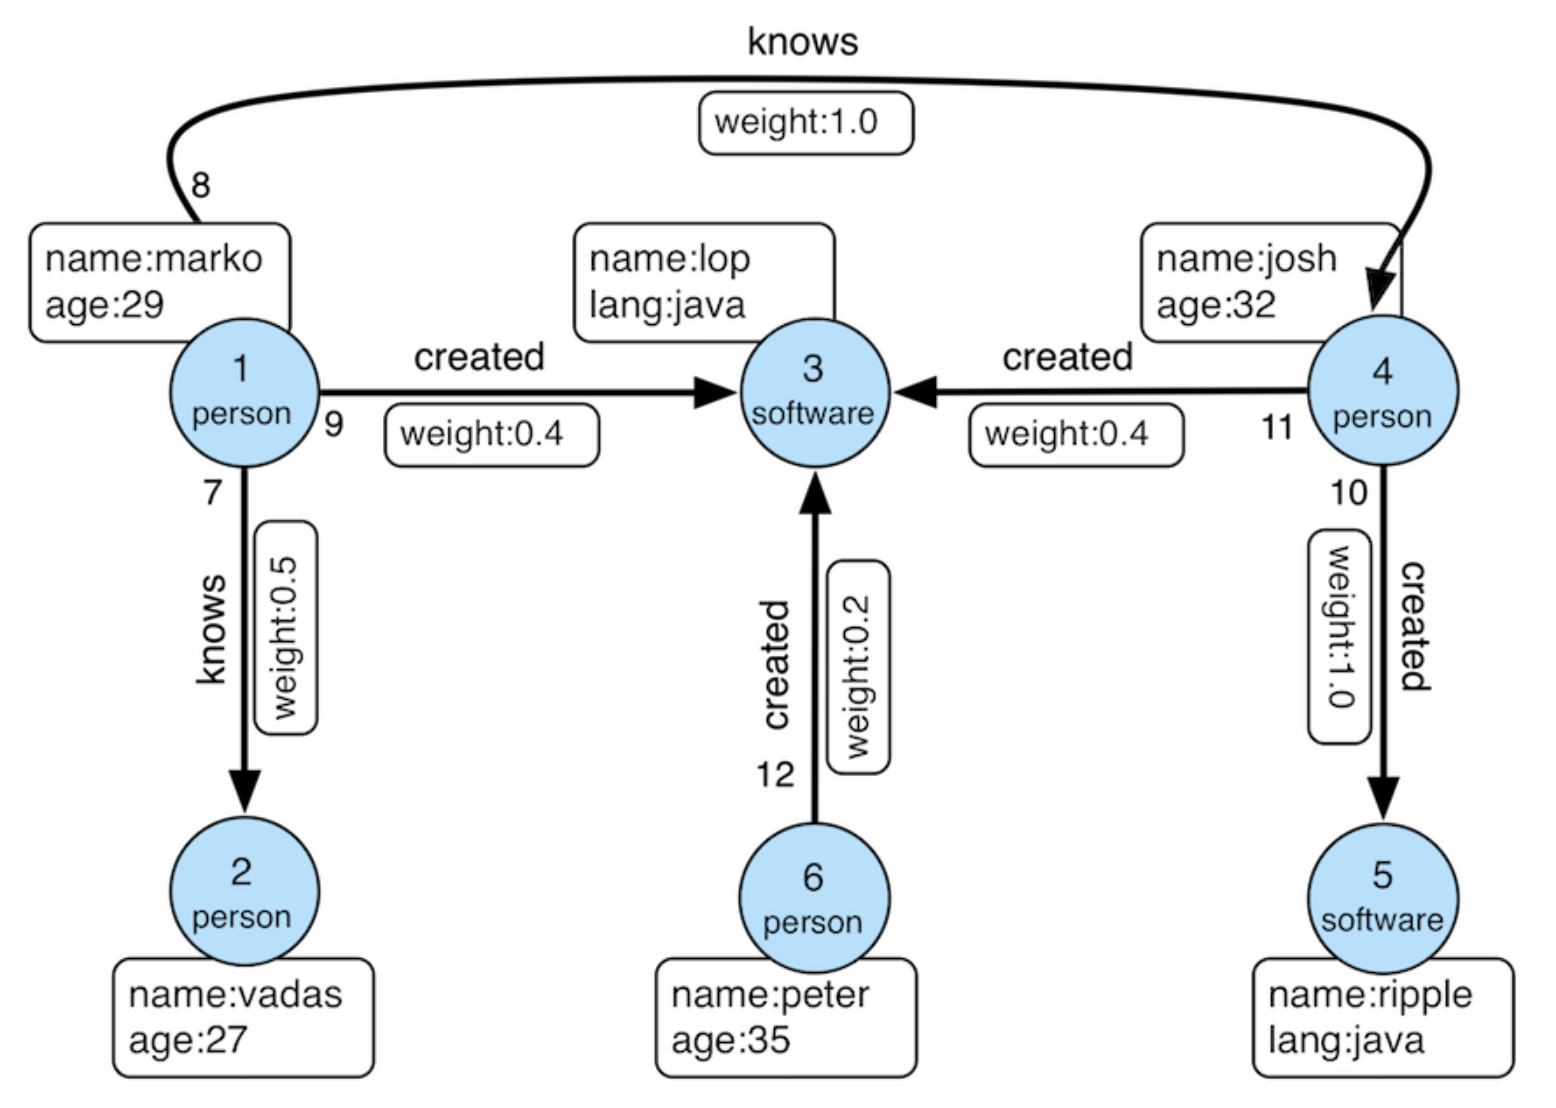
First, log into the PuppyGraph Web UI at http://localhost:8081 with the credentials configured above:
| Field | Value |
|---|---|
| Username | puppygraph |
| Password | puppygraph123 |
There are two ways to define the schema in PuppyGraph: build it interactively in the Schema Builder, or upload a JSON file directly. Pick whichever you prefer; both produce the same graph.
Build the graph in the Schema Builder
The Schema Builder is the visual editor in the PuppyGraph Web UI for adding catalogs, nodes, and edges step by step. It's the recommended path when you're modeling a graph for the first time or want to inspect what each click produces. For a deeper visual walkthrough of every dialog and field, see Modeling a Graph through the Schema Builder. The summary below covers what's needed to build the modern graph against this tutorial's SQL Server data.
Connecting to SQL Server
Click Create Catalog, then expand SQL Databases and pick SQL Server.
Fill in the connection form:
| Field | Value |
|---|---|
| Catalog name | mssql_data |
| Username | demouser |
| Password | DemoPassword123 |
| JDBC Connection String | jdbc:sqlserver://sql-server:1433;databaseName=DemoDB;encrypt=false; |
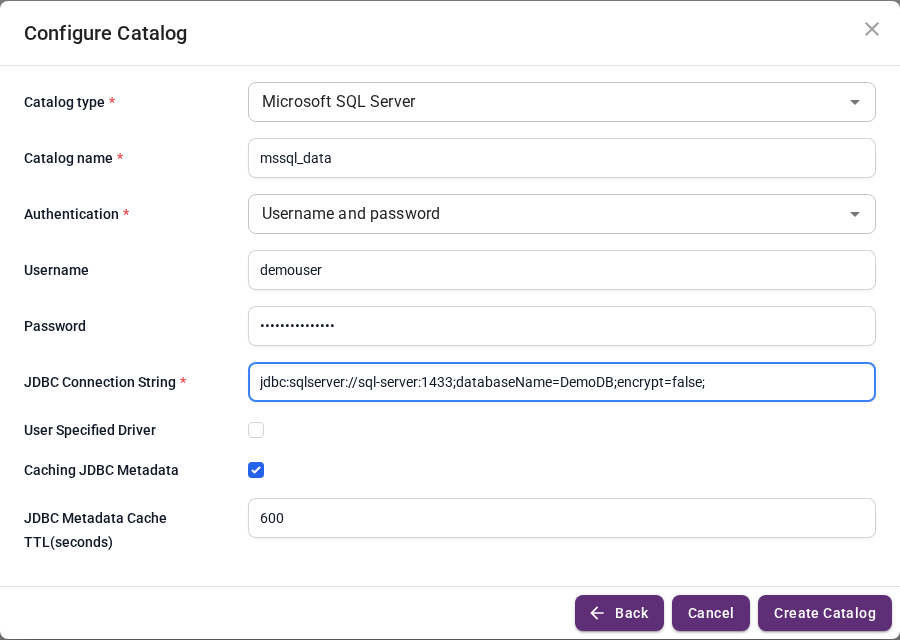
Click Create Catalog.
Adding nodes
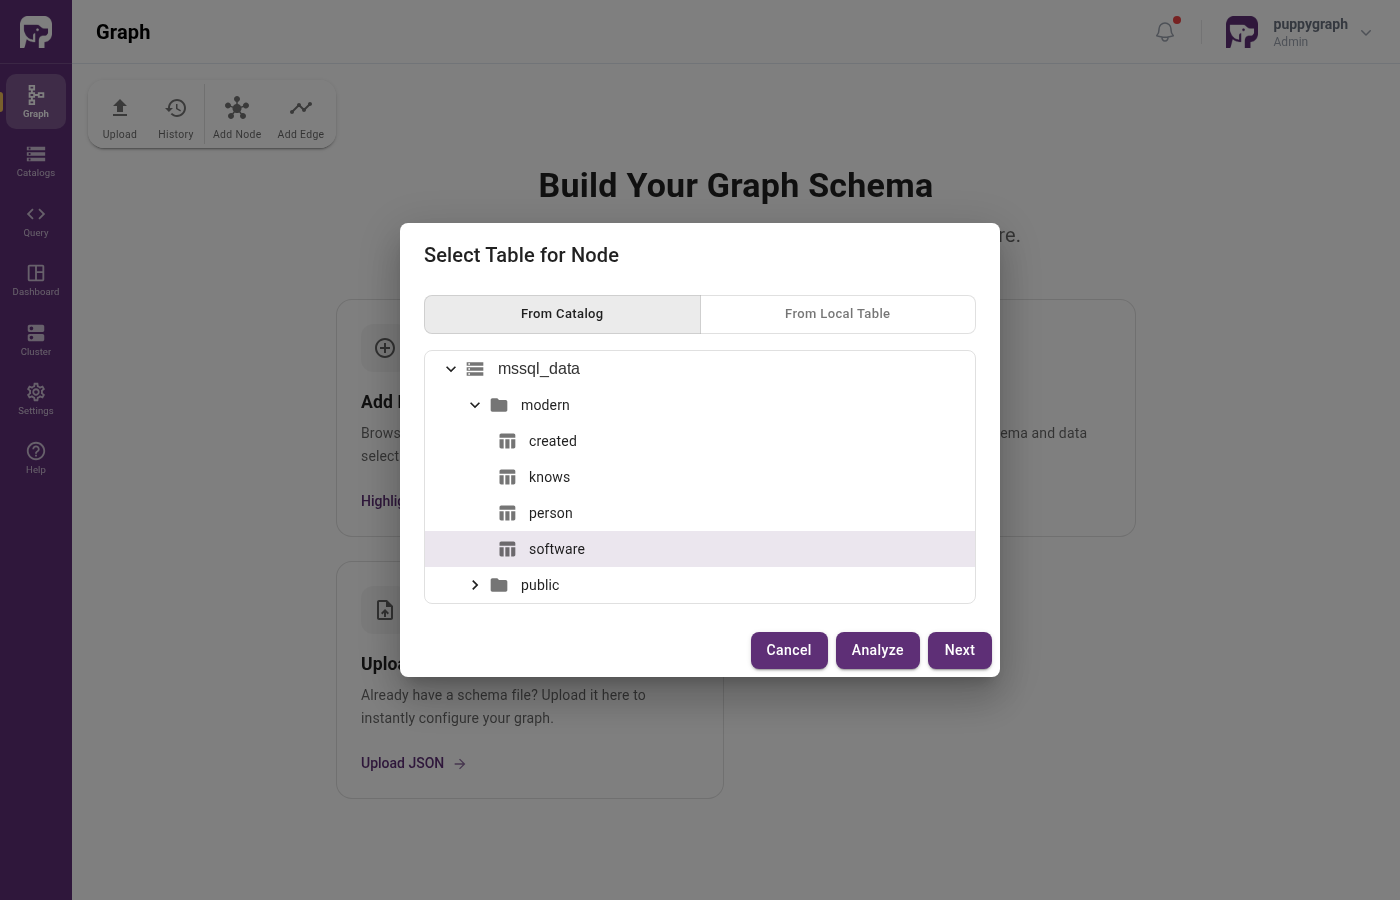
Click Add Node in the toolbar. The Select Table for Node dialog opens. Expand mssql_data then modern, pick software, then click Next.
In the Add Node wizard, click Add to ID and select id from the dropdown. The wizard moves id into ID Columns, leaving name and lang as attributes. Click Next, leave Enable Local Replication off, then click Add Node.
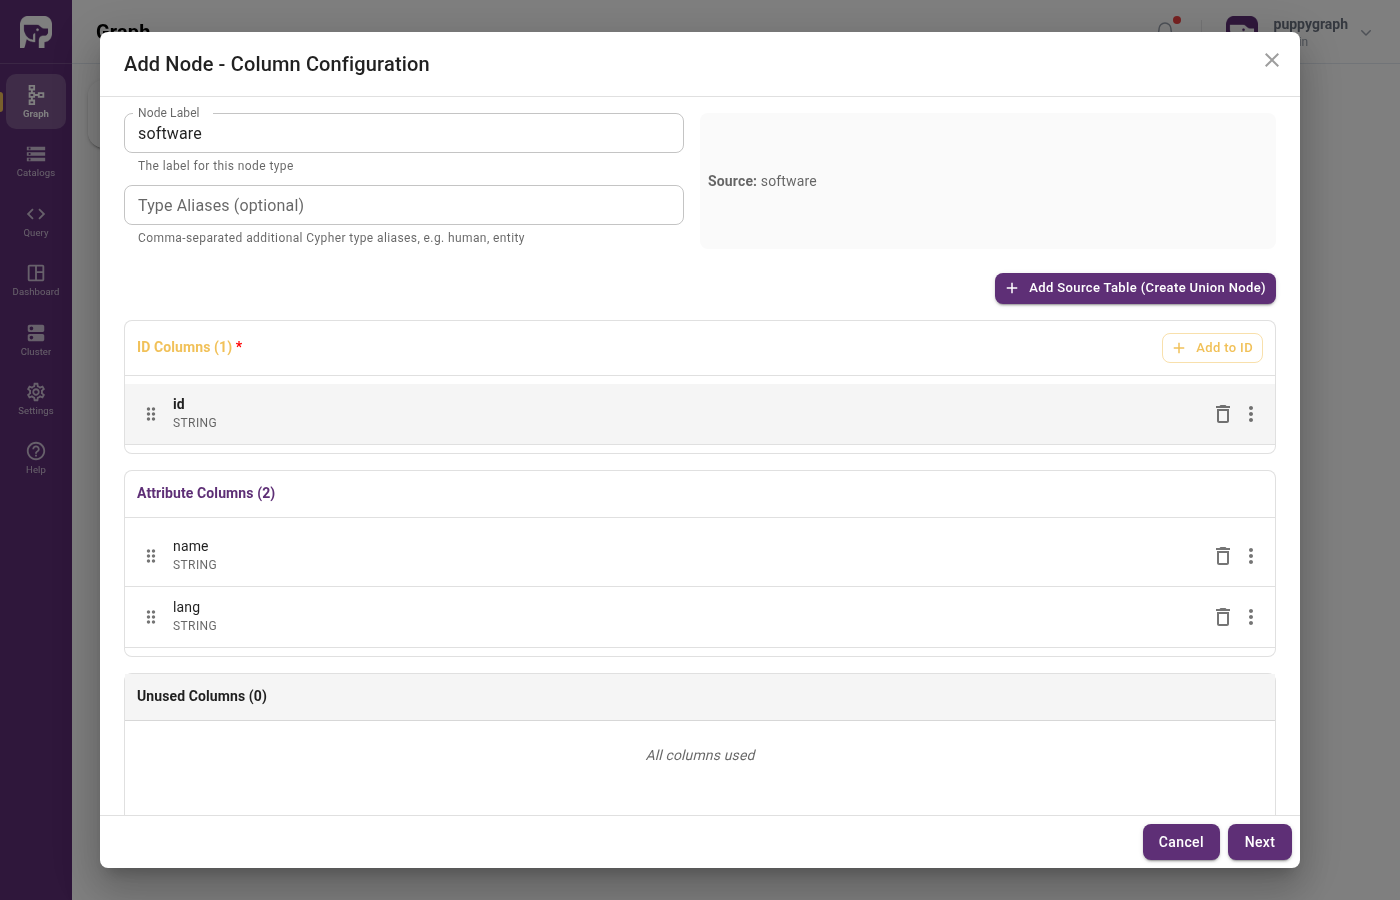
Repeat for person. The flow is the same: click Add Node, pick the table, click Next, assign id to ID Columns, leave replication off, click Add Node.
Adding edges
Click Add Edge in the toolbar, pick created from the catalog tree, then click Next.
In the Add Edge wizard, set:
| Field | Value |
|---|---|
| From Node | person |
| To Node | software |
FROM Select Column |
from_id |
TO Select Column |
to_id |
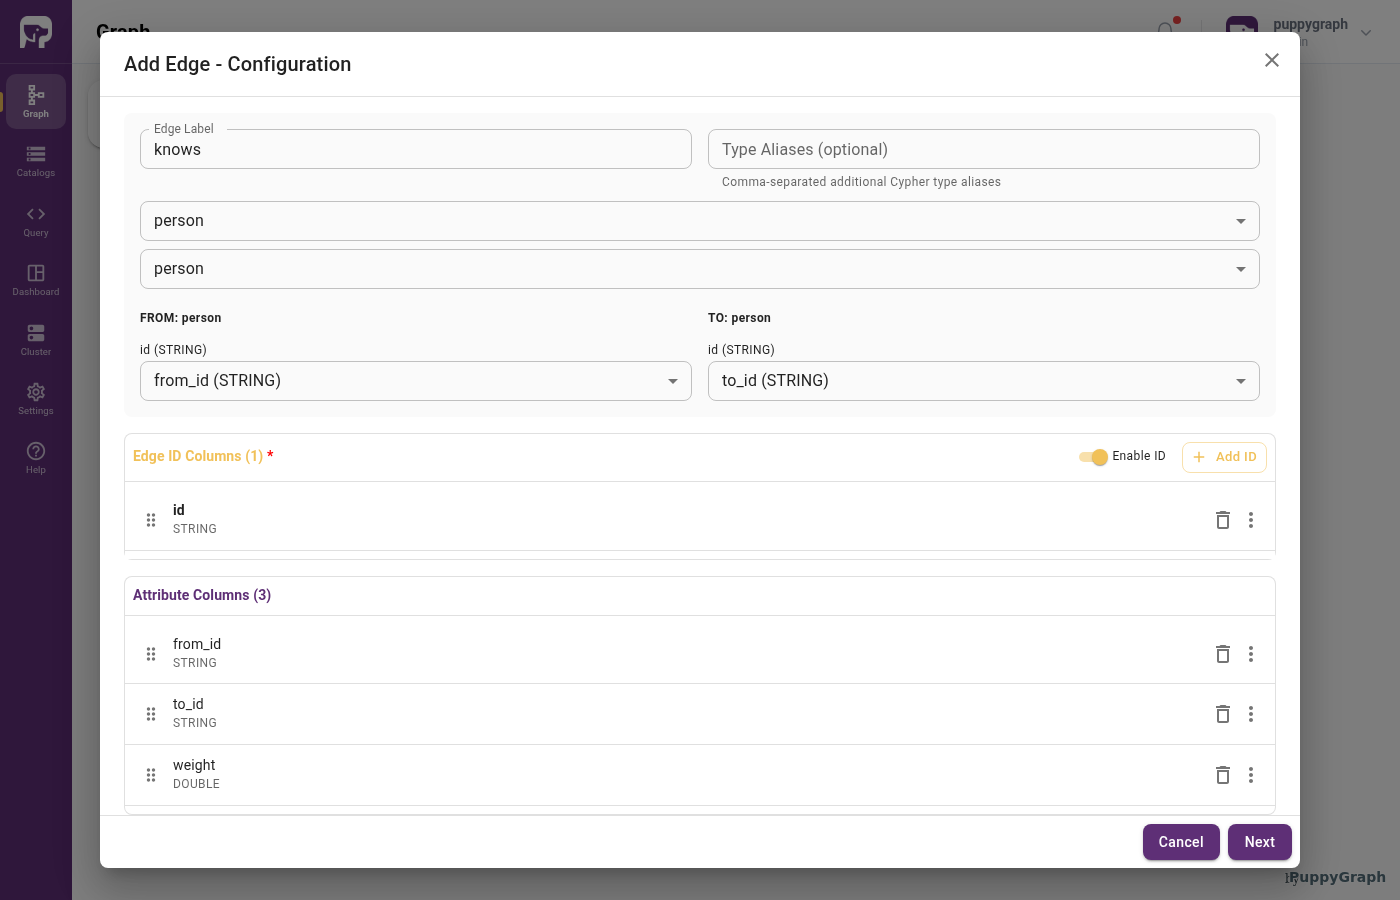
Click Add to ID and select id to set the edge identifier. Click Next, leave Enable Local Replication off, then click Add Edge.
Repeat for knows with both From Node and To Node set to person. The other settings are identical to created.
Upload a schema file
If you've already built the graph in the Schema Builder above, you can skip this section. The resulting schema is the same.
This method writes the full schema to a JSON file and uploads it directly. It's useful when you already have a schema for an environment and want to recreate it elsewhere (e.g. for CI, scripted setup, or copy-pasting between PuppyGraph instances).
Create a file schema.json with the following content:
schema.json
{
  "catalog": [
    {
      "name": "mssql_data",
      "type": "sqlserver",
      "jdbc": {
        "username": "demouser",
        "password": "DemoPassword123",
        "jdbcUri": "jdbc:sqlserver://sql-server:1433;databaseName=DemoDB;encrypt=false;"
      }
    }
  ],
  "node": [
    {
      "label": "software",
      "dataSourceGroup": {
        "externalDataSource": {
          "enabled": true,
          "catalog": "mssql_data",
          "schema": "modern",
          "table": "software",
          "mappedField": [
            { "sourceFieldName": "id",   "targetFieldName": "id"   },
            { "sourceFieldName": "name", "targetFieldName": "name" },
            { "sourceFieldName": "lang", "targetFieldName": "lang" }
          ]
        }
      },
      "id":        [{ "name": "id",   "type": "STRING" }],
      "attribute": [
        { "name": "name", "type": "STRING" },
        { "name": "lang", "type": "STRING" }
      ]
    },
    {
      "label": "person",
      "dataSourceGroup": {
        "externalDataSource": {
          "enabled": true,
          "catalog": "mssql_data",
          "schema": "modern",
          "table": "person",
          "mappedField": [
            { "sourceFieldName": "id",   "targetFieldName": "id"   },
            { "sourceFieldName": "name", "targetFieldName": "name" },
            { "sourceFieldName": "age",  "targetFieldName": "age"  }
          ]
        }
      },
      "id":        [{ "name": "id",   "type": "STRING" }],
      "attribute": [
        { "name": "name", "type": "STRING" },
        { "name": "age",  "type": "INT"    }
      ]
    }
  ],
  "edge": [
    {
      "label":         "created",
      "fromNodeLabel": "person",
      "toNodeLabel":   "software",
      "dataSourceGroup": {
        "externalDataSource": {
          "enabled": true,
          "catalog": "mssql_data",
          "schema": "modern",
          "table": "created",
          "mappedField": [
            { "sourceFieldName": "id",      "targetFieldName": "id"      },
            { "sourceFieldName": "from_id", "targetFieldName": "from_id" },
            { "sourceFieldName": "to_id",   "targetFieldName": "to_id"   },
            { "sourceFieldName": "weight",  "targetFieldName": "weight"  }
          ]
        }
      },
      "id":        [{ "name": "id",      "type": "STRING" }],
      "fromKey":   [{ "name": "from_id", "type": "STRING" }],
      "toKey":     [{ "name": "to_id",   "type": "STRING" }],
      "attribute": [
        { "name": "from_id", "type": "STRING" },
        { "name": "to_id",   "type": "STRING" },
        { "name": "weight",  "type": "DOUBLE" }
      ]
    },
    {
      "label":         "knows",
      "fromNodeLabel": "person",
      "toNodeLabel":   "person",
      "dataSourceGroup": {
        "externalDataSource": {
          "enabled": true,
          "catalog": "mssql_data",
          "schema": "modern",
          "table": "knows",
          "mappedField": [
            { "sourceFieldName": "id",      "targetFieldName": "id"      },
            { "sourceFieldName": "from_id", "targetFieldName": "from_id" },
            { "sourceFieldName": "to_id",   "targetFieldName": "to_id"   },
            { "sourceFieldName": "weight",  "targetFieldName": "weight"  }
          ]
        }
      },
      "id":        [{ "name": "id",      "type": "STRING" }],
      "fromKey":   [{ "name": "from_id", "type": "STRING" }],
      "toKey":     [{ "name": "to_id",   "type": "STRING" }],
      "attribute": [
        { "name": "from_id", "type": "STRING" },
        { "name": "to_id",   "type": "STRING" },
        { "name": "weight",  "type": "DOUBLE" }
      ]
    }
  ]
}
In the Web UI, click Graph in the sidebar, then Upload Schema, and select schema.json.
Upload via CLI
You can also POST the schema directly:
Querying the Graph
In the PuppyGraph Web UI, click Query in the sidebar. You can run graph queries in either Cypher or Gremlin.
The following query answers "What software was created by people that marko knows?"
There are two paths in the result: marko knows josh, who created lop and ripple.
Cleanup
Shut down and remove the containers: