Querying Snowflake Open Catalog Data as a Graph
Summary
In this tutorial, you will:
- Create a Snowflake Open Catalog and load example Iceberg tables into it via PySpark.
- Start a PuppyGraph container and connect it to the Open Catalog's REST endpoint.
- Run Cypher and Gremlin queries against the Open Catalog data as a graph.
Requires a Snowflake account and an S3 bucket
Snowflake Open Catalog is the managed Polaris-style Iceberg REST catalog Snowflake offers; it stores table data in an S3 bucket you own. PuppyGraph connects to the catalog's REST endpoint over OAuth2. See Connecting to Iceberg for the catalog reference.
Prerequisites
dockeris available on the host where you'll run PuppyGraph.- A Snowflake account; admin access is needed to create the Open Catalog account.
- An AWS account where you can create an S3 bucket, IAM policy, and IAM role.
pysparkinstalled locally (used once to load sample data into the Iceberg catalog).
Setup
Create an Open Catalog account
Adapted from the Snowflake Open Catalog documentation.
 Sign into Snowsight with an account admin, open a SQL worksheet, and run:
USE ROLE ORGADMIN;

CREATE ACCOUNT <account_name>
  ADMIN_NAME = <user_name>
  ADMIN_PASSWORD = '<user_password>'
  MUST_CHANGE_PASSWORD = FALSE
  EMAIL = '<user_email>'
  EDITION = standard
  REGION = <cloud_region>
  POLARIS = TRUE;
For the cloud_region value, you may run SHOW REGIONS and select the matching region. Example value is AWS_US_EAST_2.
From the response, take the host portion of accountLocatorUrl (everything between https:// and .snowflakecomputing.com, e.g. xxxxxx.us-east-1, or xxxxxx.us-east-2.aws) and save it as <account_locator_host>. You'll plug it into the Iceberg REST URI below as https://<account_locator_host>.snowflakecomputing.com/polaris/api/catalog.
Create an S3 bucket, IAM policy, IAM role, and Open Catalog
Follow Creating a catalog end-to-end:
- Create an S3 bucket and a folder (e.g.
s3://puppygraph-test/snowflake/). - Create an IAM policy that grants read/write on that bucket. In the AWS console, go to IAM > Policies > Create policy, choose the JSON editor, and paste a policy granting
s3:GetObject,s3:PutObject,s3:DeleteObject, ands3:ListBucketon your bucket ARN and its objects (arn:aws:s3:::your-bucket-nameandarn:aws:s3:::your-bucket-name/*). - Create an IAM role trusted by your AWS account; attach the policy. In the AWS console, go to IAM > Roles > Create role, select AWS account as the trusted entity type, enter your account ID, and attach the policy you just created. Note the role ARN.
- In Open Catalog, create the catalog (Storage Provider = S3, with the role ARN and the bucket path).
- From the catalog's storage details, copy the
External IDandIAM user ARN. - Update the IAM role's trust policy: go back to IAM > Roles, find your role, open the Trust relationships tab, and click Edit trust policy. Replace the principal with the IAM user ARN from Open Catalog, and add a
"sts:ExternalId"condition with the External ID. This allows Open Catalog to assume the role.
In addition to the IAM role used by Open Catalog, you also need an IAM user (or a separate IAM role) with read access to the bucket to provide PuppyGraph with credentials in the next steps.
Create an IAM user for PuppyGraph: go to IAM > Users > Create user, attach a policy with s3:GetObject and s3:ListBucket on your bucket, then open the user's Security credentials tab and click Create access key. Choose Application running outside AWS, then save the Access key ID and Secret access key. You will need them when connecting PuppyGraph to the catalog.
Create a principal role, catalog role, and namespace
In Open Catalog, create a Principal role, a Catalog role, and a namespace named modern. Grant all privileges on the namespace to the catalog role, then grant the catalog role to the principal role. (See Step 7 in Creating a catalog.)
Create a service-connection client ID and secret
In Open Catalog, click Connections → + Connection. Select the principal role you just created. Save the Client ID and Client Secret that Open Catalog shows you - they're shown only once.
Load sample data with PySpark
PySpark version and AWS_REGION
This script requires PySpark 3.x. PySpark 4 is not compatible with the Iceberg runtime packages used here. Install with:
You also need theAWS_REGION environment variable set to the region of your S3 bucket before running the script:
Save the following as load.py (replace the placeholders with your Open Catalog details):
load.py
from pyspark.sql import SparkSession

spark = (
  SparkSession.builder.appName("puppygraph_load")
    .config("spark.jars.packages", (
      "org.apache.iceberg:iceberg-spark-runtime-3.5_2.12:1.4.1,"
      "software.amazon.awssdk:s3:2.17.260,"
      "software.amazon.awssdk:sts:2.17.260,"
      "software.amazon.awssdk:glue:2.17.260,"
      "software.amazon.awssdk:kms:2.17.260"
    ))
    .config("spark.sql.extensions", "org.apache.iceberg.spark.extensions.IcebergSparkSessionExtensions")
    .config("spark.sql.defaultCatalog", "opencatalog")
    .config("spark.sql.catalog.opencatalog", "org.apache.iceberg.spark.SparkCatalog")
    .config("spark.sql.catalog.opencatalog.type", "rest")
    .config("spark.sql.catalog.opencatalog.uri", "https://<account_locator_host>.snowflakecomputing.com/polaris/api/catalog")
    .config("spark.sql.catalog.opencatalog.header.X-Iceberg-Access-Delegation", "vended-credentials")
    .config("spark.sql.catalog.opencatalog.credential", "<client_id>:<client_secret>")
    .config("spark.sql.catalog.opencatalog.warehouse", "<catalog_name>")
    .config("spark.sql.catalog.opencatalog.scope", "PRINCIPAL_ROLE:<principal_role_name>")
    .getOrCreate()
)

spark.sql("CREATE TABLE IF NOT EXISTS opencatalog.modern.person (id STRING, name STRING, age INT)")
spark.sql("""
  INSERT INTO opencatalog.modern.person VALUES
    ('v1', 'marko', 29), ('v2', 'vadas', 27),
    ('v4', 'josh', 32),  ('v6', 'peter', 35)
""")

spark.sql("CREATE TABLE IF NOT EXISTS opencatalog.modern.software (id STRING, name STRING, lang STRING)")
spark.sql("INSERT INTO opencatalog.modern.software VALUES ('v3','lop','java'),('v5','ripple','java')")

spark.sql("""
  CREATE TABLE IF NOT EXISTS opencatalog.modern.created
  (id STRING, from_id STRING, to_id STRING, weight DOUBLE)
""")
spark.sql("""
  INSERT INTO opencatalog.modern.created VALUES
    ('e9','v1','v3',0.4),('e10','v4','v5',1.0),
    ('e11','v4','v3',0.4),('e12','v6','v3',0.2)
""")

spark.sql("""
  CREATE TABLE IF NOT EXISTS opencatalog.modern.knows
  (id STRING, from_id STRING, to_id STRING, weight DOUBLE)
""")
spark.sql("""
  INSERT INTO opencatalog.modern.knows VALUES
    ('e7','v1','v2',0.5),('e8','v1','v4',1.0)
""")

spark.stop()
| id | name | age |
|---|---|---|
| v1 | marko | 29 |
| v2 | vadas | 27 |
| v4 | josh | 32 |
| v6 | peter | 35 |
| id | name | lang |
|---|---|---|
| v3 | lop | java |
| v5 | ripple | java |
| id | from_id | to_id | weight |
|---|---|---|---|
| e9 | v1 | v3 | 0.4 |
| e10 | v4 | v5 | 1.0 |
| e11 | v4 | v3 | 0.4 |
| e12 | v6 | v3 | 0.2 |
| id | from_id | to_id | weight |
|---|---|---|---|
| e7 | v1 | v2 | 0.5 |
| e8 | v1 | v4 | 1.0 |
Start PuppyGraph
Start the PuppyGraph container:
docker run -d --name puppygraph \
  -p 8081:8081 -p 8182:8182 -p 7687:7687 \
  -e PUPPYGRAPH_USERNAME=puppygraph \
  -e PUPPYGRAPH_PASSWORD=puppygraph123 \
  --pull=always puppygraph/puppygraph:latest
Default password
Change PUPPYGRAPH_PASSWORD before running on a publicly accessible machine.
Modeling a Graph
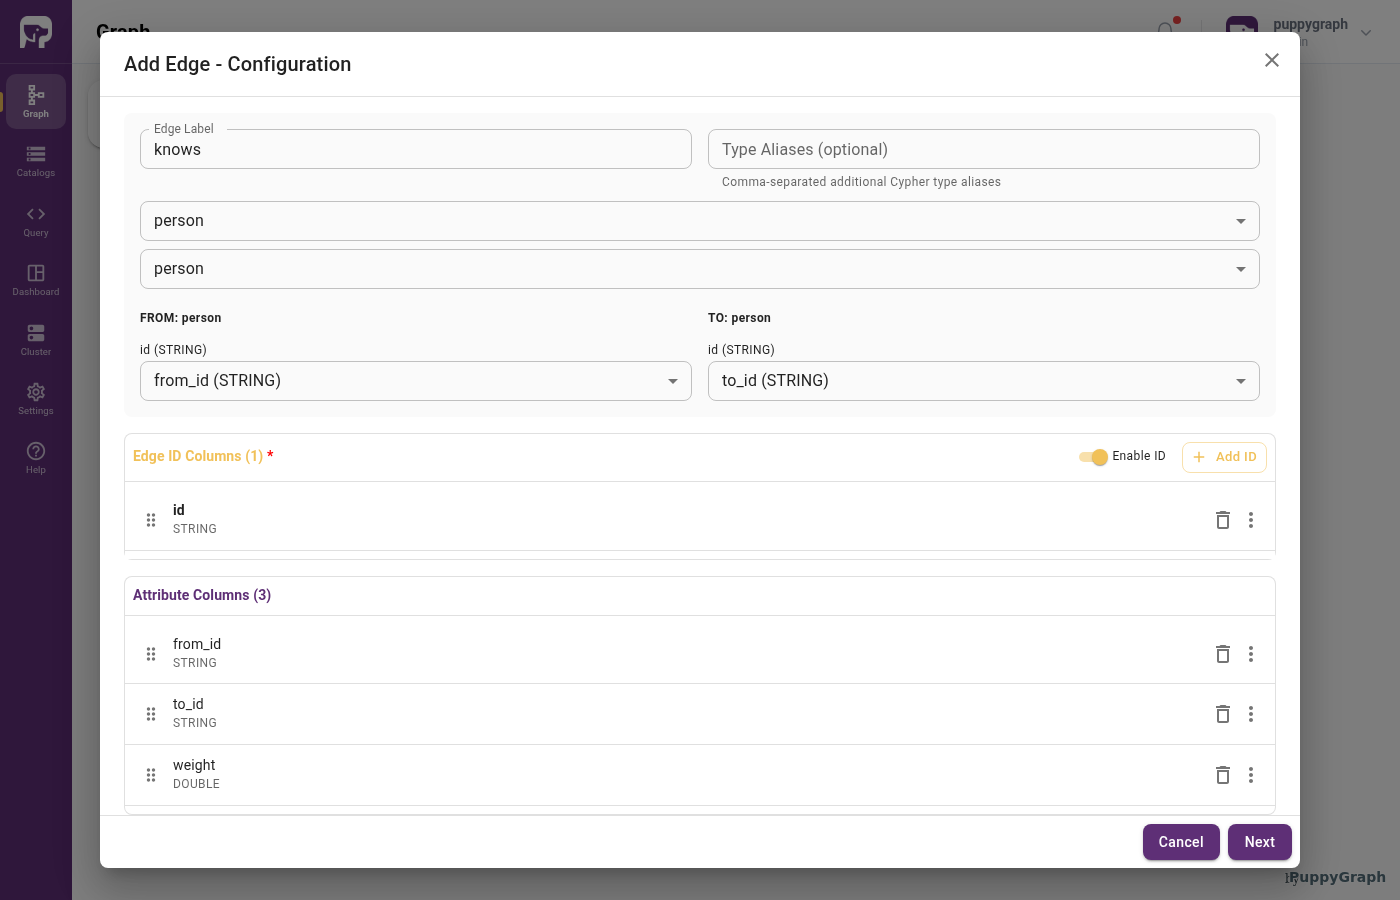
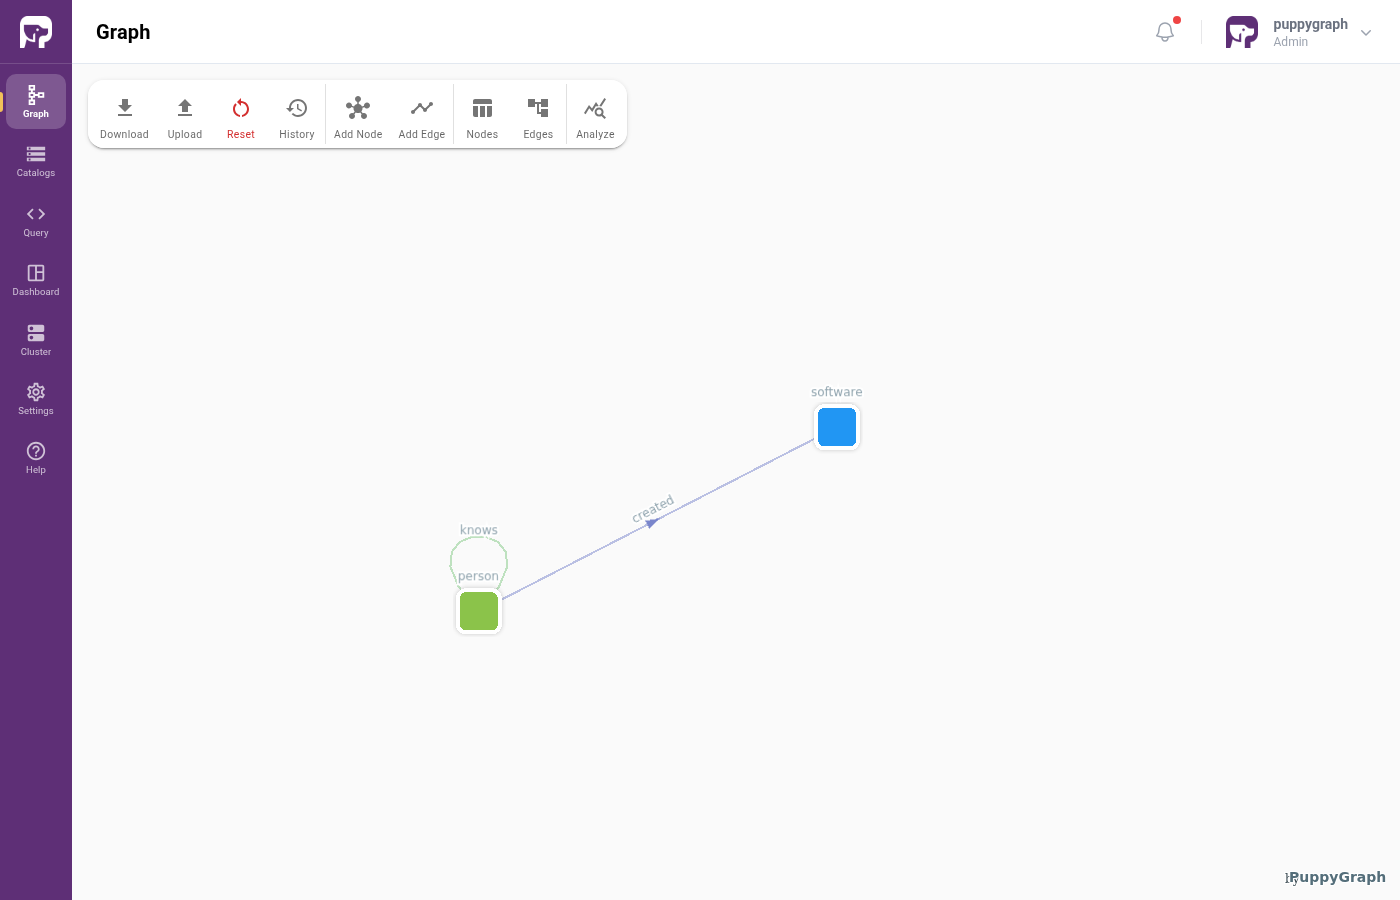
We model the data as the TinkerPop modern graph: two node types (person, software) and two edge types (knows, created).
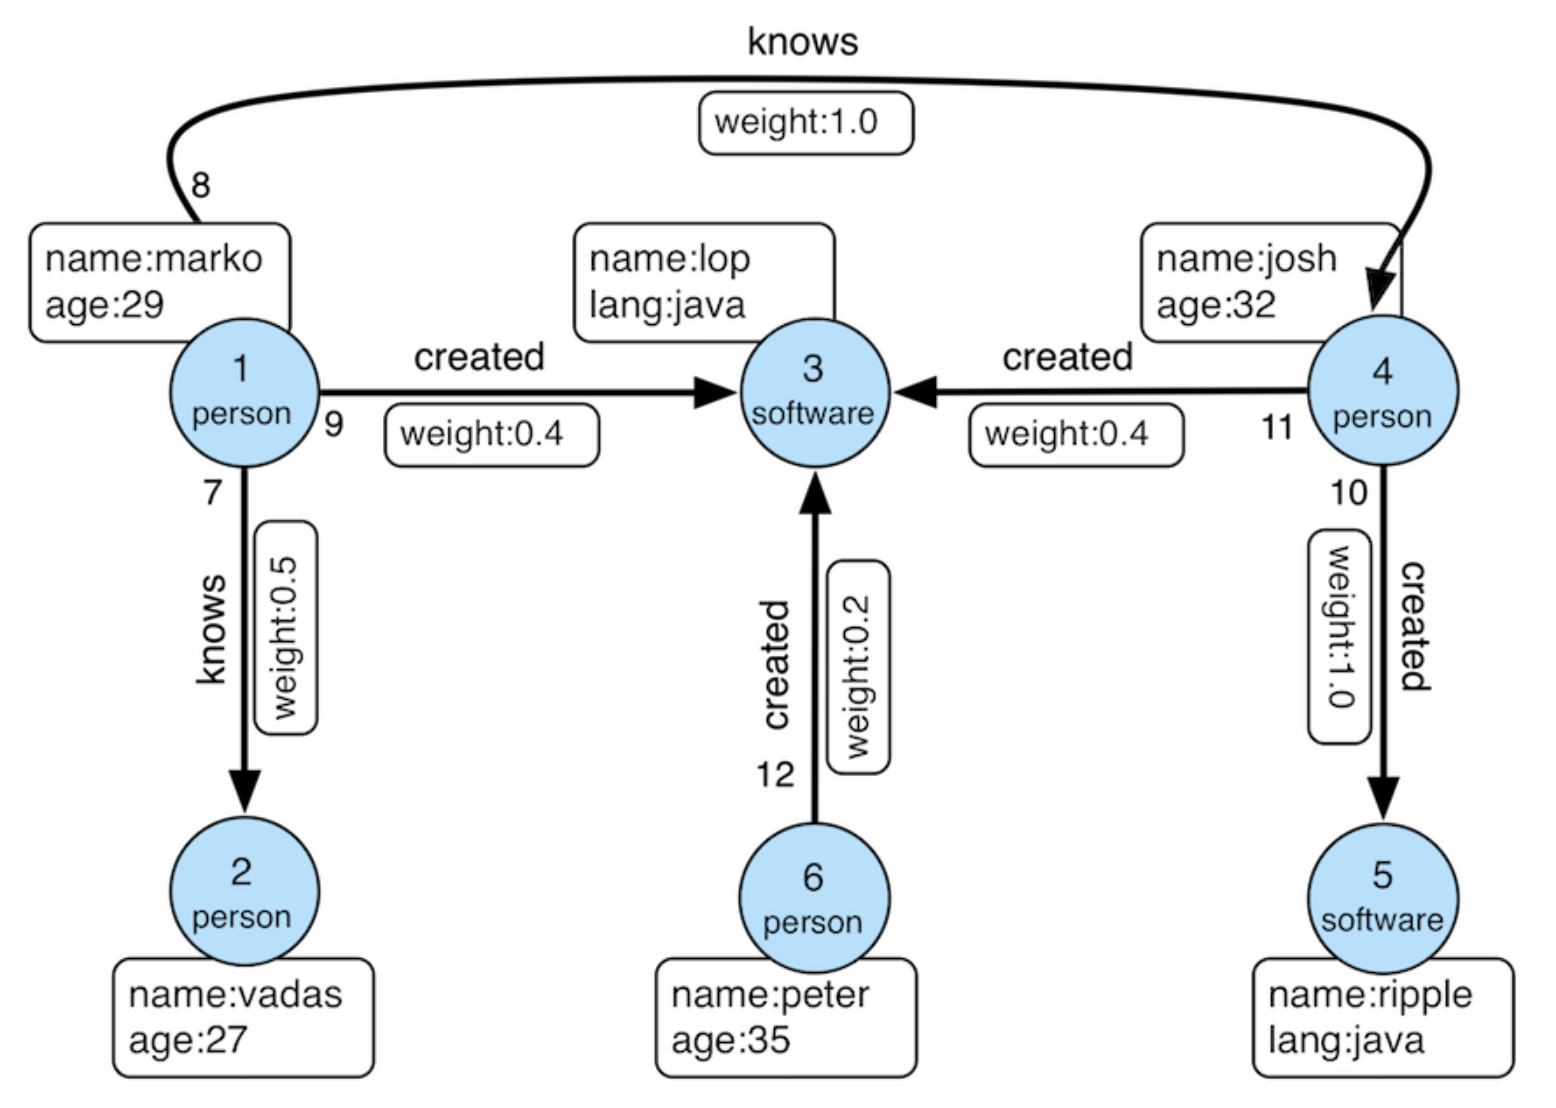
Log into the PuppyGraph Web UI at http://localhost:8081 with puppygraph / puppygraph123.
Build the graph in the Schema Builder
Click Create Catalog, then expand Data Lakes and pick Apache Iceberg.
Fill in the connection form. The same values you handed to PySpark above:
| Field | Value |
|---|---|
| Catalog name | open_catalog_data |
| Metastore type | Iceberg REST |
| REST Endpoint URL | https://<account_locator_host>.snowflakecomputing.com/polaris/api/catalog |
| REST Warehouse | <catalog_name> |
| Authentication Type | OAuth 2.0 Client Credentials |
| OAuth 2.0 Credential | <client_id>:<client_secret> |
| OAuth 2.0 Scope | PRINCIPAL_ROLE:<principal_role_name> |
| Storage type | Amazon S3 |
| Region | (your S3 bucket region, e.g. us-east-1) |
| S3 Authentication Type | AWS access keys |
| Access key | (IAM user access key with read access to the bucket) |
| Secret key | (matching secret key) |
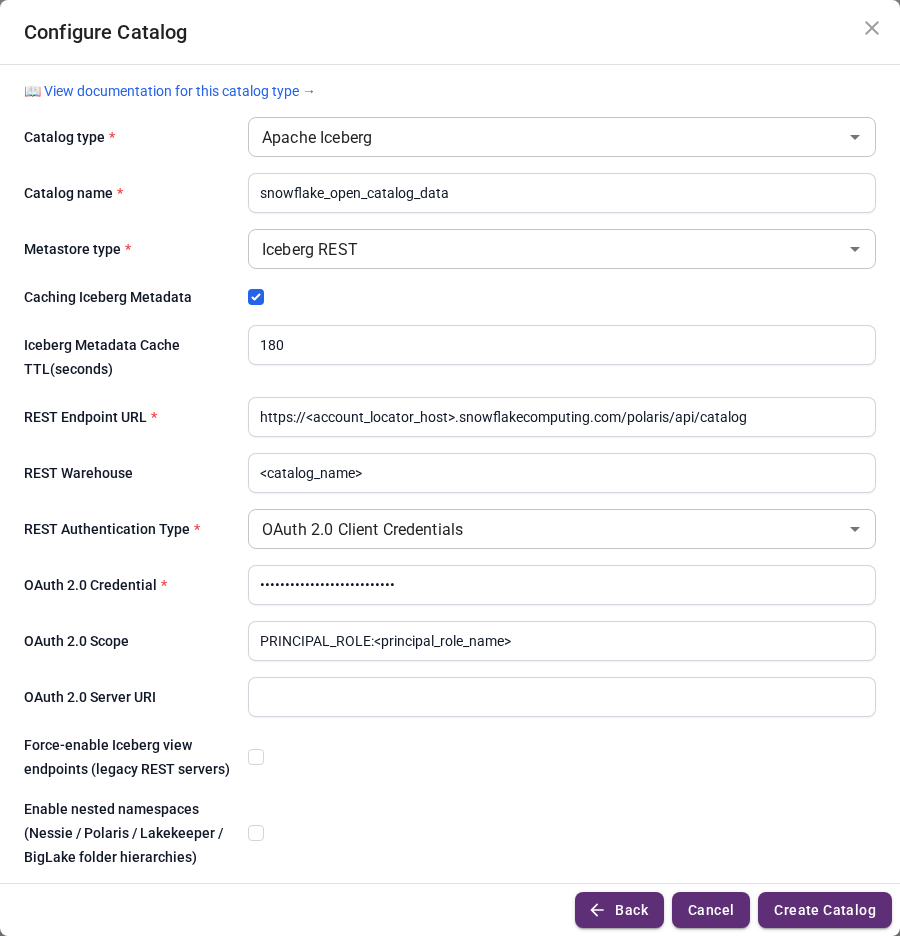
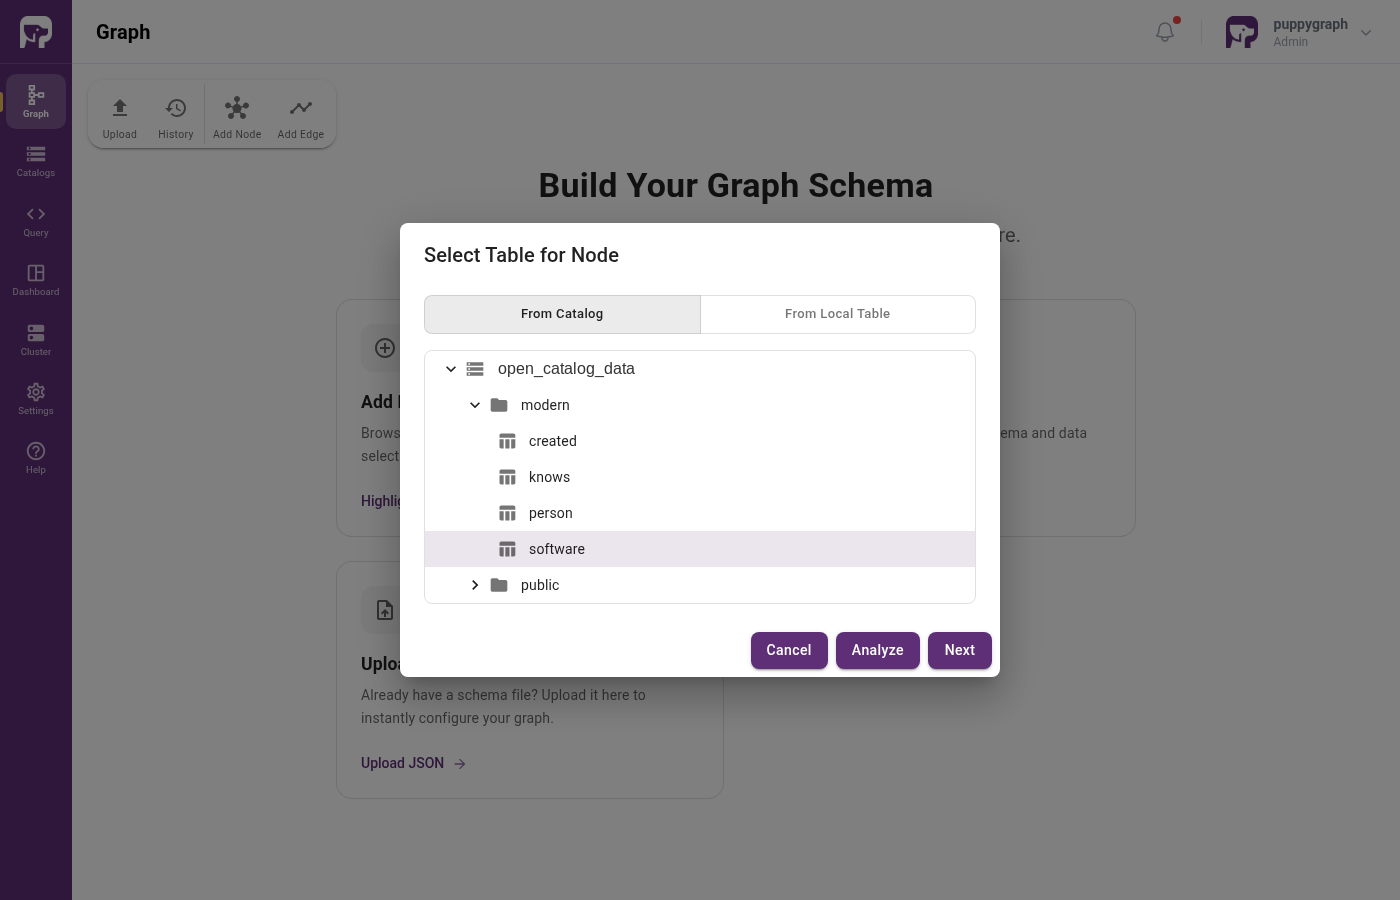
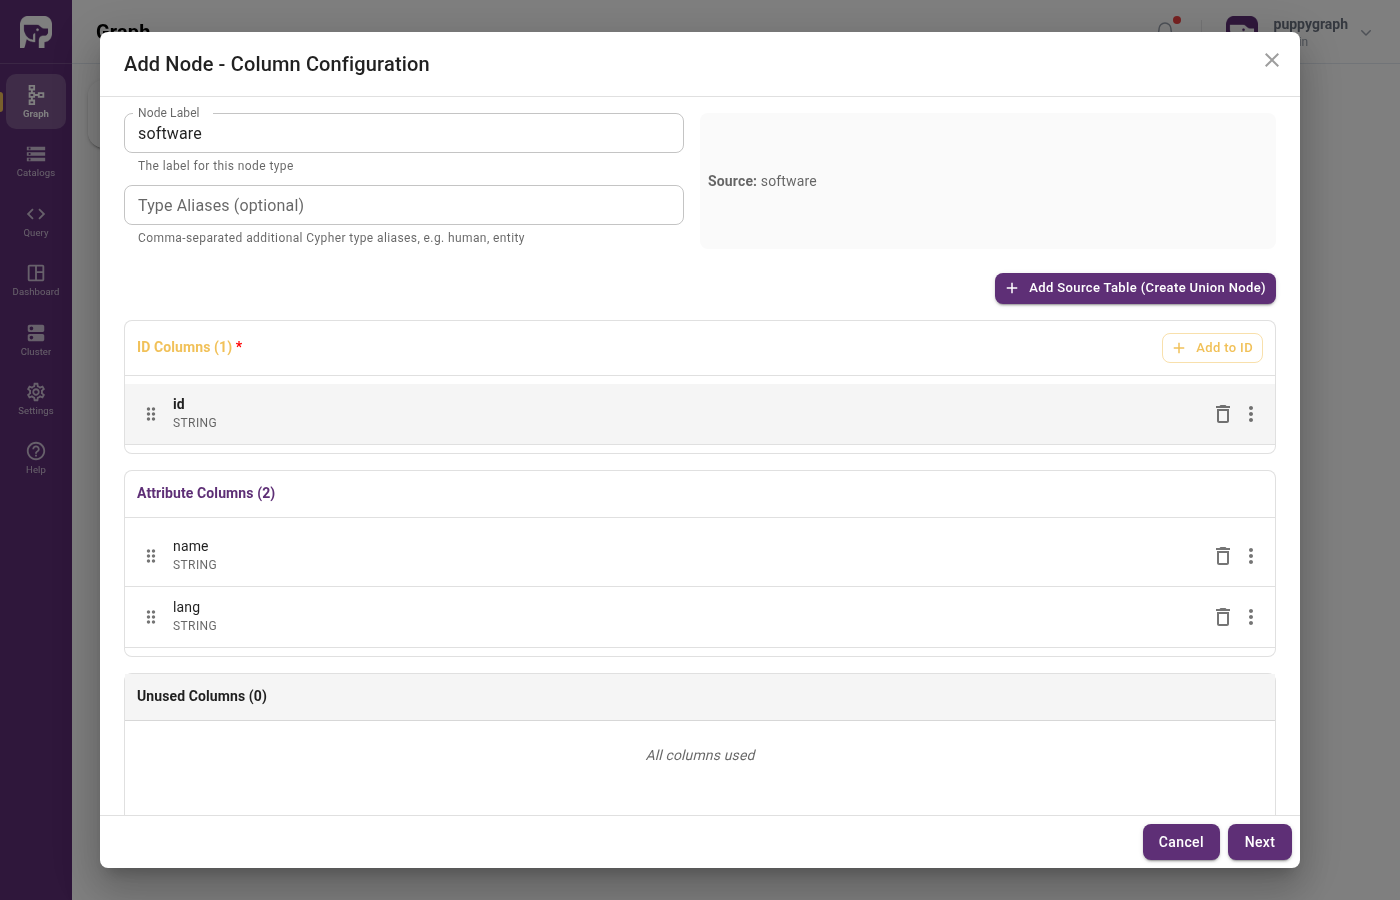
Click Create Catalog, then add the person / software nodes and created / knows edges.
Upload a schema file
Create a file schema.json with the following content. Replace the placeholders with the same Open Catalog values you used in PySpark, plus the IAM credentials that read your S3 bucket:
schema.json
{
  "catalog": [
    {
      "name": "open_catalog_data",
      "type": "iceberg",
      "metastore": {
        "type": "rest",
        "uri": "https://<account_locator_host>.snowflakecomputing.com/polaris/api/catalog",
        "warehouse": "<catalog_name>",
        "security": "oauth2",
        "credential": "<client_id>:<client_secret>",
        "scope": "PRINCIPAL_ROLE:<principal_role_name>"
      },
      "storage": {
        "type": "S3",
        "useInstanceProfile": "false",
        "region": "<region>",
        "accessKey": "<aws_access_key>",
        "secretKey": "<aws_secret_key>",
        "enableSsl": "true"
      }
    }
  ],
  "node": [
    {
      "label": "software",
      "dataSourceGroup": {
        "externalDataSource": {
          "enabled": true,
          "catalog": "open_catalog_data",
          "schema": "modern",
          "table": "software",
          "mappedField": [
            { "sourceFieldName": "id",   "targetFieldName": "id"   },
            { "sourceFieldName": "name", "targetFieldName": "name" },
            { "sourceFieldName": "lang", "targetFieldName": "lang" }
          ]
        }
      },
      "id":        [{ "name": "id",   "type": "STRING" }],
      "attribute": [
        { "name": "name", "type": "STRING" },
        { "name": "lang", "type": "STRING" }
      ]
    },
    {
      "label": "person",
      "dataSourceGroup": {
        "externalDataSource": {
          "enabled": true,
          "catalog": "open_catalog_data",
          "schema": "modern",
          "table": "person",
          "mappedField": [
            { "sourceFieldName": "id",   "targetFieldName": "id"   },
            { "sourceFieldName": "name", "targetFieldName": "name" },
            { "sourceFieldName": "age",  "targetFieldName": "age"  }
          ]
        }
      },
      "id":        [{ "name": "id",   "type": "STRING" }],
      "attribute": [
        { "name": "name", "type": "STRING" },
        { "name": "age",  "type": "INT"    }
      ]
    }
  ],
  "edge": [
    {
      "label":         "created",
      "fromNodeLabel": "person",
      "toNodeLabel":   "software",
      "dataSourceGroup": {
        "externalDataSource": {
          "enabled": true,
          "catalog": "open_catalog_data",
          "schema": "modern",
          "table": "created",
          "mappedField": [
            { "sourceFieldName": "id",      "targetFieldName": "id"      },
            { "sourceFieldName": "from_id", "targetFieldName": "from_id" },
            { "sourceFieldName": "to_id",   "targetFieldName": "to_id"   },
            { "sourceFieldName": "weight",  "targetFieldName": "weight"  }
          ]
        }
      },
      "id":        [{ "name": "id",      "type": "STRING" }],
      "fromKey":   [{ "name": "from_id", "type": "STRING" }],
      "toKey":     [{ "name": "to_id",   "type": "STRING" }],
      "attribute": [
        { "name": "from_id", "type": "STRING" },
        { "name": "to_id",   "type": "STRING" },
        { "name": "weight",  "type": "DOUBLE" }
      ]
    },
    {
      "label":         "knows",
      "fromNodeLabel": "person",
      "toNodeLabel":   "person",
      "dataSourceGroup": {
        "externalDataSource": {
          "enabled": true,
          "catalog": "open_catalog_data",
          "schema": "modern",
          "table": "knows",
          "mappedField": [
            { "sourceFieldName": "id",      "targetFieldName": "id"      },
            { "sourceFieldName": "from_id", "targetFieldName": "from_id" },
            { "sourceFieldName": "to_id",   "targetFieldName": "to_id"   },
            { "sourceFieldName": "weight",  "targetFieldName": "weight"  }
          ]
        }
      },
      "id":        [{ "name": "id",      "type": "STRING" }],
      "fromKey":   [{ "name": "from_id", "type": "STRING" }],
      "toKey":     [{ "name": "to_id",   "type": "STRING" }],
      "attribute": [
        { "name": "from_id", "type": "STRING" },
        { "name": "to_id",   "type": "STRING" },
        { "name": "weight",  "type": "DOUBLE" }
      ]
    }
  ]
}
In the Web UI, click Graph in the sidebar, then Upload Schema, and select schema.json.
Upload via CLI
Querying the Graph
In the PuppyGraph Web UI, click Query in the sidebar. You can run graph queries in either Cypher or Gremlin.
The following query answers "What software was created by people that marko knows?"
Cleanup
Stop the PuppyGraph container:
Drop the demo tables and namespace from Open Catalog. Optionally delete the S3 bucket and the Open Catalog account when you're done.