Querying Amazon S3 Tables Data as a Graph
Summary
In this tutorial, you will:
- Create Amazon S3 Tables (managed Iceberg) and load them with example data.
- Start a PuppyGraph container and connect it to the S3 Tables bucket.
- Run Cypher and Gremlin queries against the S3 Tables data as a graph.
Requires a real AWS account
PuppyGraph reads S3 Tables through the AWS-hosted Iceberg REST catalog. This tutorial assumes you can create an S3 Tables bucket and an IAM access key with the right permissions in your own AWS account. See Connecting to Iceberg for the catalog reference.
Prerequisites
dockeris available on the host where you'll run PuppyGraph.- An AWS account with permission to create S3 Tables, plus AWS CLI v2 installed and configured.
- An IAM identity with at least
AmazonS3TablesReadOnlyAccess, or equivalent permissions, on the table bucket you'll create.
It's strongly recommended to read Getting started with S3 Tables first to become familiar with table buckets, namespaces, and the AWS Analytics integrations.
Setup
Create a Table Bucket and namespace
 Follow Step 1 in Getting started with S3 Tables to create a Table Bucket. Make sure Enable integration is selected so you can query the tables from Amazon Athena.
Create a namespace using the AWS CLI. Replace <table-bucket-arn> with your bucket's ARN (format: arn:aws:s3tables:<region>:<account-id>:bucket/<table-bucket-name>):
Create tables
Create one Iceberg table per node and edge type:
aws s3tables create-table --cli-input-json file://person.json
aws s3tables create-table --cli-input-json file://software.json
aws s3tables create-table --cli-input-json file://knows.json
aws s3tables create-table --cli-input-json file://created.json
Use these table definitions (replace <table-bucket-arn>):
person.json
software.json
knows.json
{
  "tableBucketARN": "<table-bucket-arn>",
  "namespace": "modern",
  "name": "knows",
  "format": "ICEBERG",
  "metadata": {
    "iceberg": {
      "schema": {
        "fields": [
          { "name": "id",      "type": "string", "required": true },
          { "name": "from_id", "type": "string", "required": true },
          { "name": "to_id",   "type": "string", "required": true },
          { "name": "weight",  "type": "double" }
        ]
      }
    }
  }
}
created.json
{
  "tableBucketARN": "<table-bucket-arn>",
  "namespace": "modern",
  "name": "created",
  "format": "ICEBERG",
  "metadata": {
    "iceberg": {
      "schema": {
        "fields": [
          { "name": "id",      "type": "string", "required": true },
          { "name": "from_id", "type": "string", "required": true },
          { "name": "to_id",   "type": "string", "required": true },
          { "name": "weight",  "type": "double" }
        ]
      }
    }
  }
}
Insert data
In the AWS Management Console, open Amazon Athena and select the workgroup connected to your S3 Tables bucket (see Querying S3 Tables with Athena). In the query editor, set Data source to the table-bucket entry (typically s3tablescatalog/<bucket>) and Database to modern so the unqualified table names below resolve correctly, then run:
INSERT INTO modern.person VALUES
  ('v1', 'marko', 29),
  ('v2', 'vadas', 27),
  ('v4', 'josh',  32),
  ('v6', 'peter', 35);

INSERT INTO modern.software VALUES
  ('v3', 'lop',    'java'),
  ('v5', 'ripple', 'java');

INSERT INTO modern.created VALUES
  ('e9',  'v1', 'v3', 0.4),
  ('e10', 'v4', 'v5', 1.0),
  ('e11', 'v4', 'v3', 0.4),
  ('e12', 'v6', 'v3', 0.2);

INSERT INTO modern.knows VALUES
  ('e7', 'v1', 'v2', 0.5),
  ('e8', 'v1', 'v4', 1.0);
| id | name | age |
|---|---|---|
| v1 | marko | 29 |
| v2 | vadas | 27 |
| v4 | josh | 32 |
| v6 | peter | 35 |
| id | name | lang |
|---|---|---|
| v3 | lop | java |
| v5 | ripple | java |
| id | from_id | to_id | weight |
|---|---|---|---|
| e9 | v1 | v3 | 0.4 |
| e10 | v4 | v5 | 1.0 |
| e11 | v4 | v3 | 0.4 |
| e12 | v6 | v3 | 0.2 |
| id | from_id | to_id | weight |
|---|---|---|---|
| e7 | v1 | v2 | 0.5 |
| e8 | v1 | v4 | 1.0 |
Start PuppyGraph
Start the PuppyGraph container:
docker run -d --name puppygraph \
  -p 8081:8081 -p 8182:8182 -p 7687:7687 \
  -e PUPPYGRAPH_USERNAME=puppygraph \
  -e PUPPYGRAPH_PASSWORD=puppygraph123 \
  --pull=always puppygraph/puppygraph:latest
Default password
Change PUPPYGRAPH_PASSWORD before running on a publicly accessible machine.
Modeling a Graph
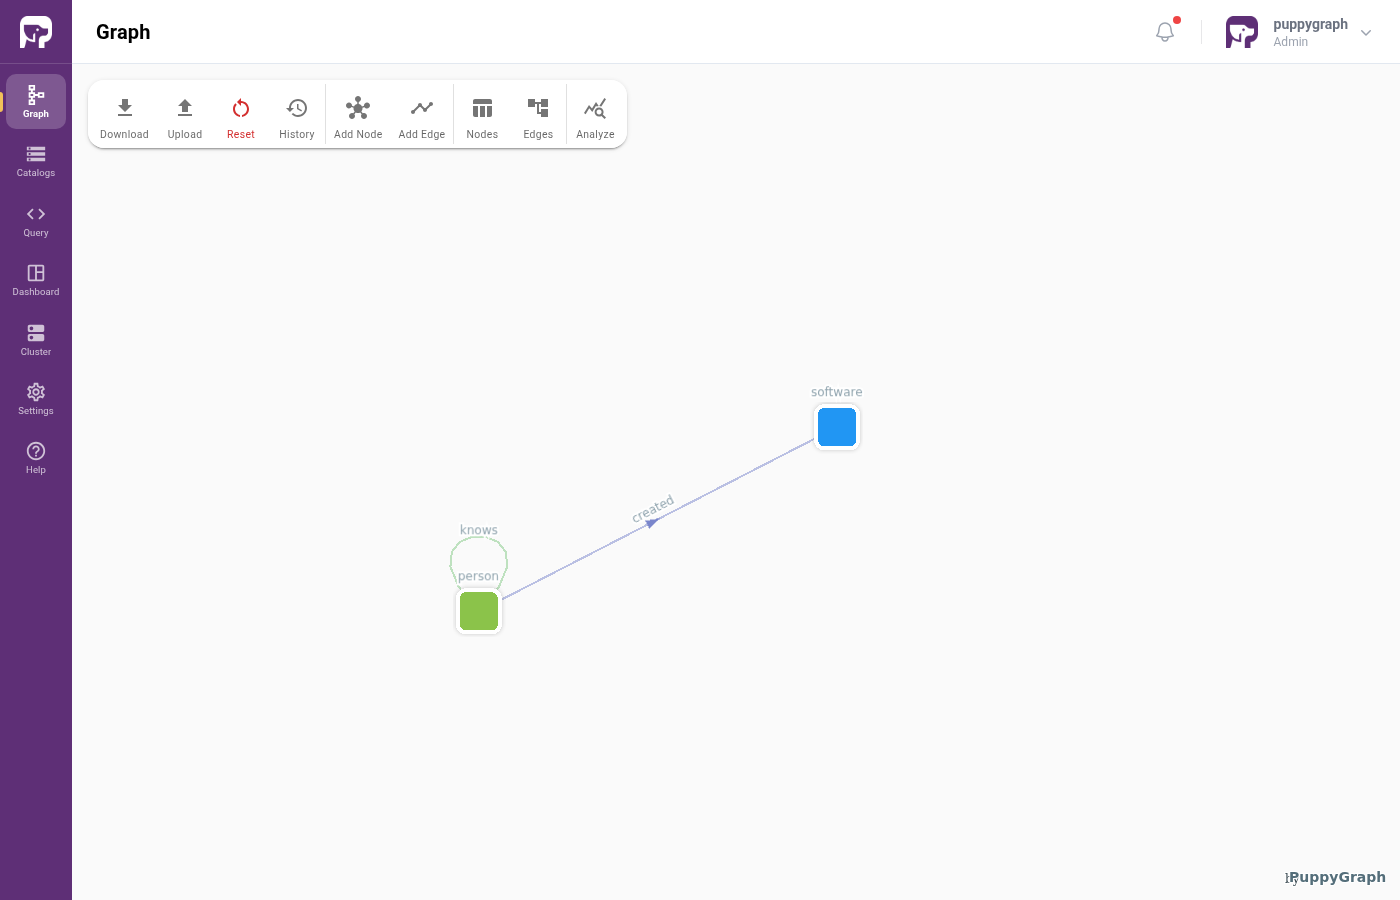
We model the data as the TinkerPop modern graph: two node types (person, software) and two edge types (knows, created).
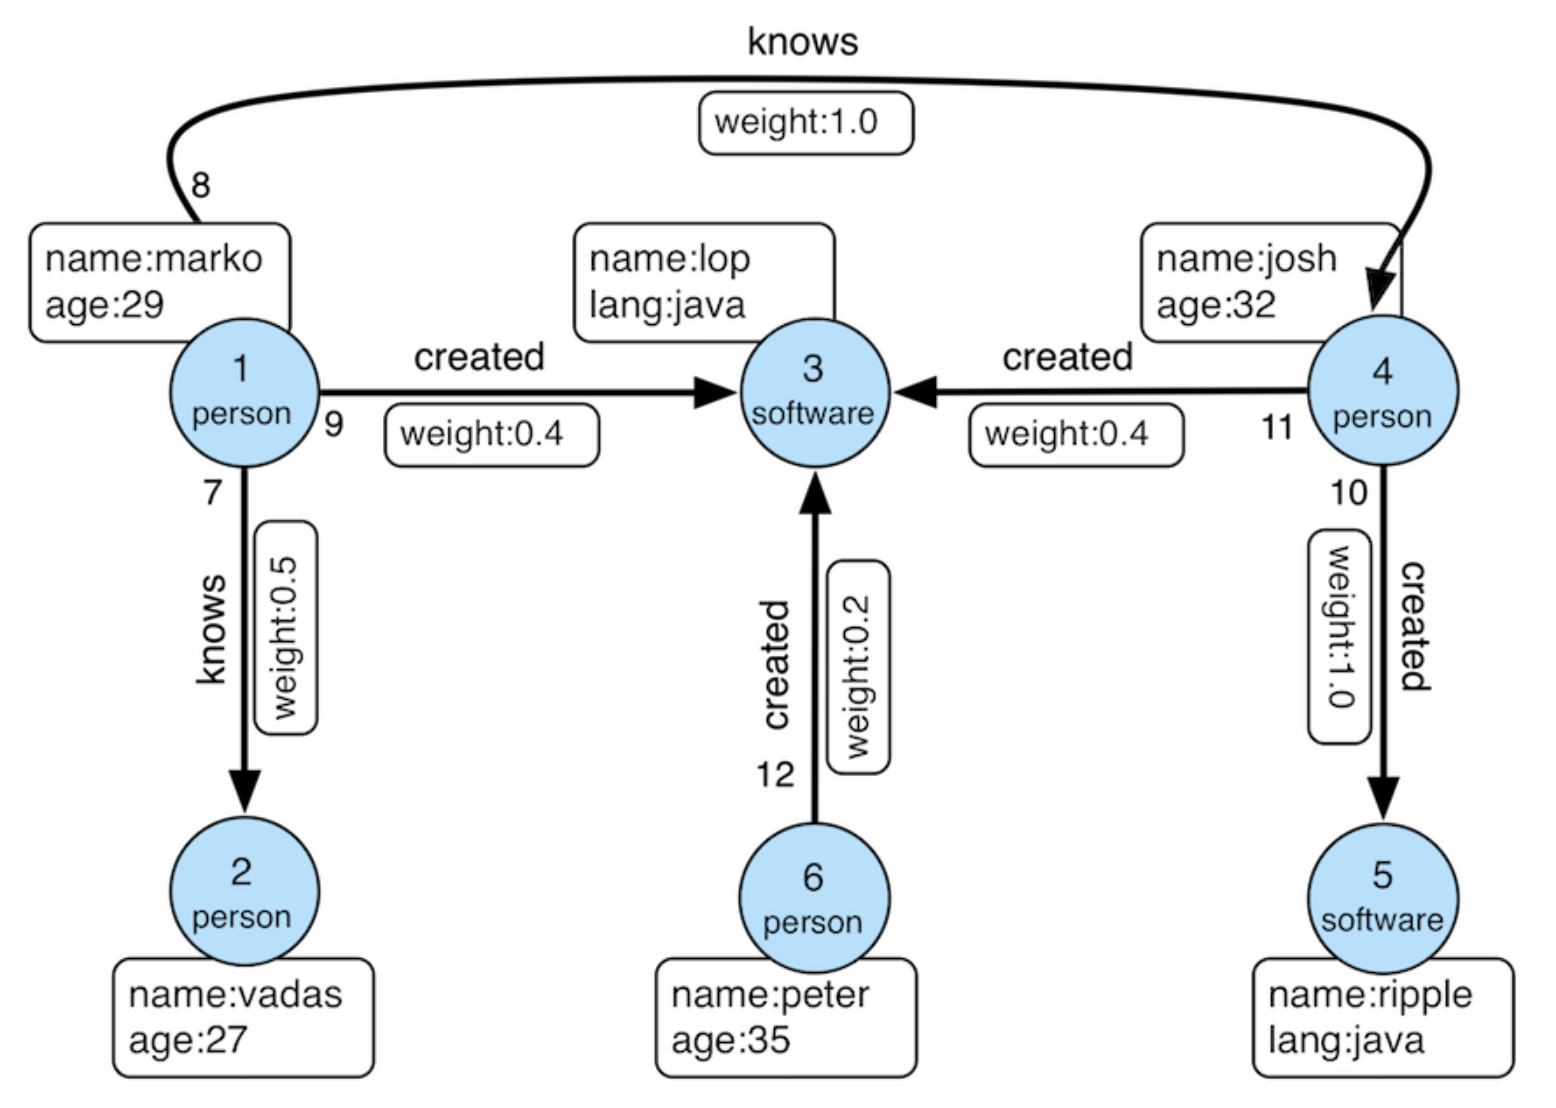
Log into the PuppyGraph Web UI at http://localhost:8081 with puppygraph / puppygraph123.
Build the graph in the Schema Builder
Click Create Catalog, then expand Data Lakes and pick Apache Iceberg.
Fill in the connection form (replace placeholders with your AWS region, IAM credentials, and table bucket ARN):
| Field | Value |
|---|---|
| Catalog name | s3_tables_data |
| Metastore type | AWS S3 Tables Catalog |
| S3 Tables Authentication Type | AWS access keys |
| Region | (your region, e.g. us-east-1) |
| Access key | (your AWS access key) |
| Secret key | (your AWS secret key) |
| Warehouse | <table-bucket-arn> |
| Storage type | Amazon S3 |
| S3 Authentication Type | AWS access keys |
| Region (S3 Storage) | (your region, e.g. us-east-1) |
| Access key (S3 Storage) | (your AWS access key) |
| Secret key (S3 Storage) | (your AWS secret key) |
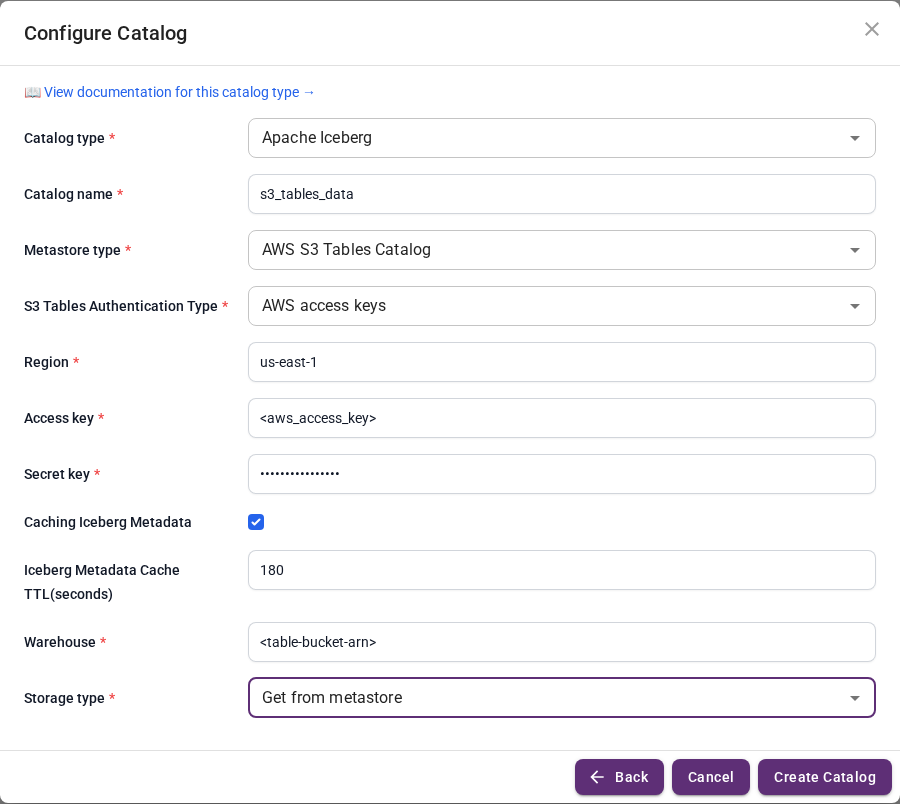
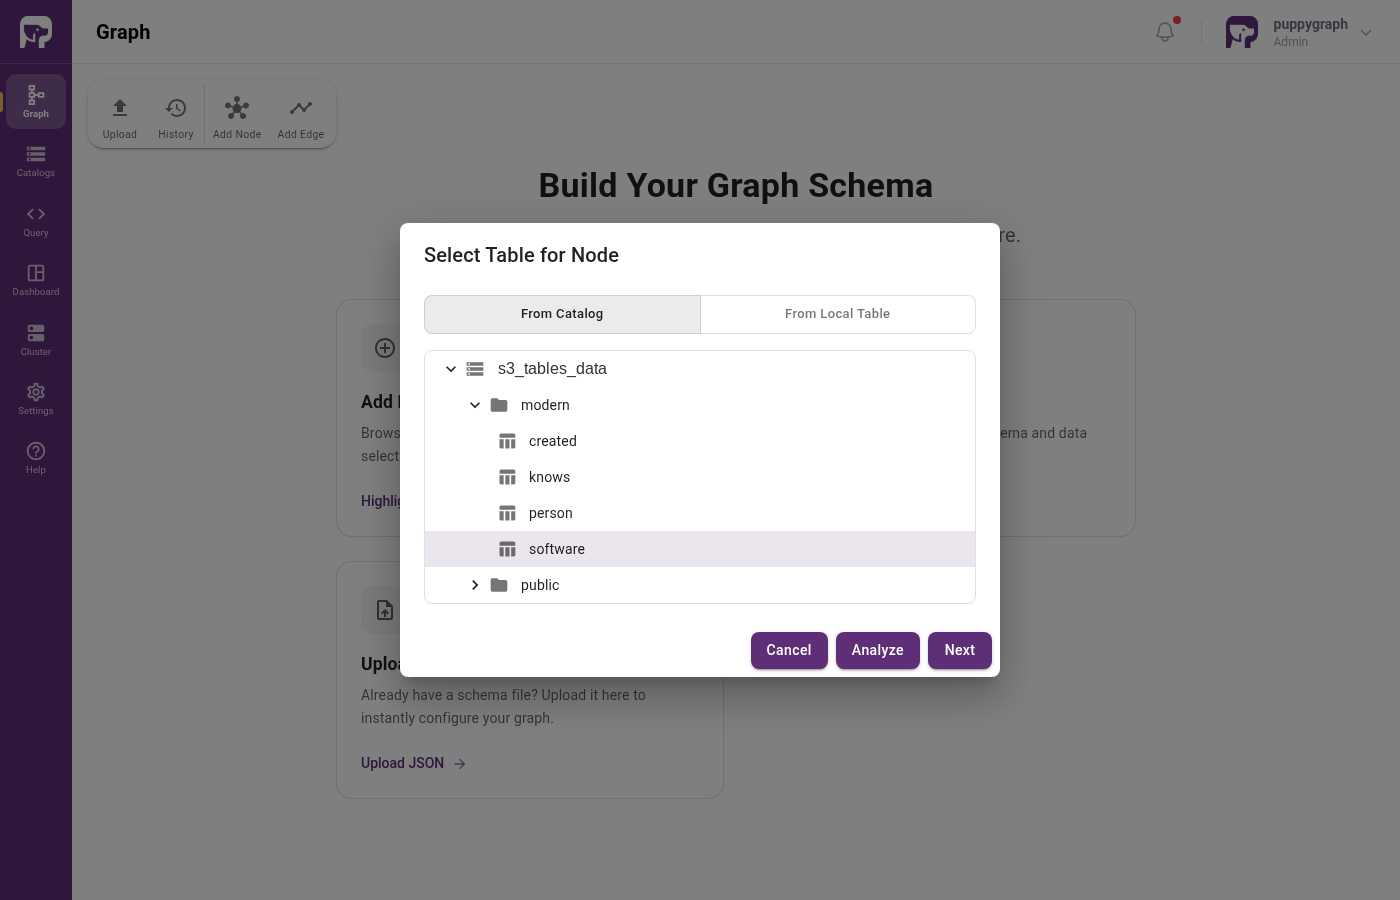
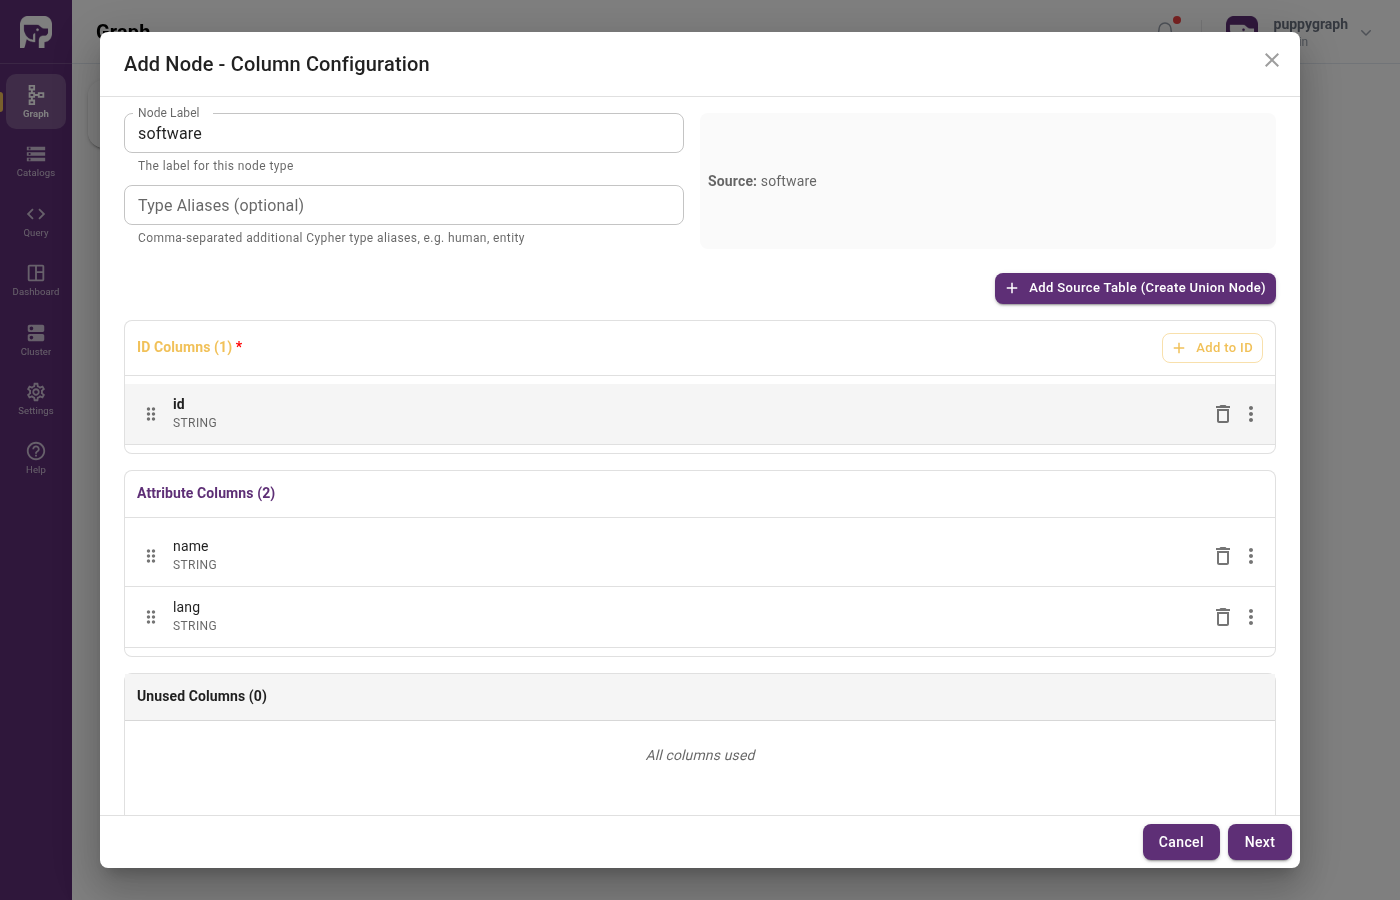
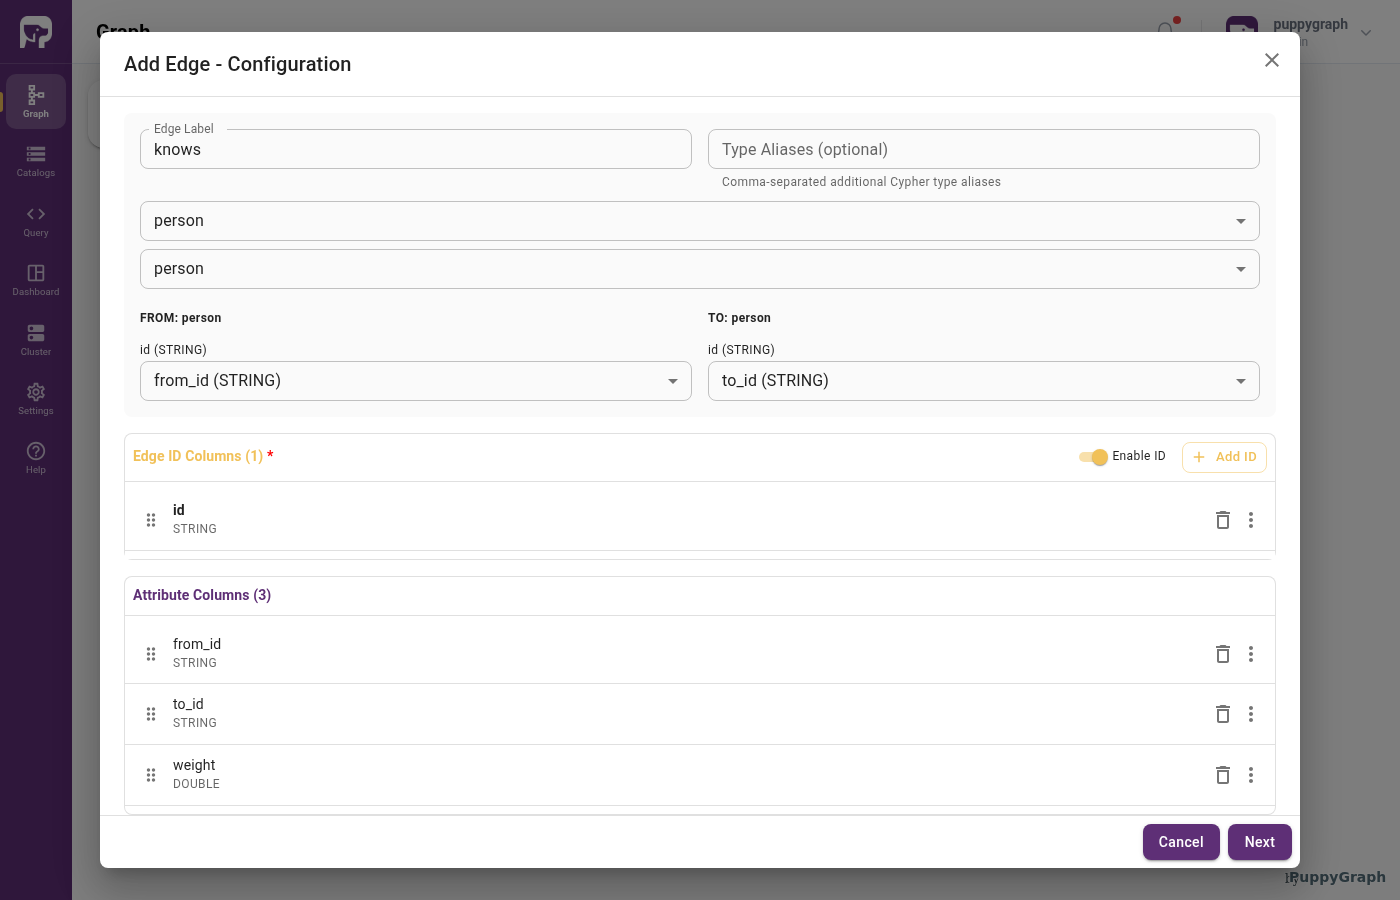
Click Create Catalog, then add the person and software nodes followed by the created and knows edges.
Upload a schema file
Create a file schema.json with the following content. Replace the region, access key, secret key, and table-bucket ARN with your AWS values:
schema.json
{
  "catalog": [
    {
      "name": "s3_tables_data",
      "type": "iceberg",
      "metastore": {
        "type": "s3tables",
        "useInstanceProfile": "false",
        "region": "<region>",
        "accessKey": "<aws_access_key>",
        "secretKey": "<aws_secret_key>",
        "warehouse": "<table-bucket-arn>"
      },
      "storage": {
        "type": "S3",
        "useInstanceProfile": "false",
        "region": "<region>",
        "accessKey": "<aws_access_key>",
        "secretKey": "<aws_secret_key>",
        "enableSsl": "true"
      }
    }
  ],
  "node": [
    {
      "label": "software",
      "dataSourceGroup": {
        "externalDataSource": {
          "enabled": true,
          "catalog": "s3_tables_data",
          "schema": "modern",
          "table": "software",
          "mappedField": [
            { "sourceFieldName": "id",   "targetFieldName": "id"   },
            { "sourceFieldName": "name", "targetFieldName": "name" },
            { "sourceFieldName": "lang", "targetFieldName": "lang" }
          ]
        }
      },
      "id":        [{ "name": "id",   "type": "STRING" }],
      "attribute": [
        { "name": "name", "type": "STRING" },
        { "name": "lang", "type": "STRING" }
      ]
    },
    {
      "label": "person",
      "dataSourceGroup": {
        "externalDataSource": {
          "enabled": true,
          "catalog": "s3_tables_data",
          "schema": "modern",
          "table": "person",
          "mappedField": [
            { "sourceFieldName": "id",   "targetFieldName": "id"   },
            { "sourceFieldName": "name", "targetFieldName": "name" },
            { "sourceFieldName": "age",  "targetFieldName": "age"  }
          ]
        }
      },
      "id":        [{ "name": "id",   "type": "STRING" }],
      "attribute": [
        { "name": "name", "type": "STRING" },
        { "name": "age",  "type": "INT"    }
      ]
    }
  ],
  "edge": [
    {
      "label":         "created",
      "fromNodeLabel": "person",
      "toNodeLabel":   "software",
      "dataSourceGroup": {
        "externalDataSource": {
          "enabled": true,
          "catalog": "s3_tables_data",
          "schema": "modern",
          "table": "created",
          "mappedField": [
            { "sourceFieldName": "id",      "targetFieldName": "id"      },
            { "sourceFieldName": "from_id", "targetFieldName": "from_id" },
            { "sourceFieldName": "to_id",   "targetFieldName": "to_id"   },
            { "sourceFieldName": "weight",  "targetFieldName": "weight"  }
          ]
        }
      },
      "id":        [{ "name": "id",      "type": "STRING" }],
      "fromKey":   [{ "name": "from_id", "type": "STRING" }],
      "toKey":     [{ "name": "to_id",   "type": "STRING" }],
      "attribute": [
        { "name": "from_id", "type": "STRING" },
        { "name": "to_id",   "type": "STRING" },
        { "name": "weight",  "type": "DOUBLE" }
      ]
    },
    {
      "label":         "knows",
      "fromNodeLabel": "person",
      "toNodeLabel":   "person",
      "dataSourceGroup": {
        "externalDataSource": {
          "enabled": true,
          "catalog": "s3_tables_data",
          "schema": "modern",
          "table": "knows",
          "mappedField": [
            { "sourceFieldName": "id",      "targetFieldName": "id"      },
            { "sourceFieldName": "from_id", "targetFieldName": "from_id" },
            { "sourceFieldName": "to_id",   "targetFieldName": "to_id"   },
            { "sourceFieldName": "weight",  "targetFieldName": "weight"  }
          ]
        }
      },
      "id":        [{ "name": "id",      "type": "STRING" }],
      "fromKey":   [{ "name": "from_id", "type": "STRING" }],
      "toKey":     [{ "name": "to_id",   "type": "STRING" }],
      "attribute": [
        { "name": "from_id", "type": "STRING" },
        { "name": "to_id",   "type": "STRING" },
        { "name": "weight",  "type": "DOUBLE" }
      ]
    }
  ]
}
In the Web UI, click Graph in the sidebar, then Upload Schema, and select schema.json.
Upload via CLI
Querying the Graph
In the PuppyGraph Web UI, click Query in the sidebar. You can run graph queries in either Cypher or Gremlin.
The following query answers "What software was created by people that marko knows?"
Cleanup
Stop the PuppyGraph container:
Delete the demo tables and the table bucket from the AWS console when you're done.