Querying Polaris Data as a Graph
Summary
In this tutorial, you will:
- Start a PuppyGraph container alongside an Apache Polaris lakehouse stack (Polaris + Spark + RustFS) and load example data.
- Connect Polaris to PuppyGraph through its Iceberg REST catalog and define a graph schema.
- Run Cypher and Gremlin queries against the Polaris-managed Iceberg data as a graph.
Self-contained Polaris Data
This tutorial bundles a complete Polaris + Iceberg stack (Polaris for catalog and authorization, Spark for writes, RustFS for object storage) and seeds it with the TinkerPop modern graph sample data. A helper script handles Polaris bootstrap (OAuth token, RustFS bucket, catalog provisioning, role grants) so you only need two commands to get going.
In real deployments, PuppyGraph queries your existing Polaris catalog and storage directly through Polaris's Iceberg REST interface. See Connecting to Iceberg for the connection reference.
Prerequisites
Please ensure that docker compose is available. The installation can be verified by running:
See https://docs.docker.com/compose/install/ for Docker Compose installation instructions and https://www.docker.com/get-started/ for more details on Docker.
Polaris exposes its health endpoint on port 8182, which collides with PuppyGraph's default Gremlin port. This tutorial remaps PuppyGraph's Gremlin port to 18182 on the host. The Web UI (8081) and Bolt port (7687) stay on their defaults.
Note
This tutorial uses demo credentials for a self-contained setup:
- Polaris bootstrap credential:
root/s3cr3t - RustFS access key:
rustfs_root - RustFS secret key:
rustfspwd - PuppyGraph login:
puppygraph/puppygraph123
Setup
This tutorial uses four containers:
polaris-rustfsfor S3-compatible object storagepolarisfor the Iceberg REST catalogpolaris-spark-icebergto create the sample Iceberg tablespolaris-puppygraphfor the PuppyGraph server
Deployment
 Create a file
 docker-compose.yaml with the following content:
docker-compose.yaml
version: "3"
services:
  polaris-rustfs:
    container_name: polaris-rustfs
    image: rustfs/rustfs:latest
    restart: always
    environment:
      RUSTFS_ACCESS_KEY: rustfs_root
      RUSTFS_SECRET_KEY: rustfspwd
      RUSTFS_CONSOLE_ENABLE: "true"
    healthcheck:
      test: ["CMD", "curl", "--fail", "http://127.0.0.1:9000/health"]
      interval: 2s
      timeout: 10s
      retries: 30
    ports:
      - "9000:9000"
      - "9001:9001"
    volumes:
      - polaris-rustfs-data:/data
  polaris:
    container_name: polaris
    image: apache/polaris:latest
    restart: always
    depends_on:
      polaris-rustfs:
        condition: service_healthy
    environment:
      AWS_REGION: us-west-2
      AWS_ACCESS_KEY_ID: rustfs_root
      AWS_SECRET_ACCESS_KEY: rustfspwd
      POLARIS_BOOTSTRAP_CREDENTIALS: POLARIS,root,s3cr3t
      polaris.realm-context.realms: POLARIS
      quarkus.otel.sdk.disabled: "true"
    healthcheck:
      test: ["CMD", "curl", "--fail", "http://127.0.0.1:8182/q/health"]
      interval: 2s
      timeout: 10s
      retries: 30
      start_period: 10s
    ports:
      - "8181:8181"
      - "8182:8182"
  polaris-spark-iceberg:
    container_name: polaris-spark-iceberg
    image: tabulario/spark-iceberg
    restart: always
    depends_on:
      polaris:
        condition: service_healthy
    entrypoint: ["/bin/bash", "-lc", "tail -f /dev/null"]
  polaris-puppygraph:
    image: puppygraph/puppygraph:latest
    pull_policy: always
    container_name: puppygraph
    restart: always
    environment:
      - PUPPYGRAPH_USERNAME=puppygraph
      - PUPPYGRAPH_PASSWORD=puppygraph123
    ports:
      - "8081:8081"
      - "18182:8182"
      - "7687:7687"
    depends_on:
      - polaris-spark-iceberg
volumes:
  polaris-rustfs-data:
networks:
  default:
    name: puppy-polaris
Default credentials
The compose file ships with default credentials for convenience. Change POLARIS_BOOTSTRAP_CREDENTIALS, RustFS root credentials, and the PuppyGraph login before running on a publicly accessible machine.
Data Preparation
The Polaris setup needs more than a single SQL paste: get an OAuth token, create the RustFS bucket, provision the Polaris catalog, grant roles, and only then can Spark create the Iceberg tables. The helper script below does all of that in one run.
Create a file setup-polaris.sh with the following content, then chmod +x setup-polaris.sh:
setup-polaris.sh
#!/usr/bin/env bash
set -euo pipefail

SCRIPT_DIR=$(cd -- "$(dirname -- "${BASH_SOURCE[0]}")" && pwd)
cd "$SCRIPT_DIR"

docker compose up -d

ROOT_TOKEN=$(
  docker run --rm --network puppy-polaris alpine/curl:8.17.0 sh -lc '
    apk add --no-cache jq >/dev/null
    curl -s --user root:s3cr3t \
      -H "Polaris-Realm: POLARIS" \
      -d grant_type=client_credentials \
      -d scope=PRINCIPAL_ROLE:ALL \
      http://polaris:8181/api/catalog/v1/oauth/tokens | jq -r .access_token
  '
)

docker compose exec -T polaris-rustfs sh -ec '
  curl -fsS --aws-sigv4 aws:amz:us-west-2:s3 --user rustfs_root:rustfspwd \
    --head http://localhost:9000/bucket457 >/dev/null 2>&1 ||
  curl -fsS --aws-sigv4 aws:amz:us-west-2:s3 --user rustfs_root:rustfspwd \
    -X PUT http://localhost:9000/bucket457
'

docker run --rm --network puppy-polaris -e ROOT_TOKEN="$ROOT_TOKEN" alpine/curl:8.17.0 sh -lc '
  apk add --no-cache jq >/dev/null

  if ! curl -s http://polaris:8181/api/management/v1/catalogs \
    -H "Authorization: Bearer ${ROOT_TOKEN}" \
    -H "Polaris-Realm: POLARIS" | jq -e ".catalogs[]? | select(.name == \"modern_catalog\")" >/dev/null; then
    curl -s -X POST http://polaris:8181/api/management/v1/catalogs \
      -H "Authorization: Bearer ${ROOT_TOKEN}" \
      -H "Polaris-Realm: POLARIS" \
      -H "Content-Type: application/json" \
      -d "{\"catalog\":{\"name\":\"modern_catalog\",\"type\":\"INTERNAL\",\"readOnly\":false,\"properties\":{\"default-base-location\":\"s3://bucket457/modern_catalog\"},\"storageConfigInfo\":{\"storageType\":\"S3\",\"allowedLocations\":[\"s3://bucket457/modern_catalog\",\"s3://bucket457\"],\"endpoint\":\"http://polaris-rustfs:9000\",\"endpointInternal\":\"http://polaris-rustfs:9000\",\"pathStyleAccess\":true}}}"
  fi

  curl -s -X PUT http://polaris:8181/api/management/v1/catalogs/modern_catalog/catalog-roles/catalog_admin/grants \
    -H "Authorization: Bearer ${ROOT_TOKEN}" \
    -H "Polaris-Realm: POLARIS" \
    -H "Content-Type: application/json" \
    -d "{\"type\":\"catalog\",\"privilege\":\"TABLE_WRITE_DATA\"}"

  curl -s -X PUT http://polaris:8181/api/management/v1/principal-roles/service_admin/catalog-roles/modern_catalog \
    -H "Authorization: Bearer ${ROOT_TOKEN}" \
    -H "Polaris-Realm: POLARIS" \
    -H "Content-Type: application/json" \
    -d "{\"name\":\"catalog_admin\"}"
'

docker compose exec -T -e ROOT_TOKEN="$ROOT_TOKEN" polaris-spark-iceberg bash -lc '
  cat >/tmp/prepare.sql
  /opt/spark/bin/spark-sql \
    --packages org.apache.iceberg:iceberg-spark-runtime-3.5_2.12:1.10.1,org.apache.iceberg:iceberg-aws-bundle:1.10.1 \
    --conf spark.sql.extensions=org.apache.iceberg.spark.extensions.IcebergSparkSessionExtensions \
    --conf spark.sql.catalog.polaris=org.apache.iceberg.spark.SparkCatalog \
    --conf spark.sql.catalog.polaris.type=rest \
    --conf spark.sql.catalog.polaris.uri=http://polaris:8181/api/catalog \
    --conf spark.sql.catalog.polaris.oauth2-server-uri=http://polaris:8181/api/catalog/v1/oauth/tokens \
    --conf spark.sql.catalog.polaris.header.X-Iceberg-Access-Delegation=vended-credentials \
    --conf spark.sql.catalog.polaris.client.region=us-west-2 \
    --conf spark.sql.catalog.polaris.token="${ROOT_TOKEN}" \
    --conf spark.sql.catalog.polaris.warehouse=modern_catalog \
    --conf spark.sql.defaultCatalog=polaris \
    -f /tmp/prepare.sql
' <<'SQL'
CREATE DATABASE IF NOT EXISTS modern;

CREATE TABLE modern.software (id string, name string, lang string) USING iceberg;
INSERT INTO modern.software VALUES
    ('v3', 'lop',    'java'),
    ('v5', 'ripple', 'java');

CREATE TABLE modern.person (id string, name string, age int) USING iceberg;
INSERT INTO modern.person VALUES
    ('v1', 'marko', 29),
    ('v2', 'vadas', 27),
    ('v4', 'josh',  32),
    ('v6', 'peter', 35);

CREATE TABLE modern.created (id string, from_id string, to_id string, weight double) USING iceberg;
INSERT INTO modern.created VALUES
    ('e9',  'v1', 'v3', 0.4),
    ('e10', 'v4', 'v5', 1.0),
    ('e11', 'v4', 'v3', 0.4),
    ('e12', 'v6', 'v3', 0.2);

CREATE TABLE modern.knows (id string, from_id string, to_id string, weight double) USING iceberg;
INSERT INTO modern.knows VALUES
    ('e7', 'v1', 'v2', 0.5),
    ('e8', 'v1', 'v4', 1.0);
SQL
Run the setup:
When the script completes:
- Polaris is at
http://localhost:8181/api/catalog - PuppyGraph Web UI is at
http://localhost:8081 - PuppyGraph Gremlin is at
localhost:18182 - Iceberg catalog:
modern_catalog, namespace:modern
The script creates the following tables:
| id | name | age |
|---|---|---|
| v1 | marko | 29 |
| v2 | vadas | 27 |
| v4 | josh | 32 |
| v6 | peter | 35 |
| id | name | lang |
|---|---|---|
| v3 | lop | java |
| v5 | ripple | java |
| id | from_id | to_id | weight |
|---|---|---|---|
| e9 | v1 | v3 | 0.4 |
| e10 | v4 | v5 | 1.0 |
| e11 | v4 | v3 | 0.4 |
| e12 | v6 | v3 | 0.2 |
| id | from_id | to_id | weight |
|---|---|---|---|
| e7 | v1 | v2 | 0.5 |
| e8 | v1 | v4 | 1.0 |
Modeling a Graph
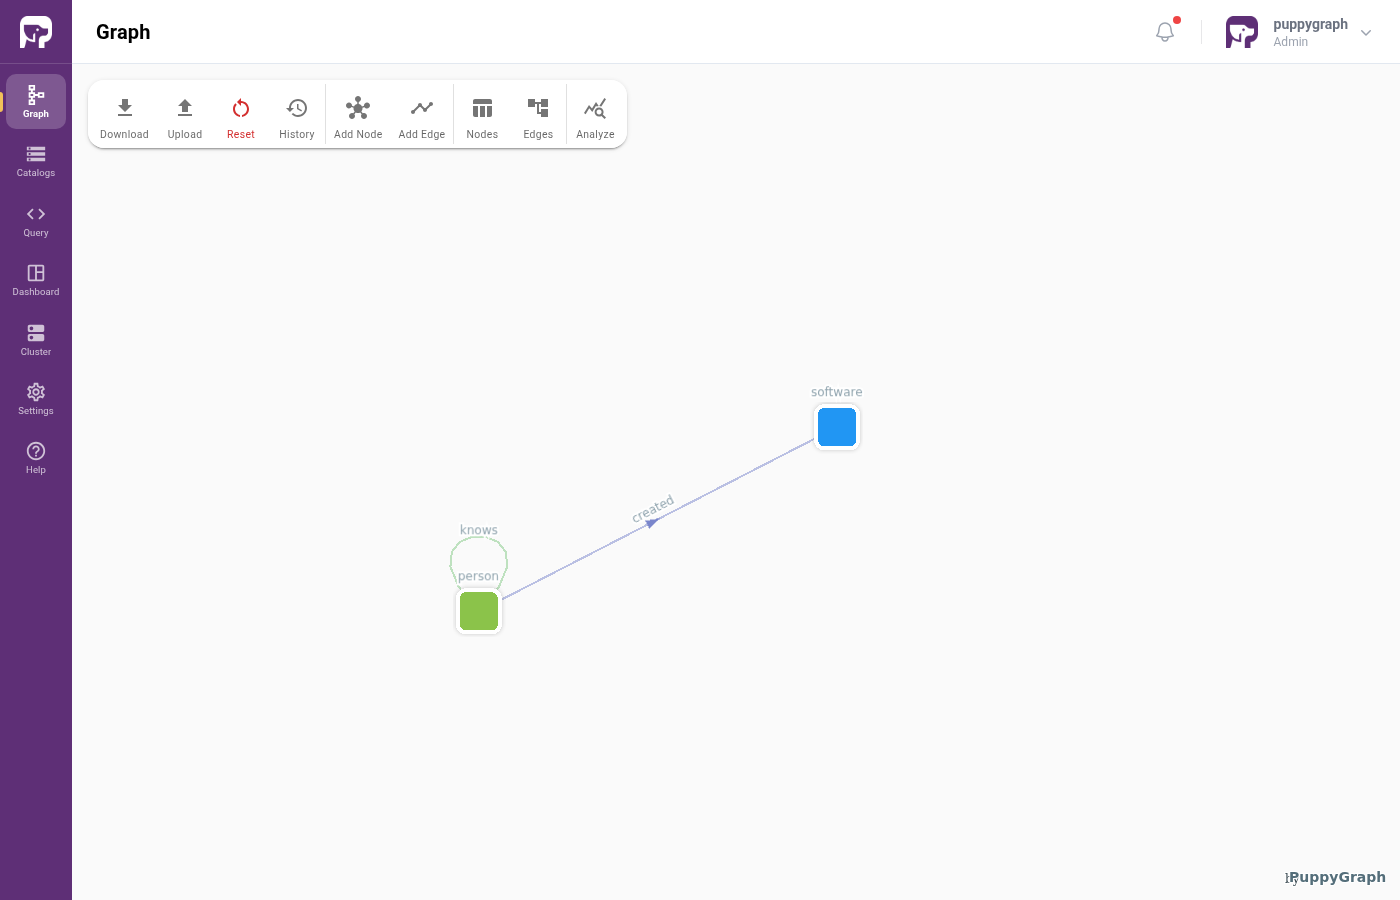
We model the data as the TinkerPop modern graph: two node types (person, software) and two edge types (knows, created).
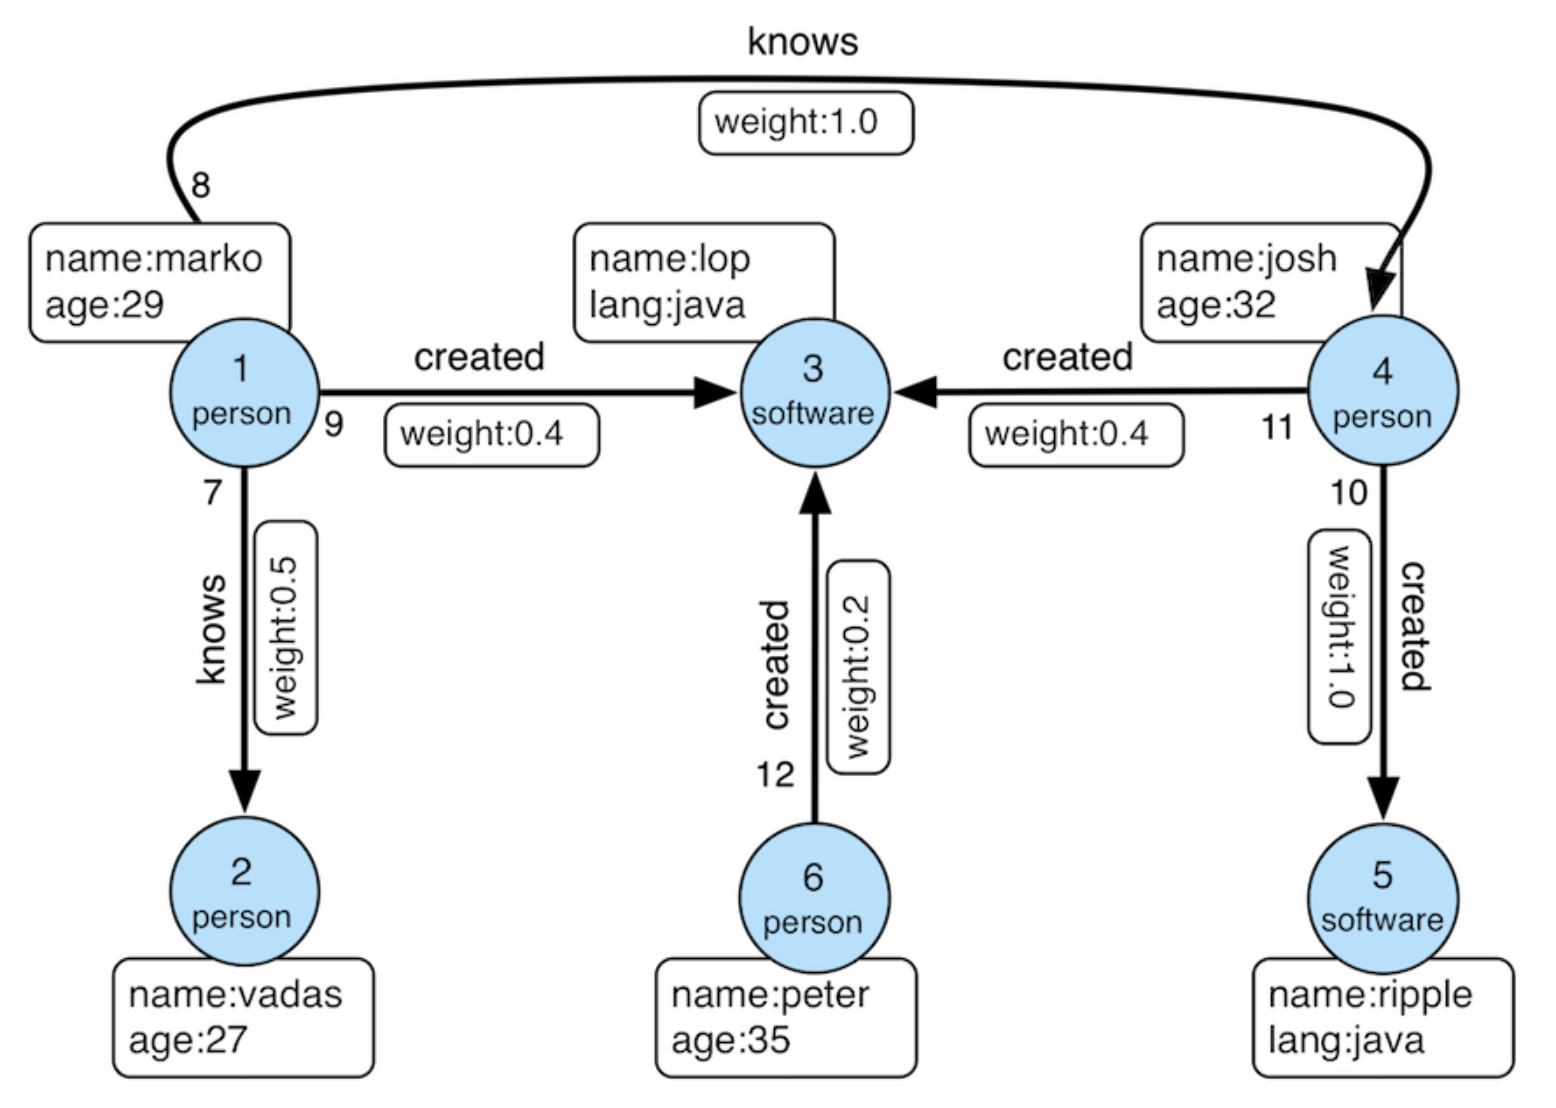
First, log into the PuppyGraph Web UI at http://localhost:8081 with the credentials configured above:
| Field | Value |
|---|---|
| Username | puppygraph |
| Password | puppygraph123 |
There are two ways to define the schema in PuppyGraph: build it interactively in the Schema Builder, or upload a JSON file directly. Pick whichever you prefer; both produce the same graph.
Build the graph in the Schema Builder
The Schema Builder is the visual editor in the PuppyGraph Web UI for adding catalogs, nodes, and edges step by step. It's the recommended path when you're modeling a graph for the first time or want to inspect what each click produces. For a deeper visual walkthrough of every dialog and field, see Modeling a Graph through the Schema Builder. The summary below covers what's needed to build the modern graph against this tutorial's Polaris-managed Iceberg tables.
PuppyGraph treats Polaris as an Iceberg REST catalog, so the catalog type below is Apache Iceberg.
Connecting to Polaris
Click Create Catalog, then expand Data Lakes and pick Apache Iceberg.
Fill in the connection form:
| Field | Value |
|---|---|
| Catalog name | polaris_data |
| Metastore type | Apache Polaris |
| Endpoint URL | http://polaris:8181/api/catalog |
| Warehouse | modern_catalog |
| Polaris Authentication Type | OAuth2 |
| Credential | root:s3cr3t |
| OAuth2 Scope | PRINCIPAL_ROLE:ALL |
| OAuth Server URI | http://polaris:8181/api/catalog/v1/oauth/tokens |
| Storage type | S3 Compatible |
| S3 Endpoint | http://polaris-rustfs:9000 |
| Access Key | rustfs_root |
| Secret Key | rustfspwd |
| Path-style access | enabled |
| SSL | disabled |
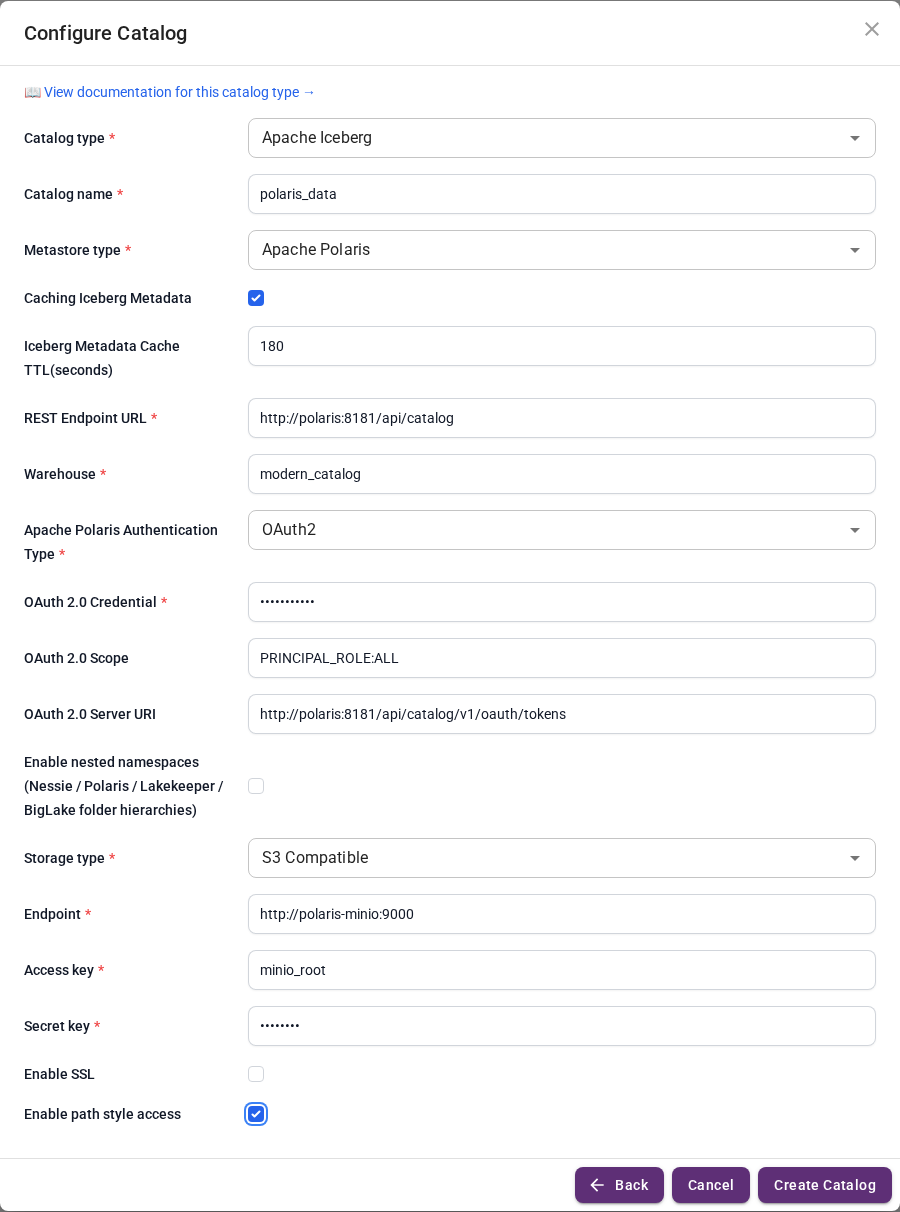
Click Create Catalog.
Adding nodes
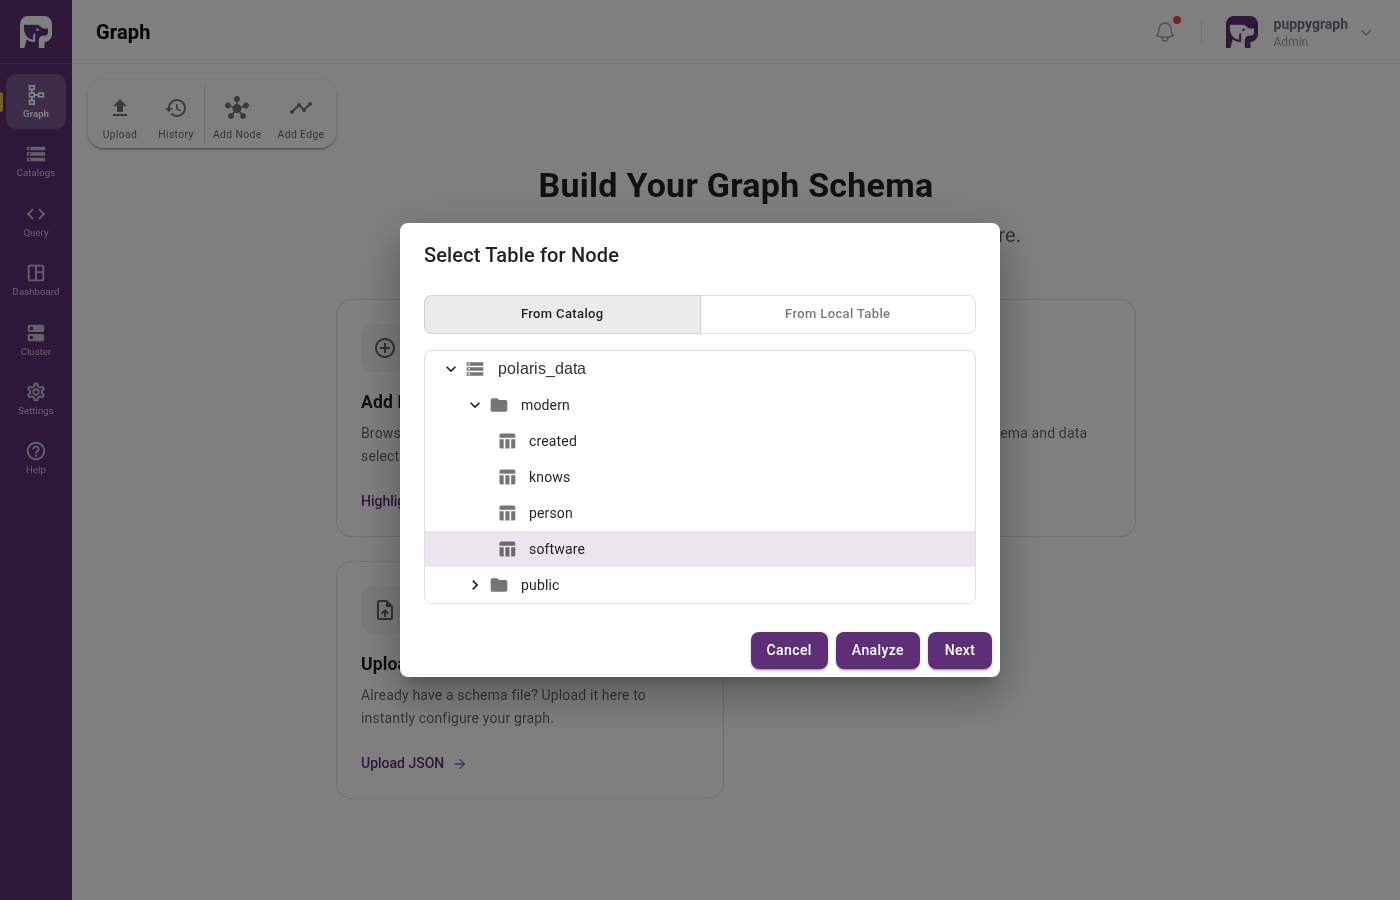
Click Add Node in the toolbar. The Select Table for Node dialog opens. Expand polaris_data then modern, pick software, then click Next.
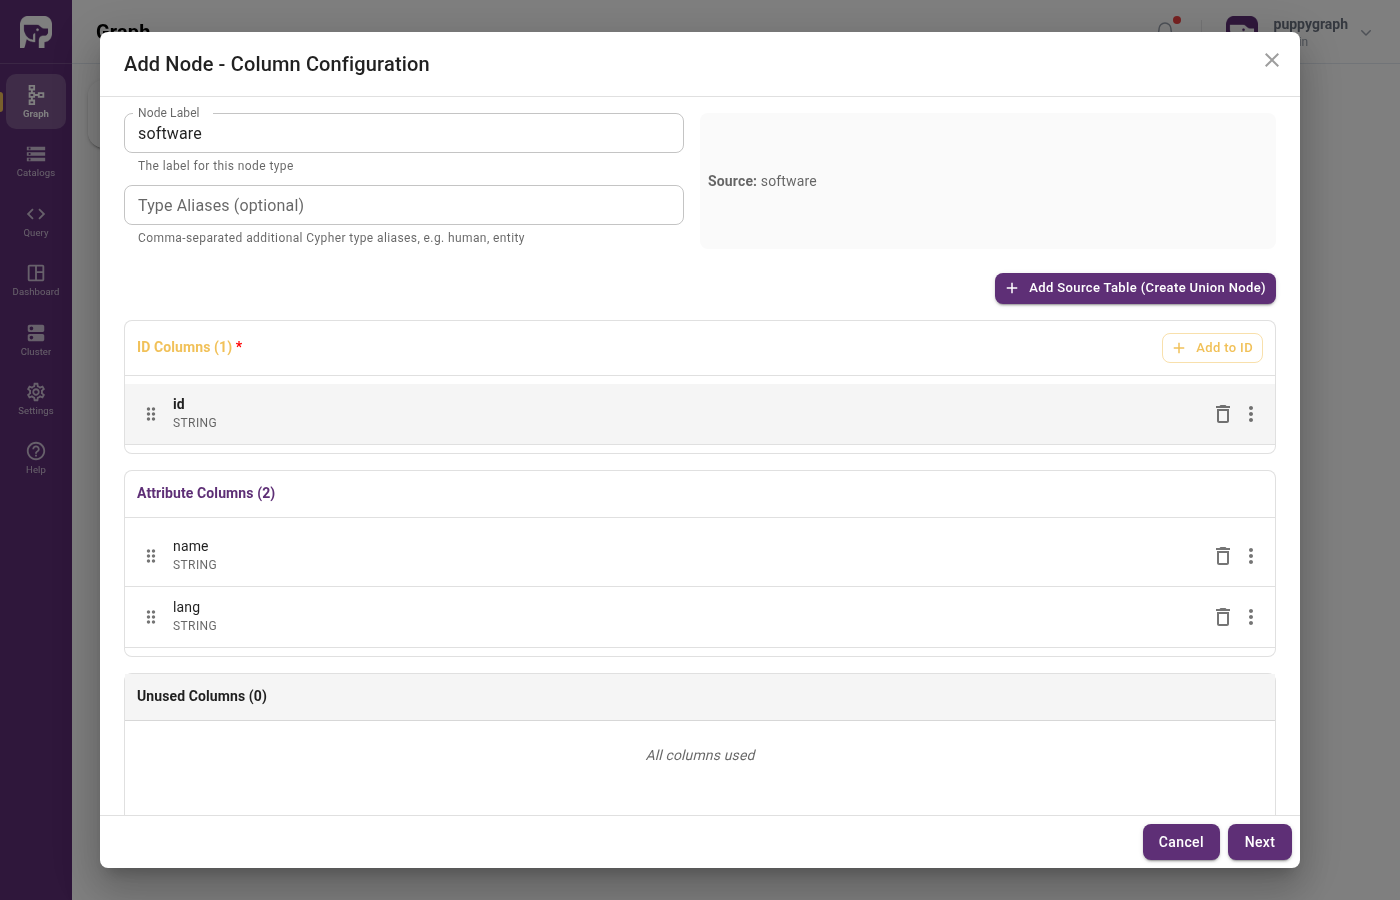
In the Add Node wizard, click Add to ID and select id from the dropdown. The wizard moves id into ID Columns, leaving name and lang as attributes. Click Next, leave Enable Local Replication off, then click Add Node.
Repeat for person. The flow is the same: click Add Node, pick the table, click Next, assign id to ID Columns, leave replication off, click Add Node.
Adding edges
Click Add Edge in the toolbar, pick created from the catalog tree, then click Next.
In the Add Edge wizard, set:
| Field | Value |
|---|---|
| From Node | person |
| To Node | software |
FROM Select Column |
from_id |
TO Select Column |
to_id |
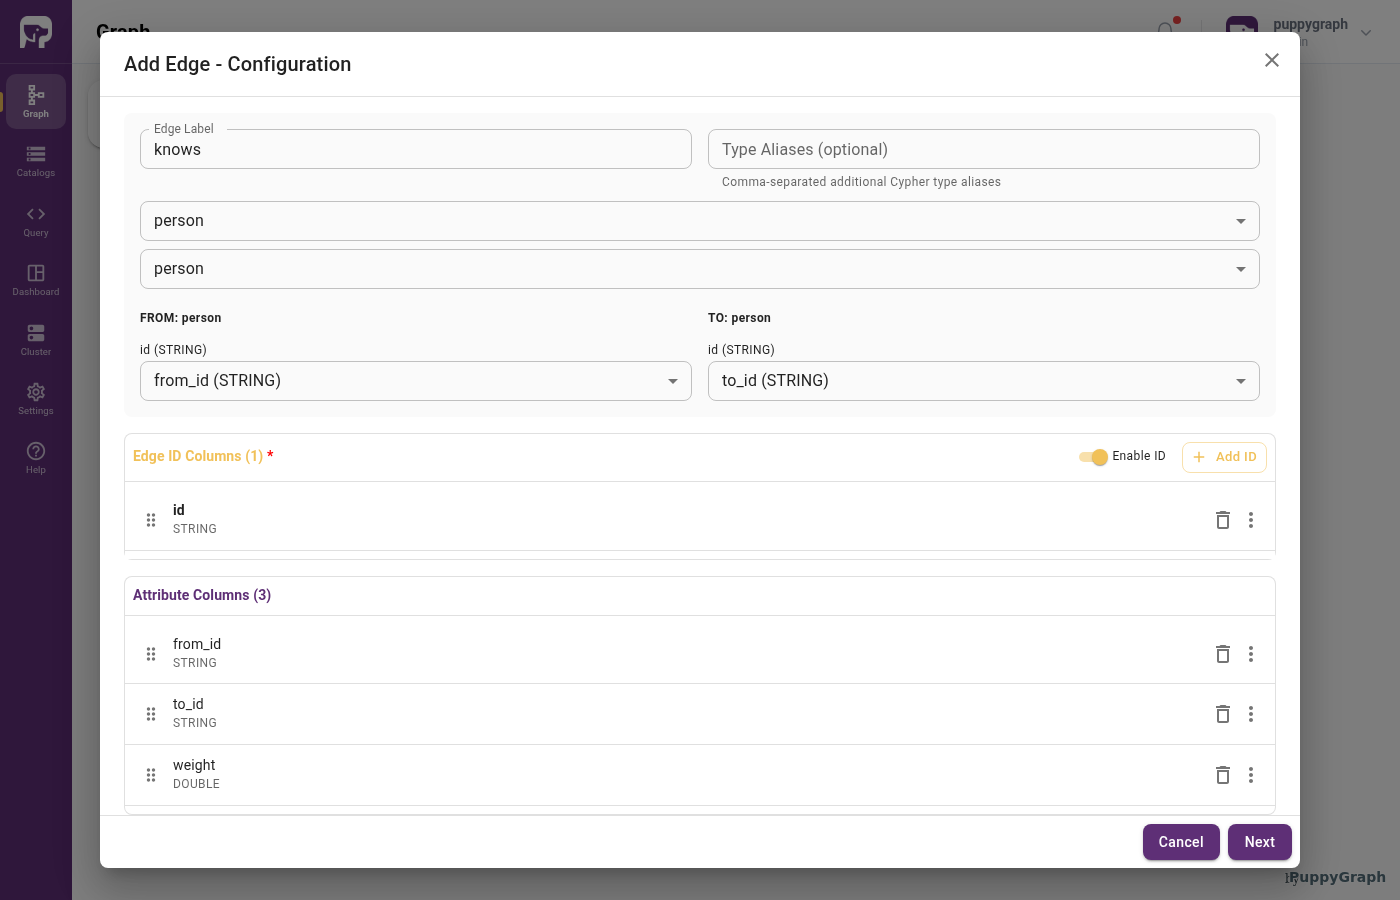
Click Add to ID and select id to set the edge identifier. Click Next, leave Enable Local Replication off, then click Add Edge.
Repeat for knows with both From Node and To Node set to person. The other settings are identical to created.
Upload a schema file
If you've already built the graph in the Schema Builder above, you can skip this section. The resulting schema is the same.
This method writes the full schema to a JSON file and uploads it directly. It's useful when you already have a schema for an environment and want to recreate it elsewhere (e.g. for CI, scripted setup, or copy-pasting between PuppyGraph instances).
Create a file schema.json with the following content:
schema.json
{
  "catalog": [
    {
      "name": "polaris_data",
      "type": "iceberg",
      "metastore": {
        "type": "rest",
        "uri": "http://polaris:8181/api/catalog",
        "warehouse": "modern_catalog",
        "security": "oauth2",
        "credential": "root:s3cr3t",
        "scope": "PRINCIPAL_ROLE:ALL",
        "oauthServerUri": "http://polaris:8181/api/catalog/v1/oauth/tokens"
      },
      "storage": {
        "type": "S3",
        "useInstanceProfile": "false",
        "accessKey": "rustfs_root",
        "secretKey": "rustfspwd",
        "enableSsl": "false",
        "endpoint": "http://polaris-rustfs:9000",
        "enablePathStyleAccess": "true"
      }
    }
  ],
  "node": [
    {
      "label": "software",
      "dataSourceGroup": {
        "externalDataSource": {
          "enabled": true,
          "catalog": "polaris_data",
          "schema": "modern",
          "table": "software",
          "mappedField": [
            { "sourceFieldName": "id",   "targetFieldName": "id"   },
            { "sourceFieldName": "name", "targetFieldName": "name" },
            { "sourceFieldName": "lang", "targetFieldName": "lang" }
          ]
        }
      },
      "id":        [{ "name": "id",   "type": "STRING" }],
      "attribute": [
        { "name": "name", "type": "STRING" },
        { "name": "lang", "type": "STRING" }
      ]
    },
    {
      "label": "person",
      "dataSourceGroup": {
        "externalDataSource": {
          "enabled": true,
          "catalog": "polaris_data",
          "schema": "modern",
          "table": "person",
          "mappedField": [
            { "sourceFieldName": "id",   "targetFieldName": "id"   },
            { "sourceFieldName": "name", "targetFieldName": "name" },
            { "sourceFieldName": "age",  "targetFieldName": "age"  }
          ]
        }
      },
      "id":        [{ "name": "id",   "type": "STRING" }],
      "attribute": [
        { "name": "name", "type": "STRING" },
        { "name": "age",  "type": "INT"    }
      ]
    }
  ],
  "edge": [
    {
      "label":         "created",
      "fromNodeLabel": "person",
      "toNodeLabel":   "software",
      "dataSourceGroup": {
        "externalDataSource": {
          "enabled": true,
          "catalog": "polaris_data",
          "schema": "modern",
          "table": "created",
          "mappedField": [
            { "sourceFieldName": "id",      "targetFieldName": "id"      },
            { "sourceFieldName": "from_id", "targetFieldName": "from_id" },
            { "sourceFieldName": "to_id",   "targetFieldName": "to_id"   },
            { "sourceFieldName": "weight",  "targetFieldName": "weight"  }
          ]
        }
      },
      "id":        [{ "name": "id",      "type": "STRING" }],
      "fromKey":   [{ "name": "from_id", "type": "STRING" }],
      "toKey":     [{ "name": "to_id",   "type": "STRING" }],
      "attribute": [
        { "name": "from_id", "type": "STRING" },
        { "name": "to_id",   "type": "STRING" },
        { "name": "weight",  "type": "DOUBLE" }
      ]
    },
    {
      "label":         "knows",
      "fromNodeLabel": "person",
      "toNodeLabel":   "person",
      "dataSourceGroup": {
        "externalDataSource": {
          "enabled": true,
          "catalog": "polaris_data",
          "schema": "modern",
          "table": "knows",
          "mappedField": [
            { "sourceFieldName": "id",      "targetFieldName": "id"      },
            { "sourceFieldName": "from_id", "targetFieldName": "from_id" },
            { "sourceFieldName": "to_id",   "targetFieldName": "to_id"   },
            { "sourceFieldName": "weight",  "targetFieldName": "weight"  }
          ]
        }
      },
      "id":        [{ "name": "id",      "type": "STRING" }],
      "fromKey":   [{ "name": "from_id", "type": "STRING" }],
      "toKey":     [{ "name": "to_id",   "type": "STRING" }],
      "attribute": [
        { "name": "from_id", "type": "STRING" },
        { "name": "to_id",   "type": "STRING" },
        { "name": "weight",  "type": "DOUBLE" }
      ]
    }
  ]
}
In the Web UI, click Graph in the sidebar, then Upload Schema, and select schema.json.
Upload via CLI
You can also POST the schema directly:
Querying the Graph
In the PuppyGraph Web UI, click Query in the sidebar. You can run graph queries in either Cypher or Gremlin.
The following query answers "What software was created by people that marko knows?"
There are two paths in the result: marko knows josh, who created lop and ripple.
Cleanup
Shut down the stack and remove the RustFS volume: