Querying Google Spanner Data as a Graph
Summary
In this tutorial, you will:
- Create a Google Spanner database, load it with example data, and create a property graph in Spanner Graph.
- Start a PuppyGraph Docker container and import an existing Spanner graph into PuppyGraph.
- Query the Spanner data as a graph.
Prerequisites:
Please ensure that docker compose is available. The installation can be verified by running:
See https://docs.docker.com/compose/install/ for Docker Compose installation instructions and https://www.docker.com/get-started/ for more details on Docker.
Accessing the PuppyGraph Web UI requires a browser. However, the tutorial offers alternative instructions for those who wish to exclusively use the CLI.
Creating a Credential File
 Create or select a Service Account and grant it
 roles/spanner.databaseReader (or higher if needed).
Generate a new key for this Service Account, download it, and save it locally as key.json.
Data Preparation in Spanner (Optional)
- If there has been a Spanner Graph, you can skip this section and go directly to Modeling the Graph.
Create or select a Spanner instance, then create a database with Google Standard SQL dialect.
Open Spanner Studio, and in the SQL Editor, run the following script to create tables and a property graph:
CREATE TABLE Person (
  id               INT64 NOT NULL,
  name             STRING(MAX),
  birthday         TIMESTAMP,
  country          STRING(MAX),
  city             STRING(MAX),
) PRIMARY KEY (id);

CREATE TABLE Account (
  id               INT64 NOT NULL,
  create_time      TIMESTAMP,
  is_blocked       BOOL,
  nick_name        STRING(MAX),
) PRIMARY KEY (id);

CREATE TABLE PersonOwnAccount (
  id               INT64 NOT NULL,
  account_id       INT64 NOT NULL,
  create_time      TIMESTAMP,
  FOREIGN KEY (account_id) REFERENCES Account (id)
) PRIMARY KEY (id, account_id),
  INTERLEAVE IN PARENT Person ON DELETE CASCADE;

CREATE TABLE AccountTransferAccount (
  id               INT64 NOT NULL,
  to_id            INT64 NOT NULL,
  amount           FLOAT64,
  create_time      TIMESTAMP NOT NULL,
  order_number     STRING(MAX),
  FOREIGN KEY (to_id) REFERENCES Account (id)
) PRIMARY KEY (id, to_id, create_time),
  INTERLEAVE IN PARENT Account ON DELETE CASCADE;

CREATE OR REPLACE PROPERTY GRAPH FinGraph
  NODE TABLES (Account, Person)
  EDGE TABLES (
    PersonOwnAccount
      SOURCE KEY (id) REFERENCES Person (id)
      DESTINATION KEY (account_id) REFERENCES Account (id)
      LABEL Owns,
    AccountTransferAccount
      SOURCE KEY (id) REFERENCES Account (id)
      DESTINATION KEY (to_id) REFERENCES Account (id)
      LABEL Transfers
  );


INSERT INTO Account
  (id, create_time, is_blocked, nick_name)
VALUES
  (7,"2020-01-10 06:22:20.222",false,"Vacation Fund"),
  (16,"2020-01-27 17:55:09.206",true,"Vacation Fund"),
  (20,"2020-02-18 05:44:20.655",false,"Rainy Day Fund");

INSERT INTO Person
  (id, name, birthday, country, city)
VALUES
  (1,"Alex","1991-12-21 00:00:00","Australia","Adelaide"),
  (2,"Dana","1980-10-31 00:00:00","Czech_Republic","Moravia"),
  (3,"Lee","1986-12-07 00:00:00","India","Kollam");

INSERT INTO AccountTransferAccount
  (id, to_id, amount, create_time, order_number)
VALUES
  (7,16,300,"2020-08-29 15:28:58.647","304330008004315"),
  (7,16,100,"2020-10-04 16:55:05.342","304120005529714"),
  (16,20,300,"2020-09-25 02:36:14.926","103650009791820"),
  (20,7,500,"2020-10-04 16:55:05.342","304120005529714"),
  (20,16,200,"2020-10-17 03:59:40.247","302290001255747");

INSERT INTO PersonOwnAccount
  (id, account_id, create_time)
VALUES
  (1,7,"2020-01-10 06:22:20.222"),
  (2,20,"2020-01-27 17:55:09.206"),
  (3,16,"2020-02-18 05:44:20.655");
Deployment
Run PuppyGraph with Docker:
docker run -p 8081:8081 -p 8182:8182 -p 7687:7687 \
  -e PUPPYGRAPH_PASSWORD=puppygraph123 \
  -d --name puppy -e GOOGLE_APPLICATION_CREDENTIALS=/home/ubuntu/key.json \
  -v ./key.json:/home/ubuntu/key.json \
  --rm  puppygraph/puppygraph:stable
 Warning: Please replace
 ./key.json with the actual path to your key.json file on your local system.
Modeling the Graph
Step 1: Connecting to Spanner
Log into the PuppyGraph Web UI at http://localhost:8081 with puppygraph as the username and puppygraph123 as the password.
Click on Create graph schema to create a new graph schema.
Fill in the fields as follows.
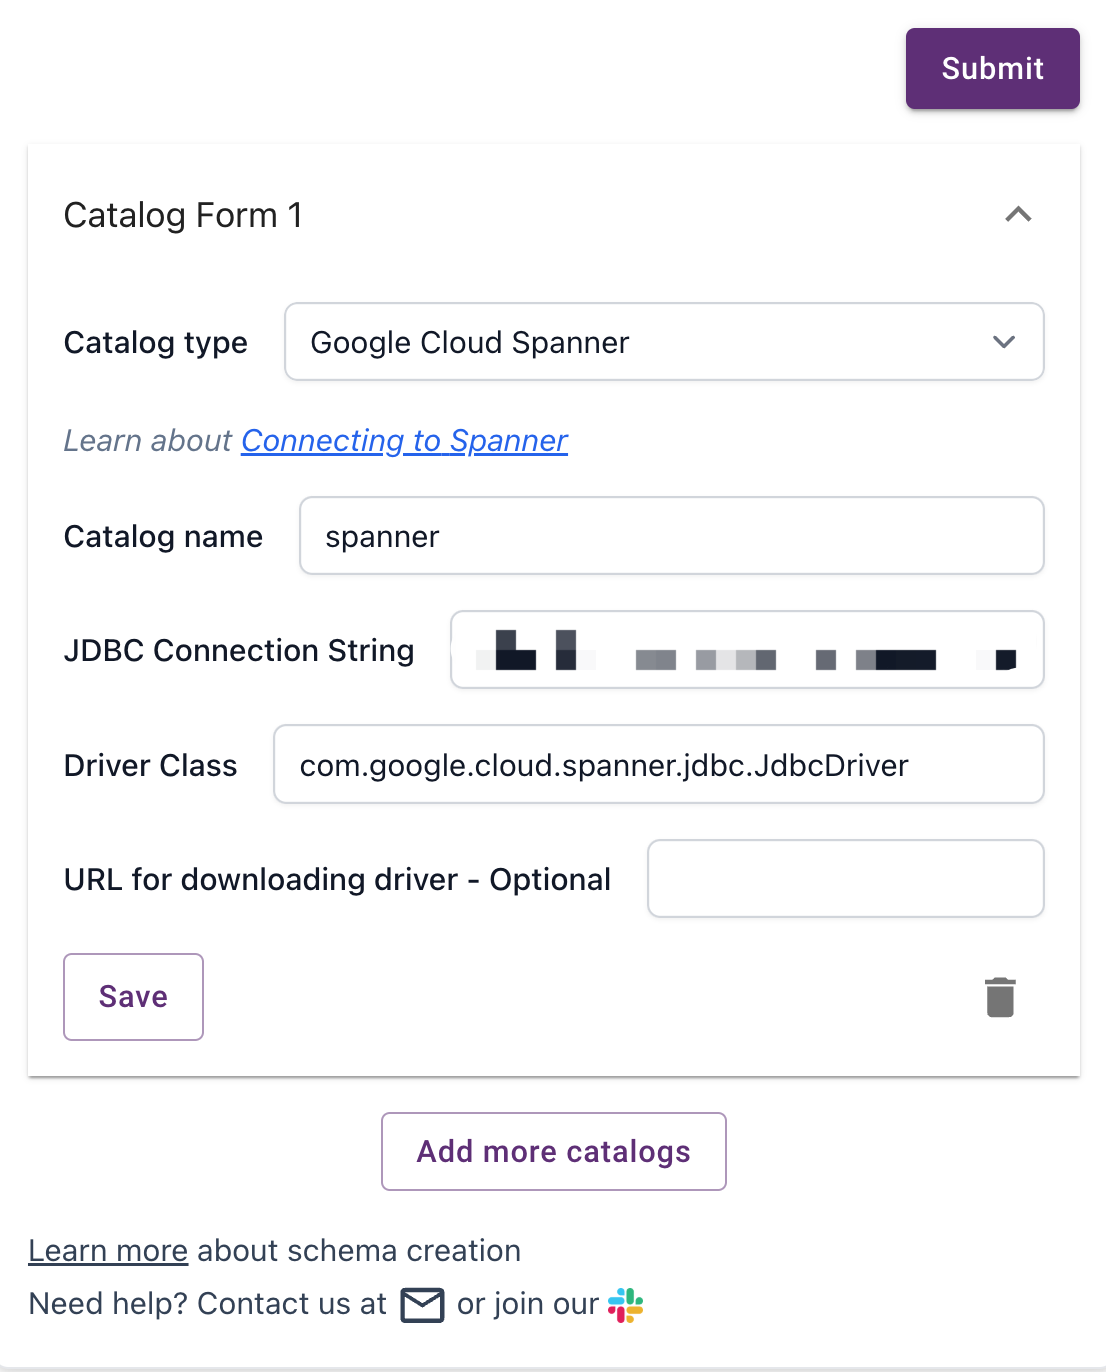
Create Spanner Catalog
| Parameter | Value |
|---|---|
| Catalog type | Google Cloud Spanner |
| Catalog name | Some name for the catalog as you like. |
| JDBC Connection String | jdbc:cloudspanner:/projects/{ProjectId}/instances/{InstanceName}/databases/{Database} |
| Driver Class | The class name of the JDBC Driver. The default value is com.google.cloud.spanner.jdbc.JdbcDriver. |
Click on Save, then Click on Submit to connect to Spanner.
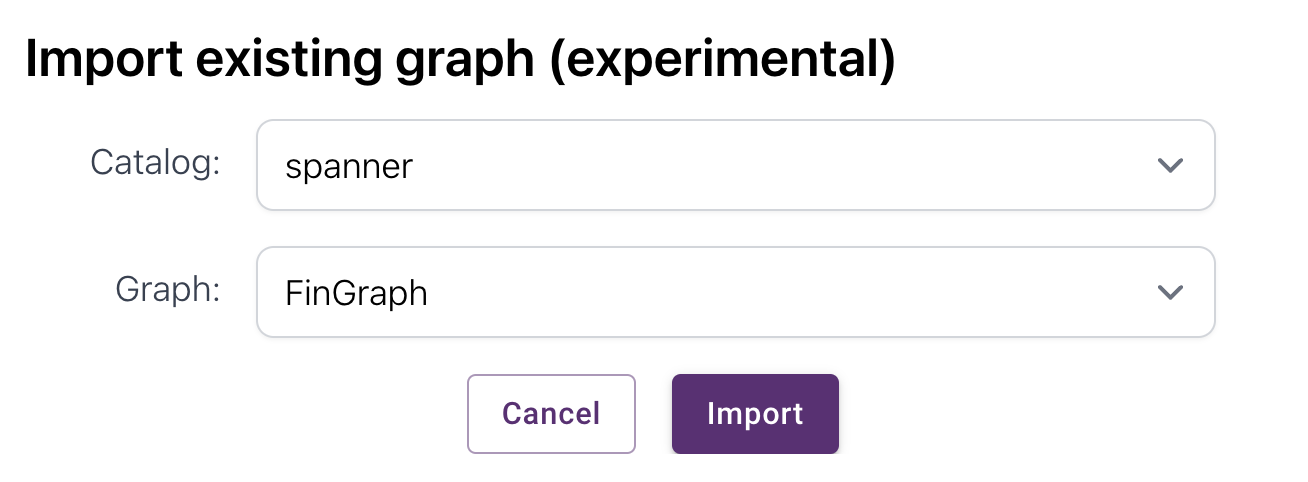
Step 2: Importing the Existing Spanner Graph
In the Schema Builder, click the Import existing graph (experimental) button. Select the graph name FinGraph and proceed to import the graph.
The graph schema should look like this:
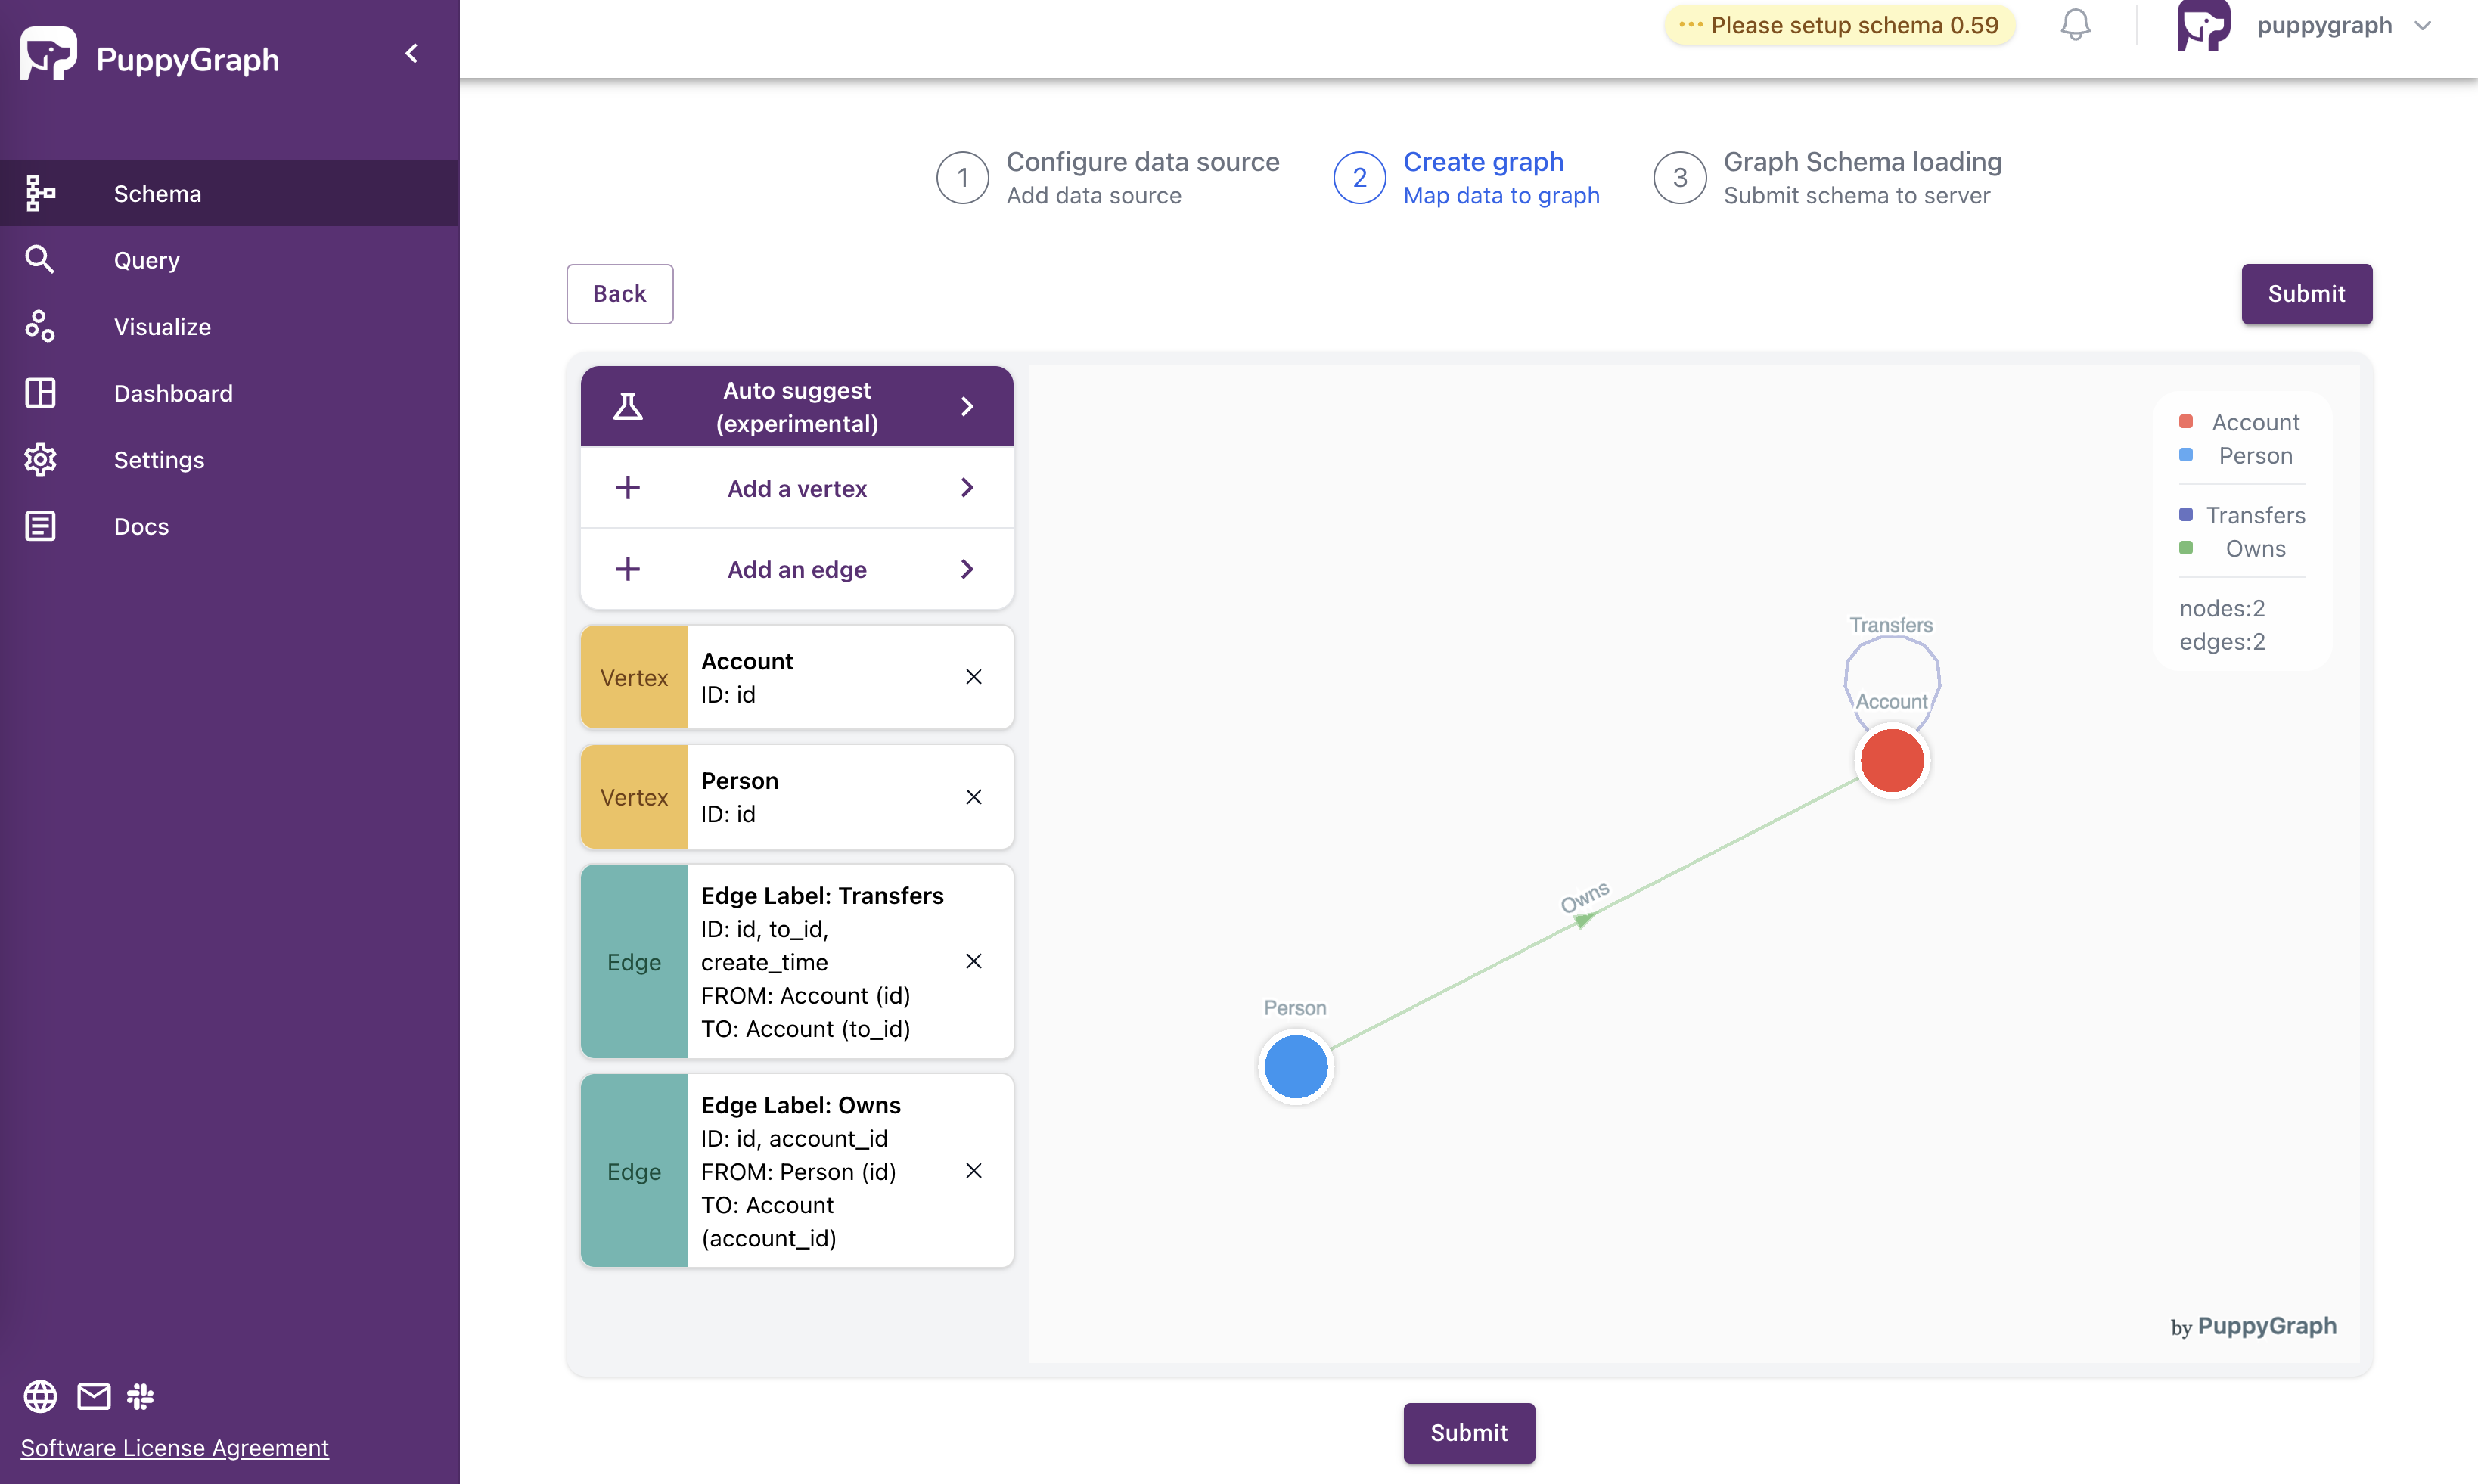 Submit the schema to create the graph.
Step 3: Querying the Graph
PuppyGraph provides a Dashboard that gives the summary of the graph.

Use the Interactive Query UI to further explore the graph by sending queries.
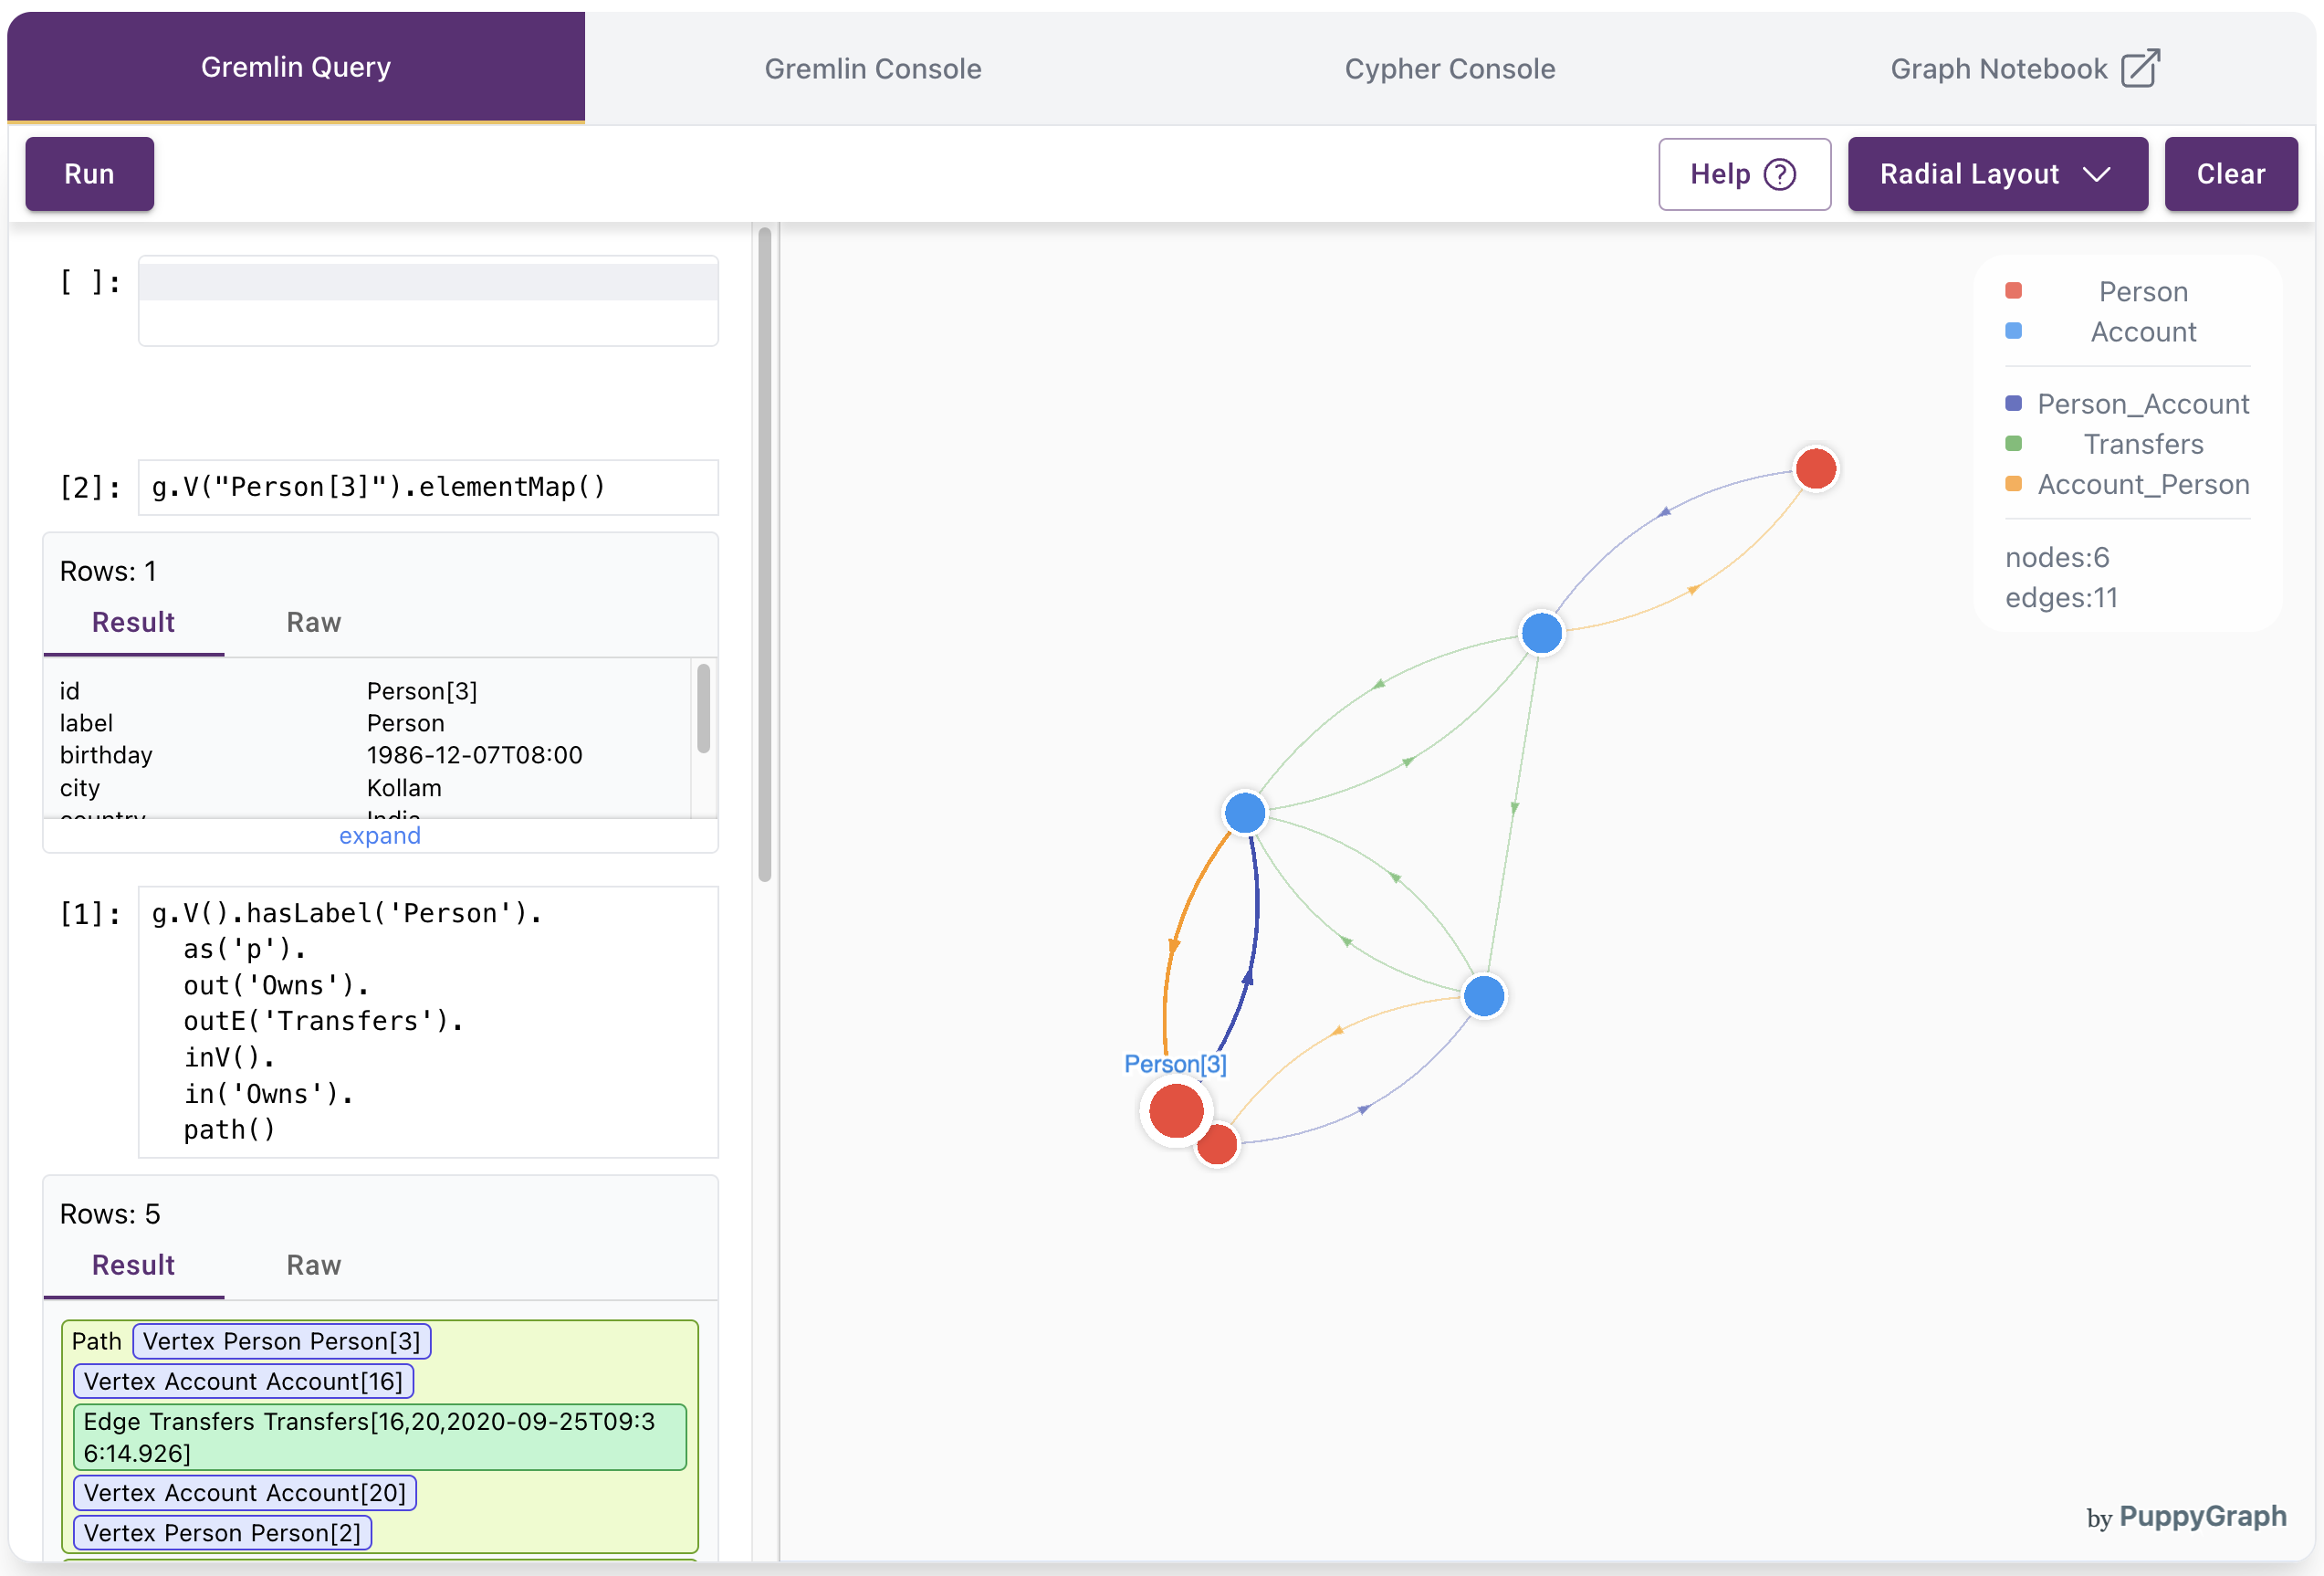
Example Queries:
Retrieve All Person Nodes (Vertices) with Their Properties
cypher:
gremlin:
Retrieve Person-to-Person Transfer Paths via Owned Accounts
cypher:
MATCH path = (p:Person)-[:Owns]->(a:Account)-[:Transfers]->(b:Account)<-[:Owns]-(q:Person)
RETURN path
gremlin:
Cleanup
- To stop and remove the PuppyGraph Docker container, run: